In today's tutorial, I'll show you how to create a Pop Art Effect in GIMP using Filters. We can play around with GIMP's many filters to add our own artistic effects. We'll be using the Scissor Select Tool and the Fuzzy Select Tool to create selections, the Posterize to reduce the number of image colors, the Despeckle Filter to smoothen the lines, and the Gradient Tool to fill the selected area with a gradient blend of the foreground and background colors.
Steps to make a pop art effect in GIMP:
1. Open image
Use File>Open... command in the top menu or else just press Ctrl+O to open your image. The “Open Image” dialog will appear, allowing you to navigate to the file and click on its name. Navigate through your folders in the Places panel and the Name panel until your images' name appears in the Name panel. Click the image you want to open. When an image file is selected, we can view the preview of the image file at the right-hand side of the box, although it's not easy to find an image based on a thumbnail. Click Open.
For this GIMP tutorial, I'll use this image, 324103, that downloaded from Pixabay.
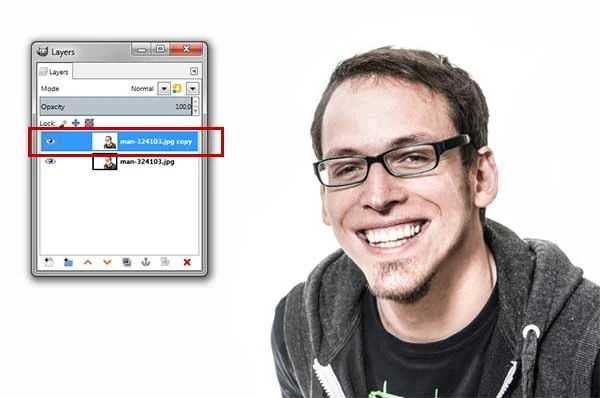
2. Duplicate layer
Use Layer> Duplicate Layer (or by using the keyboard shortcut Shift+Ctrl+D). A new layer which is a nearly identical copy of the active layer added to the image.3. Desaturate the duplicate layer
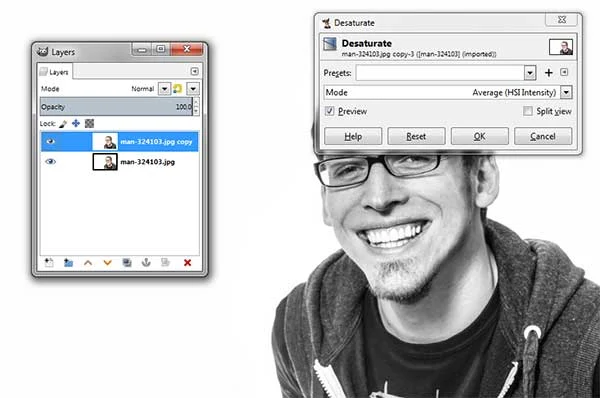
Select the duplicate layer on the Layers dialog. Use Colors>Desaturate>Desaturate. The Desaturate dialog box appears. In the dialog box, you can just leave the default settings and click OK.
The Desaturate command applied.
4. Make a selection
I will use the Scissor Select Tool to create a selection around the object. Select The Scissor Tool by clicking on the tool icon in the ToolBox or else by going to Tools>Selection Tools>Intelligent Scissors.
Start to create a selection by clicking around the object with your mouse to create control points. To finish, click on the first point.
Click anywhere inside the curve to convert it into a selection.
5. Invert selection
Use Select>Invert to inverts the selection in the current layer. Now all of the layer contents which were previously outside of the selection are now inside it.
6. Fill selection with white
Use Tools>Default colors or else just press keyboard key D to reset the foreground/background color to default.
Now fill the selection with white by going to Edit>Fill with BG color. Now white color fills the active layer selection. Remove the selection by choosing Select> None.
7. Apply Colors Posterize
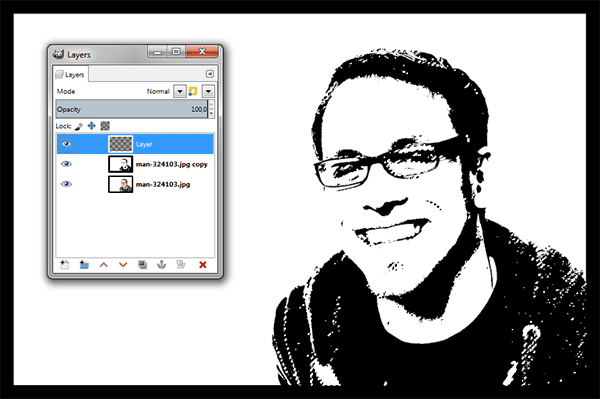
Make sure you have already removed the selection by going to Select>None. Use Colors>Posterize. The Posterize dialog box appears. Set the Posterize Level slider with 2. Click OK.
The Posterize command will weigh the pixel colors of the active layer and reduce the number of colors but still maintaining the original image characteristics.
8. Smoothen the lines
To smoothen the lines we'll use the Despeckle filter. Use Filter>Enhance>Despeckle. The Despeckle dialog box appears. I will adjust the Radius slider to 25, the Black Level to -1 and the White Level to 256. Click OK.
The Despeckle filter applied.
9. Add Stroke
I'll add a stroke to the image. Select everything on the duplicate layer by going to Select>All or by using the keyboard shortcut Ctrl+A. Now create a border from the selection by going to Select>Border. The Border Selection dialog box appears. Enter the width of the border selection in the box. I'll enter 50 pixels on the width text box then click OK.
Border Selection.
Fill the border with black by choosing Edit> Fill with FG color. Remove the selection by choosing Select> None.
10. Create selection using the Fuzzy Select tool
Because our object is in black color, we'll use the Fuzzy Select Tool. It works very well for selecting a solid-colored area. Select The Fuzzy Select Tool by clicking on the tool icon in the ToolBox or else by going to Tools>Selection Tools>Fuzzy Select (U).
In the Tool Options, dialog select Add to the current selection Mode.
Make a selection by clicking on all the black area of the image.
11. Create a new layer
Use Layer> New Layer or press Shift+Ctrl+N to create a new layer. The New Layer window open. Type a name in the Layer Name text box. Click OK.
A new, empty layer, added to the layer stack of the image, just above the active layer.
12. Apply Gradient to the new layer
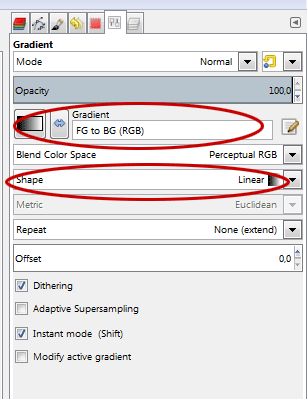
Grab the Gradient Tool by clicking on the tool icon in the ToolBox or else by going to Tools>Paint Tools>Gradient (G).
In the Tool Options dialog, choose FG to GB gradient and Linear Shape. Click on the Foreground color in the Toolbox. The Change Foreground Color dialog box appears.
I'll choose a Blue color. Click OK. Next, click on the Background color in the Toolbox. The Change Background Color dialog box appears. I'll choose Red color. Click OK.
Make sure the new layer is selected in the Layers dialog. Apply Gradient on a new layer by clicking from bottom to the top.
13. Add Background
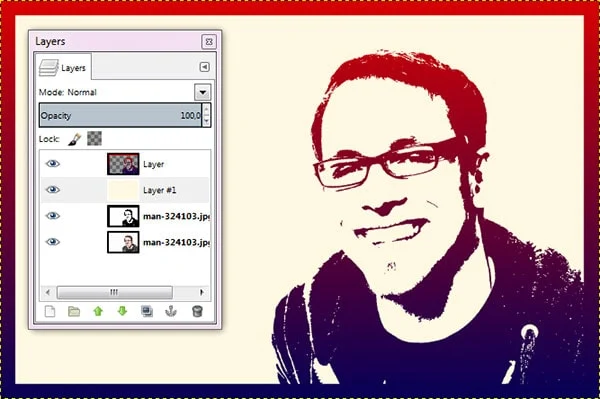
The last step is to add a layer for the background. Click the foreground color box and select a color for the background. Use Layer>New Layer to create a new layer. Move this new layer at the second position from the top. Then Fill this layer with the foreground color you choose by selecting Edit> Fill with FG color.
Here is the photo before applying the pop art effect:
14. Save document
Use File>Save command in the top menu or else just press Ctrl+S to save your project file. The Save Image dialog box appears. Navigate to the folder where you want to store your project file. Type a name in the Name text box and leave the default GIMP (*.XCF) format. XCF is GIMP's native format and is useful because it stores everything about your image and will allow you to later edit your image in GIMP, in case you notice a problem. Click Save to store the project file.
Once you have finished, you will probably also want to export the image in a more widely used format, such as JPEG, PNG, TIFF, etc.
There you have it! GIMP Pop Art.









No comments:
Post a Comment