In today's tutorial, we are going to learn how to turn a photo into a collage of Polaroids in GIMP . (See a new version and easier for this polaroids tutorial: GIMP Collage of Polaroids Using Layer Mask). We'll be using the Rectangle Select, the Rotate, the Move Tool and Drop Shadow that comes with GIMP. Once you have arranged it to your satisfaction, you can play around with other GIMP's tools to add your own artistic effects.
Step 1: Open Image Then Add Alpha Channel
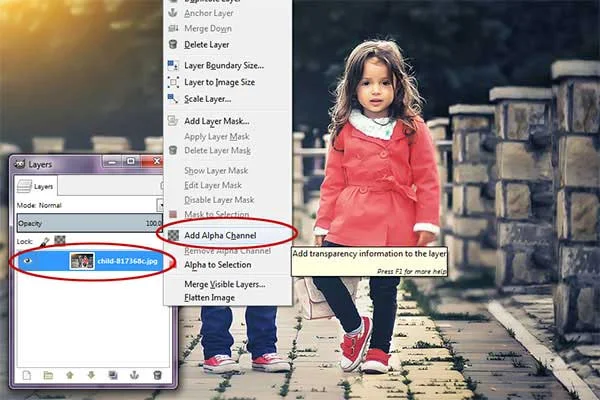
Go to File>Open command in the top menu or else just press Ctrl+O. The “Open Image” dialog will open. Navigate to your file and click on its name. Click Open. Right click on the image's layer you will be working on and then click “add alpha channel”.
For this GIMP Collage tutorial, I'll use this image that I downloaded from Pixabay.
Step 2: Create a New Layer
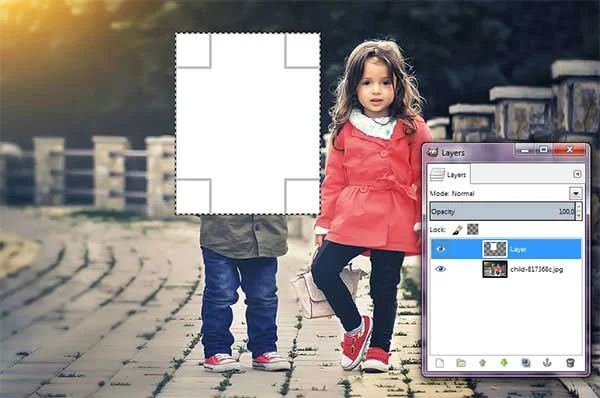
Use Layer> New Layer or else press keyboard keys Shift+Ctrl+N to create a new layer in an image. The New Layer window open. For Layer Fill Type, click Transparency and then click the OK button.
Step 3: Draw a Rectangle Selection
Select Rectangle Selection Tool from the toolbox or use Tools> Selection Tools> Rectangle Select (R).
Click and drag your mouse to choose a portion of the document. If you are done, just leave the mouse. Now, the selected portion of the document has been picked in rectangular shaped.
Step 4: Fill Selection With White Color
Make sure the background color is white by pressing keyboard key D, then go to Edit> Fill with BG color.
Step 5: Shrink Selection
Use Select> Shrink, set your shrink value manually or through the up and down arrows and check the “Shrink from image border”. Click OK to apply.
Step 6: Fill Selection With Black Color
Click the background color box, then choose black color. Go to Edit> Fill with BG color. Remove the selection by choosing Select> None when you are done.
Step 7: Rotate Polaroid Layer
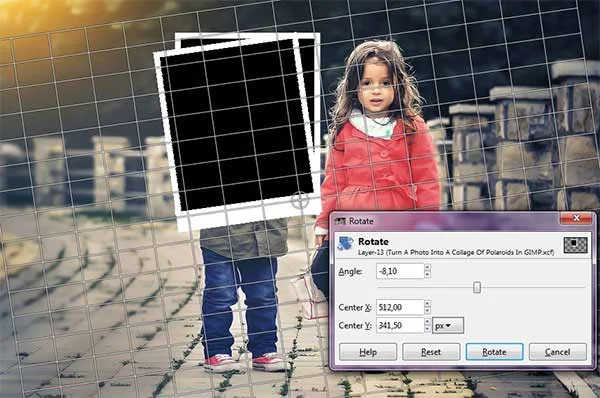
Use Tools>Transform Tools>Rotate.
A Rotation Information dialog is open. Set the angle, center X, and center Y manually or through the up and down arrows. Click the Rotate button when you're done.
Step 8: Adjust Photo Frame Position Using Move Tool
Click the Move Tool icon or else use Tools>Transform Tool>Move.
Click and hold anywhere inside the duplicate rectangle layer and drag to the position you want.
Step 9: Duplicate the Polaroid Layer
Please duplicate polaroid layer as many as you want by using Layer> Duplicate Layer. Then adjust its position using the Move tool and rotate using the Rotate tool.
Step 10: Create Layer For Background
Choose Layer> New Layer. Move this layer to the bottom.Step 11: Duplicate The Image's Layer
Activate the image's layer by clicking on it and then duplicate layer by choosing Layer> Duplicate Layer. Move the image's layer right on top of one of the duplicate polaroid layer.
Step 12: Create a Selection on Polaroid Transparent Area
Click the Select by Color tool icon.
Click polaroid first layer and then click on an empty area / transparent.
Step 13: Remove Selection Area
Click on the images's layer, then delete the selection area by choosing Edit> Clear.
Step 14: Create Selection Inside the Frame
Click layer Polaroid. Click Select by Color Tool icon or by choosing Tools> Selection Tools> By Color Select, then click inside polaroid frame that is black.
Step 15: Remove Selection Area
Choose Edit> Clear to delete the selection area. Remove the selection by choosing Select> None.
Step 16: Merge Down
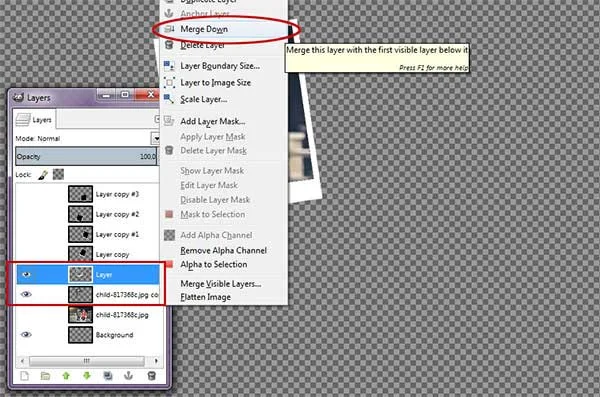
Merge the photo layer with the polaroid layer. Click polaroid layer and then choose Layer> Merge Down.
Step 17: Add Drop Shadow
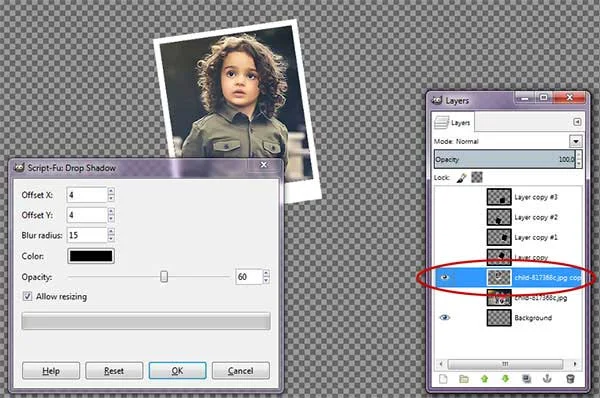
Make sure you already use Select>None to remove the selection. Use Filters> Light and Shadow> Drop Shadow. You can just leave the default value and then click the OK button.
The Drop Shadow applied.
Step 18: Repeat Step 11 Until Step 17
Repeat step 11 through 17 for all Polaroid frame.Step 19: Add Background
Click the Background Layer and then click the Bucket Fill Tool or by selecting Tools> Paint Tools> Bucket Fill. Choose a background color or pattern and then select Edit> Fill with a pattern.
Step 20: Save your document
Use File>Save command in the top menu and name your document.Click OK when you are done.
There you have it! Turn A Photo Into A Collage Of Polaroids In GIMP.








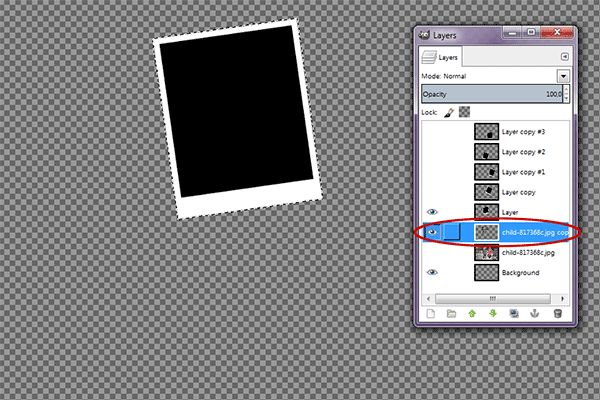




Step 12. What do you mean click on an empty area/transparent?
ReplyDeletesorry for my english. click on outside frame, see the red arrow? click in there
DeleteCan you make step 12 into a proper sentence so I can keep following the instructions please?
ReplyDeletesorry for my english. click on outside frame, see the red arrow? click in there
Delete