If you liked my tutorials, please subscribe to my YouTube channel - JTSGraph. Watch the video for detailed instructions and use the written steps for quick reference.
Steps to make a grid collage in GIMP:
1. Create new image
Use File>New to open the Create a new image dialog. Here you can set the Width and Height of the new image. Enter a value for the initial width with 1350 px and height with 1350 px manually or through the up and down arrows, then click OK.
2. Show the Grid
Now we need to place a lot of small images in our new image precisely. We'll use Grid, a flexible type of positioning aid. Grid are horizontal and vertical lines we can temporarily display on an image while we are working on it. Enable displaying Grid by going to View>Show Grid.
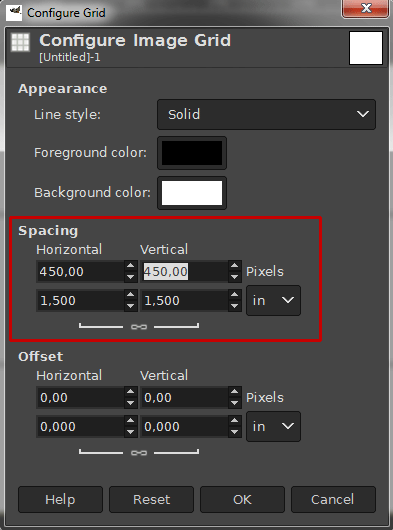
Now configure the Grid by going to Image>Configure Grid... The Configure Grid dialog box appears. In the Configure Grid dialog box, choose the color of the grid lines, the spacing, and offsets.
Snapping is a useful feature in GIMP that allows us to align images with the Grid. Choose View>Snap to Grid to enable snapping that will help you to align any images or shapes you want.
3. Insert image into grid
Use File> Open As Layers command in the top menu to open the image you'd like to insert.
Click on the image, then click Open.
4. Adjust image
You can now edit the image as follows:- Use Tools>Transform Tools>Scale command to resize the image. Click anywhere inside the image. In the Scale dialog box, click the chain to keep the image does not distort. Enter new values for the image's width and height manually or through the up and down arrows. Press Scale button when you are done.
- Use Tools>Transform Tools>Move command to move the image. Click and hold anywhere inside the image and drag.
Resize the image using the Scale tool.
5. Create selection then duplicate layer
Use Tools>Selection Tools>Rectangle Select command. To create a selection, drag your mouse over part of the image, go to Edit> Copy command, go to Edit>Paste command and then use Layer>To New Layer.
Now you can delete the original image's layer.
6. Add Stroke/Borders
I will choose foreground color with white color. Use Tools>Default Colors to reset the color to default.
Then use Tools>Swap Colors.
Right-click on your new layer/pasted layer then go to Alpha to Selection.
With the selection still active, use Edit>Stroke Selection.
A Stroke selection pop-up window appears. Click “Stroke line” radio button and then click “Solid color” radio button. I will set the Line width with 30 px. Finally, click the Stroke button.
Use Select>None to clear selection.
7. Insert all images
Repeat step 3 through 6 to open and manipulate each picture you'd like to insert. Use Image>Guides>Remove All guides to remove guides.
8. Save document
Use File>Save command in the top menu and name your document. Click OK when you are done. Once you have finished, you will probably also want to export the image in a more widely used format, such as JPEG, PNG, TIFF, etc, using File>Export As.
There you have it! How to make a grid photo collage in GIMP.


Very useful, Thank You
ReplyDeleteGlad you liked it :)
DeleteExcellent!
ReplyDeleteThanks :) Glad You liked it!
DeleteThank you for this guide. I am using this to create my thesis on cancer research and need to make a single image containing multiple photos from a microscope. you saved my LIFE!
ReplyDeleteGlad you liked it :)
DeleteI would like to know what the purpose of the deleting the original image layers is? When I copy a image layer it still appears as a .jpg.
ReplyDeleteIt's just an optional step to keep your collage file small.
DeleteNice
ReplyDeleteThank you :) Glad You liked it!
DeleteVery useful and simple. Thank you
ReplyDeleteYou're welocome :)
Deletenice
ReplyDeleteGlad you liked it!
Deletethanks man I had made correct collage using this.
ReplyDeleteYou're welcome :)
DeleteThank you so much for this blogpost! It is the clearest I've seen yet! I am trying to upload memorabilia such as funeral programs into family history websites. I like uploading the whole program as one image so that it stays intact. Therefore, my finished image is a wide, short rectangle because I upload each of the four pages of the program into a long row.
ReplyDeleteBecause I am new to GIMP (and any photo editing software), I am confused by "5. Create Selection Then Duplicate Layer." above. When I deleted the original image's layer, everything went white. Help! What did I do wrong?