In today's Photoshop tutorial, I am going to take you through the process of creating a water reflection in Photoshop. We'll be using the Rectangular Marquee tool to create selection, Free Transform to flip layer for the reflection, Liquify Filter, Motion Blur, Curves Adjustment Layer and Clipping Mask.
1. Open an Image File
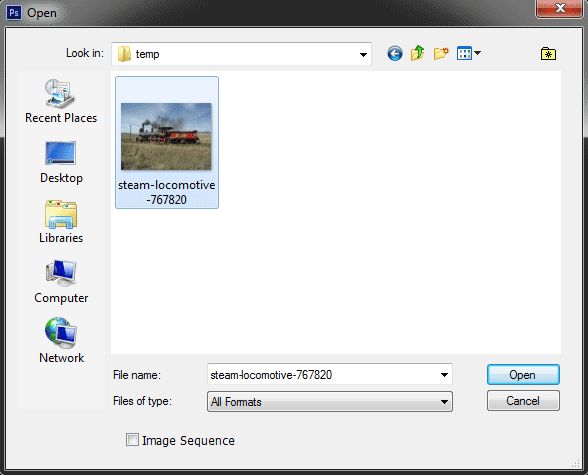
Choose File>Open or else just press Ctrl+O to Open up your base image in Photoshop.
The standard Open dialog box appears.
Navigate to the folder that contains your file then select the name of the file you want to open.
If your file does not appear, try to view all files by selecting All Formats from the Files of type list.
Click the Open button.
The Open dialog box.
For this Photoshop tutorial, I'll use this image, 767820, that downloaded from Pixabay.
The standard Open dialog box appears.
Navigate to the folder that contains your file then select the name of the file you want to open.
If your file does not appear, try to view all files by selecting All Formats from the Files of type list.
Click the Open button.
For this Photoshop tutorial, I'll use this image, 767820, that downloaded from Pixabay.
2. Increase the Canvas Height
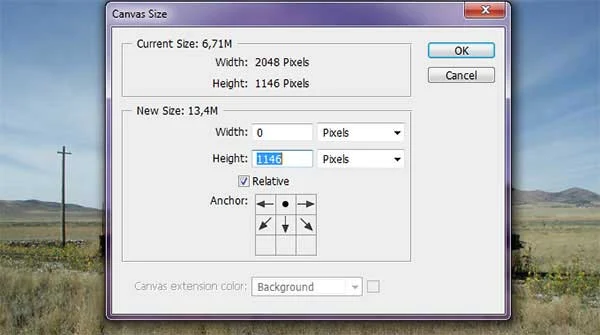
Increase the Canvas Height by going to Image>Canvas Size or else just press Alt+Ctrl+C.
The Canvas Size dialog box appears.
Check Relative, then increase the Height value by entering a value the same amount with Height shown in the Current Size Height.
Click the black dot in the top center of the Anchor arrows that represent the existing image area.
The Canvas Size dialog box appears.
Check Relative, then increase the Height value by entering a value the same amount with Height shown in the Current Size Height.
Click the black dot in the top center of the Anchor arrows that represent the existing image area.
3. Duplicate Layer
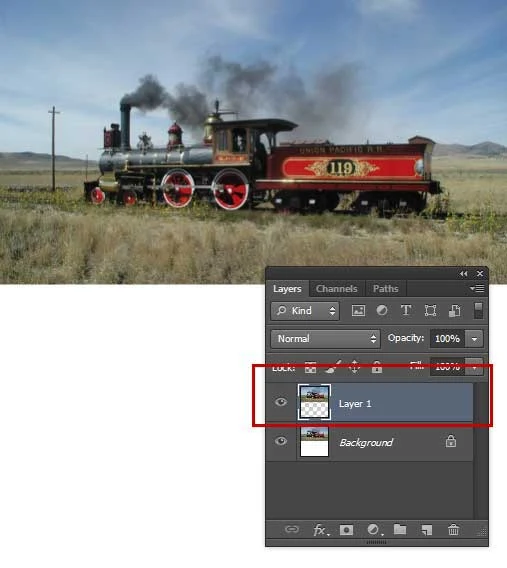
To create a reflection, you must duplicate the original layer.
Select the Rectangular Marquee Tool at the top of the Tools panel or else just press M.
There are four tools available to choose from, the Rectangular Marquee Tool, the Elliptical Marquee Tool, the Single Row Marquee Tool, and Single Column Marquee Tool.
Press Shift+M to cycle through the four available marquee tools until the one you want is active.
Drag your mouse diagonally to create a selection.
Select the image area.
Create a duplicate of the image on a new layer by going to Layer>New>Layer via copy or else just press Ctrl+J.
The Rectangular Marquee Tool.
Drag your mouse diagonally to create a selection.
Duplicate the image on a new layer by pressing Ctrl+J.
Select the Rectangular Marquee Tool at the top of the Tools panel or else just press M.
There are four tools available to choose from, the Rectangular Marquee Tool, the Elliptical Marquee Tool, the Single Row Marquee Tool, and Single Column Marquee Tool.
Press Shift+M to cycle through the four available marquee tools until the one you want is active.
Drag your mouse diagonally to create a selection.
Select the image area.
Create a duplicate of the image on a new layer by going to Layer>New>Layer via copy or else just press Ctrl+J.
4. Create a Mirrored image of the original
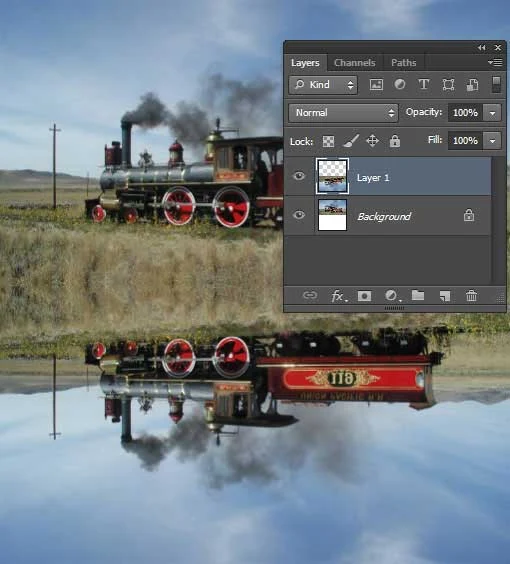
Go to Edit>Transform>Flip Vertical to create a mirrored image of the original.
Select the Move tool and drag your mirrored image to the bottom of the original image.
Select the reflection layer on the Layers panel.
Flip Vertical the reflection layer.
Select the Move Tool.
Drag your mirrored image to the bottom of the original image.
Select the Move tool and drag your mirrored image to the bottom of the original image.
5. Apply the Liquify Filter
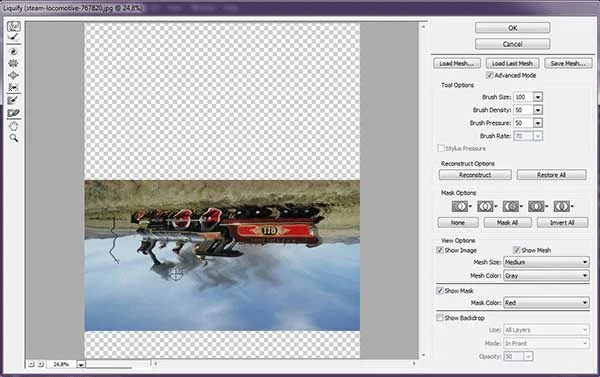
Click the mirrored layer on the Layers panel then go to Filter>Liquify.
In the window select the Forward warp tool from the toolbar on the left.
Depend on your image, set Brush size to 100, set Brush Density and Brush Pressure to 50.
In the window select the Forward warp tool from the toolbar on the left.
Depend on your image, set Brush size to 100, set Brush Density and Brush Pressure to 50.
6. Create Some Ripples
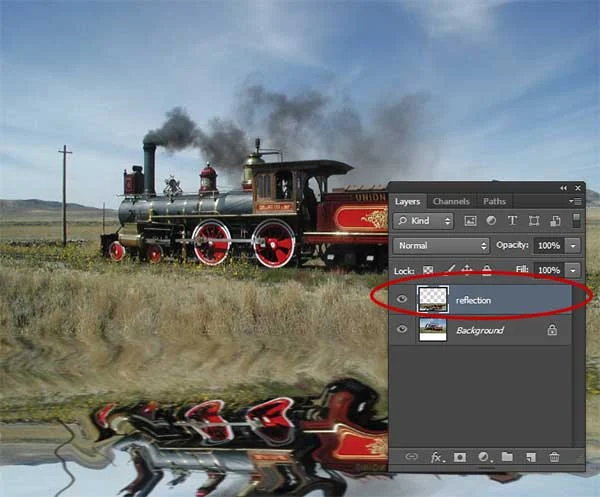
Move your mouse from left to right across the top of the image and then work back across the image in the opposite direction, from right to left.
7. Create Some Twirl
Select the Twirl Clockwise tool from the toolbar on the left.
Set Brush Size to 300.
Set Brush Density, Brush Pressure and Brush Rate to 70.
Now click-hold your mouse on the image to add twirl.
Set Brush Size to 300.
Set Brush Density, Brush Pressure and Brush Rate to 70.
Now click-hold your mouse on the image to add twirl.
8. Apply Motion Blur
Add motion blur by going to Filter>Blur>Motion blur.
The Motion Blur dialog box appears.
In the window set the Distance to 10 pixels.
Click OK.
The Motion Blur filter simulates the blur you see in objects that are moving.
The Motion Blur dialog box appears.
In the window set the Distance to 10 pixels.
Click OK.
The Motion Blur filter simulates the blur you see in objects that are moving.
9. Add Curves Adjustment Layer for Reflection
Select the Reflection layer on the Layers panel.
Create a Curves Adjustment Layer.
Choose Layer>New Adjustment Layer>Curves.
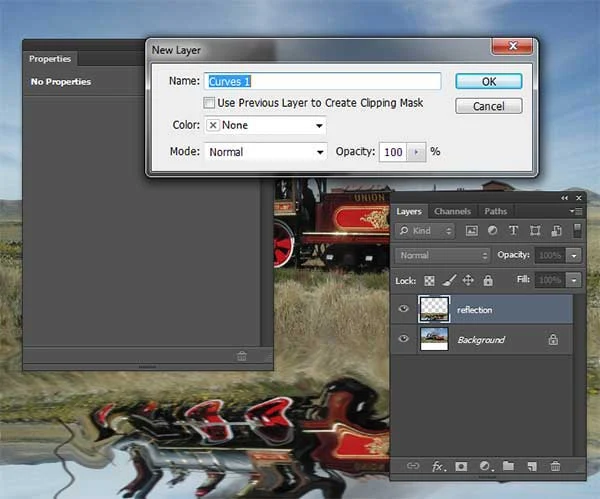
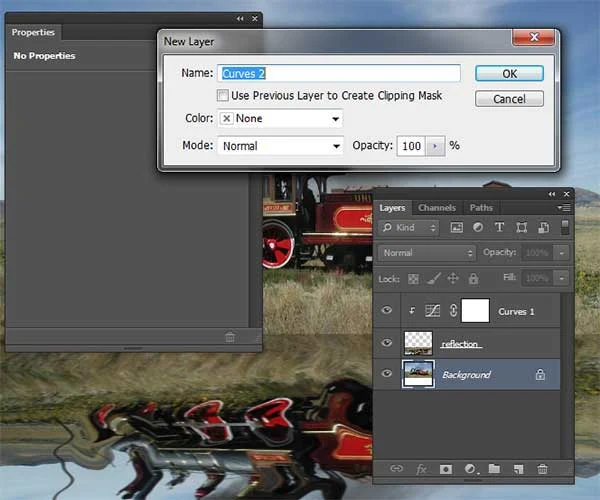
The New Layer dialog box appears.
In the New Layer dialog box, name the layer if you want, leave the other options at their defaults, and click OK.
The Curves controls display on the Properties panel.
Choose Preset Darker (RGB).
Then go to Layer>Create Clipping Mask or else just click the clipping mask icon.
This will make the Curves adjustment clip to the layer below it (the reflection layer).
Select the Reflection layer on the Layers panel.
The New Layer dialog box appears.
Create a Curves Adjustment Layer.
Choose Layer>New Adjustment Layer>Curves.
The New Layer dialog box appears.
In the New Layer dialog box, name the layer if you want, leave the other options at their defaults, and click OK.
The Curves controls display on the Properties panel.
Choose Preset Darker (RGB).
Then go to Layer>Create Clipping Mask or else just click the clipping mask icon.
This will make the Curves adjustment clip to the layer below it (the reflection layer).
10. Add Curves Adjustment Layer for Main Image
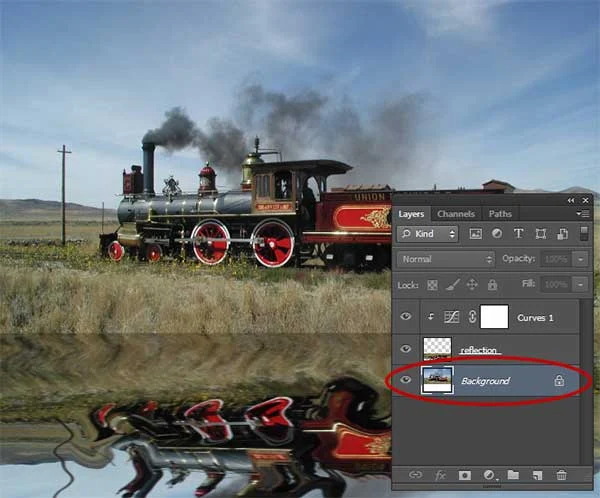
Select the Background layer on the Layers panel.
Create a Curves Adjustment Layer.
Choose Layer>New Adjustment Layer>Curves.
The New Layer dialog box appears.
In the New Layer dialog box, name the layer if you want, leave the other options at their defaults, and click OK.
The Curves controls display on the Properties panel.
Choose Preset Strong Contrast (RGB).
Then go to Layer>Create Clipping Mask or else just click the clipping mask icon.
This will make the Curves adjustment clip to the layer below it (the Background layer).
Select the Background layer on the Layers panel.
The New Layer dialog box appears.
Create a Curves Adjustment Layer.
Choose Layer>New Adjustment Layer>Curves.
The New Layer dialog box appears.
In the New Layer dialog box, name the layer if you want, leave the other options at their defaults, and click OK.
The Curves controls display on the Properties panel.
Choose Preset Strong Contrast (RGB).
Then go to Layer>Create Clipping Mask or else just click the clipping mask icon.
This will make the Curves adjustment clip to the layer below it (the Background layer).
Choose Preset Strong Contrast (RGB) and click the clipping mask icon to clip the Curves adjustment to the layer below it.
11. Save Your Project File
Choose File>Save or else just press Ctrl+S to save your project file.
The Save As dialog box appears.
Navigate to the folder where you want to store the file.
Type a name in the File Name text box and leave the default Photoshop (*.PSD;*.PDD) format.
Click Save to store the image.
Choose File>Save or else just press Ctrl+S to save your project file.
The Save As dialog box appears.
Navigate to the folder where you want to store the file.
Type a name in the File Name text box and leave the default Photoshop (*.PSD;*.PDD) format.
Click Save to store the image.
Once you have finished, you will probably also want to use File>Save As (Shift+Ctrl+S) to export the image in a more widely used format, such as JPEG, PNG, TIFF, etc.
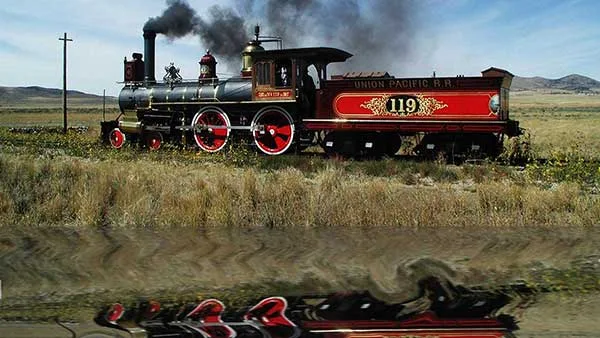
Here is the result:











No comments:
Post a Comment