In this tutorial, we will guide you through the process of creating text in a circular shape using Photoshop. By using the Horizontal Type Tool, Ellipse Tool, and Free Transform, you can easily achieve this effect for your designs. Follow along step by step to learn how to type text in a circle with Photoshop.
Let's dive into the world of circular text creation in Photoshop! Perfect for adding a unique touch to your projects.
If you liked my tutorials, please subscribe to my YouTube channel - JTSGraph
Step 1: Create new Document
Choose File> New (or Ctrl+N). In the pop-up window, type a name in the Name field and enter the following information: Width 1280 pixels, Height 720 pixels, Resolution 300 Pixels/Inch, Color Mode RGB color, and Background contents Transparent. Click OK.
Step 2: Fill The New Layer With Color
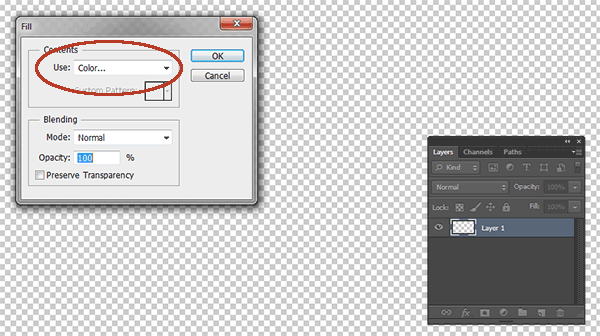
Choose Edit>Fill (or Shift+F5). In the Fill dialog box, under Contents, you can choose a color to fill the new layer. In the dropdown Use: select Color. Select your prefer color in the Color Picker. Click OK.
Now, the color that you choose fills the layer.
Step 3: Grab The Ellipse Tool
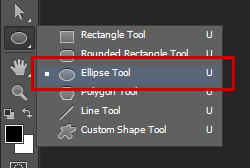
Select the Ellipse Tool from the Tools panel (or just press U). Press Shift+U to cycle through the six available shape tools until the one you want is active. In the Options Bar, make sure Shape is chosen from the menu.
Choose the color for the shape by, clicking the color swatch in the options bar, and then choose a color available.
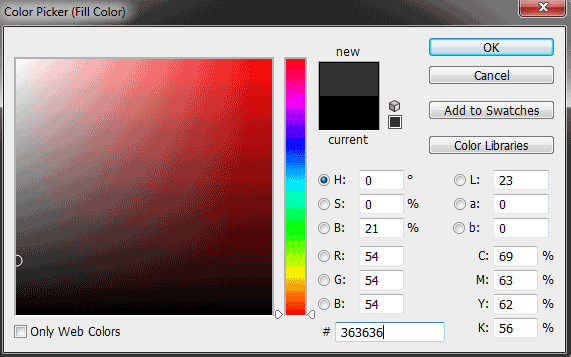
You can also choose a color from the Color Picker.
Choose Proportional to keep the circle doesn’t distort. Check From Center.
Step 4: Draw a Circle Shape
Click inside your document and drag away from the starting point. When you release your mouse button, Photoshop completes the circle/ellipse shape and fills it with your chosen color.
Step 5: Grab the Horizontal Type Tool
Select the Horizontal Type tool from the Tools panel (or just press T). Press Shift+T to cycle through the four available type tools until the one you want is active. Your cursor will look like an I-beam, similar to the one you see in a word processing program.
Select type Options, such as font, style, size, and color, in the tool Options bar.For this Photoshop tutorial I'm using Noto Serif font.
Step 6: Type Text on Document
Make sure the ellipse/circle shape layer is active. Move your cursor and click when you see the cursor look like an I-beam with wavy line.
Type your text. When finished, click the Commit button on the Options bar or you can just press Ctrl+Enter. Photoshop creates a new type layer. Now we have three layers, Layer 0 (background), Ellipse 1, and the type layer.
Step 7: If You Need to Adjust the Text Size
With the Horizontal Type Tool still active, move the mouse cursor over your text and click. Choose Select>All (or Ctrl+A) then try to change the font size in the Options Bar until you’re happy with the result. Click Commit button.
Step 8: Create Another Circle Text
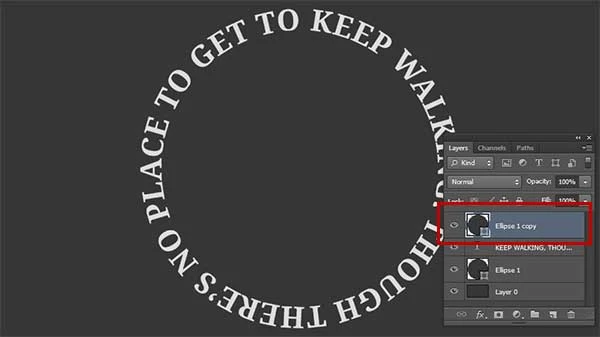
Select the circle/ellipse layer then duplicate it by going to Layer>Duplicate Layer.
Move the duplicate ellipse/circle layer to the topmost position.
Step 9: Resize the Circle layer using Free Transform
Choose Edit>Free Transform Path. You can set the new Width (%) and Height (%) in the Options Bar or resize by dragging any corner while holding down the Shift key to keep the shape does not distort.
Step 10: Type Your Text
Grab the Horizontal Type Tool, hover your mouse over the shape and click, then type your text. Click Commit when you’re done.
Step 11: Repeat the Steps Earlier for Another Circle Text
Repeat steps 8 through 10 if you want to create another circle text.
There you have it! How To Type Text in Circle in Photoshop.
Step 12: Save Your Document
Choose File>Save (or press Ctrl+S) to save your project file. The Save As dialog box appears. Navigate to the folder where you want to store the file. Type a name in the File Name text box and leave the default Photoshop (*.PSD;*.PDD) format. Click Save to store the image.


Hi
ReplyDelete