In today's tutorial we'll learn, steps by steps, on how to place multipe images in text in Photoshop. Let's get started! Each letter has a different image. The first step is to write letter by letter, then arrange the letters using the Move Tool, then place the image using the File>Place command, adjust the size and position of the image using Free Transform, then create a clipping mask so that the image can appear on the letters. In this way, each letter in the text will have a different image.
Video: Place Multiple Images in Text using Photoshop.
1. Create a New Document
Choose File>New (or Ctrl+N).
I will create a document with a size of width: 1366 pixels, height: 768 pixels, resolution: 72 Pixels/Inch, Color Mode: RGB Color and Background Contents: White.
Click OK.
Create New Document.
2. Write Your Text
We will write text on the document using the Horizontal Type Tool.
Click the Horizontal Type Tool icon on the toolbar (or press T/Shift+T).
In the options bar, select a font type and select white for the font color.
The white color is chosen so that the image can appear on the letters.
I will write VISIT INDONESIA.
So I will write VISIT then press Ctrl+Enter.
I use the Das Modern font.
Please download the font for free.
Previously, a tutorial on how to make pictorial text using Photoshop was made.
Horizontal Type Tool.
Select the font type, font size, and the font color is selected white.
Write down your text.
3. Duplicate Posts
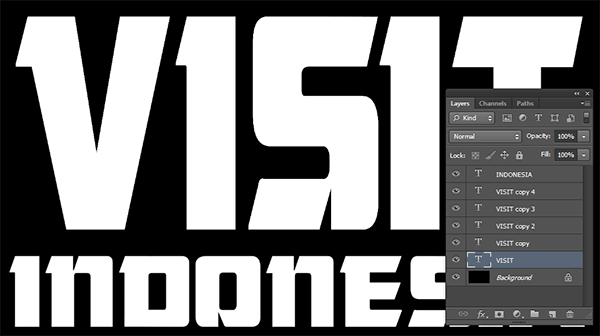
I will duplicate the VISIT text 4 times by pressing Ctrl+J 4 times.
It will form 4 VISIT layers.
Duplicate Posts.
4. Change Letters
Click the VISIT layer, then rename it to the letter V.
Click the Visit copy layer then rename it to the letter I and so on.
Do this step until all the letters are arranged into the words 'VISIT'.
Change the letters.
5. Drag the Letters Using the Move Tool
Click the Move Tool icon.
Then click the second duplicate layer and press the right arrow.
Do this step until all the letters are shifted.
Move Tools.
Slide the letters.
6. Insert Image And Place It On Letter
Stock images used for this Photoshop text effect tutorial: bali-301462, buffalo-825584, landscape-603950, mosque-243175, temple-598969, wayang-695696.
Click on one of the letter layers that you want to insert a photo into.
Select the File>Place command to open the photo you want to insert.
Browse to the location of the photo, click on the photo, then click OK.
Now that your photo is in the document and around the photo you will see a Free Transform help box with handles.
You can edit the size and position of the photo in the following ways:
Enter a photo.
7. Add Another Image
Repeat step 6 for the other letters.
Insert a picture for each letter.
8. Add an Outer Glow Style
I'm going to add an outer glow effect to the letters.
To do this, click on one of the Letter layers, then select Layer> Layer Style> Outer Glow.
For this outer glow effect I will fill it with a 15% spread and a size of 15 pixels.
Click OK.
Now your letter has an outer glow effect.
Copy this outer glow layer style to the other letters.
The trick, while holding down the Alt key, click-drag the outer glow layer style to other letter layers.
Add Outer Glow.
9. Save Document
Save the pictorial writing project that you have created by selecting the File>Save command (or Ctrl+S).
In the "Save in" drop-down menu above, please browse to the folder location to save the file location, in the "File name" column type the name of your illustrated writing project file then click the Save button.
Don't forget to save your project in PSD document format so we can edit it later.
If you want to upload to social media or for other purposes, select the File menu> Save As and save the photo in JPG or PNG format.
Please experiment on your own to get satisfactory results. Here are the results:

Choose File>New (or Ctrl+N).
I will create a document with a size of width: 1366 pixels, height: 768 pixels, resolution: 72 Pixels/Inch, Color Mode: RGB Color and Background Contents: White.
Click OK.
Create New Document.
2. Write Your Text
We will write text on the document using the Horizontal Type Tool.
Click the Horizontal Type Tool icon on the toolbar (or press T/Shift+T).
In the options bar, select a font type and select white for the font color.
The white color is chosen so that the image can appear on the letters.
I will write VISIT INDONESIA.
So I will write VISIT then press Ctrl+Enter.
I use the Das Modern font.
Please download the font for free.
Previously, a tutorial on how to make pictorial text using Photoshop was made.
Horizontal Type Tool.
Select the font type, font size, and the font color is selected white.
Write down your text.
3. Duplicate Posts
I will duplicate the VISIT text 4 times by pressing Ctrl+J 4 times.
It will form 4 VISIT layers.
Duplicate Posts.
4. Change Letters
Click the VISIT layer, then rename it to the letter V.
Click the Visit copy layer then rename it to the letter I and so on.
Do this step until all the letters are arranged into the words 'VISIT'.
Change the letters.
5. Drag the Letters Using the Move Tool
Click the Move Tool icon.
Then click the second duplicate layer and press the right arrow.
Do this step until all the letters are shifted.
Move Tools.
Slide the letters.
6. Insert Image And Place It On Letter
Stock images used for this Photoshop text effect tutorial: bali-301462, buffalo-825584, landscape-603950, mosque-243175, temple-598969, wayang-695696.
Click on one of the letter layers that you want to insert a photo into.
Select the File>Place command to open the photo you want to insert.
Browse to the location of the photo, click on the photo, then click OK.
Now that your photo is in the document and around the photo you will see a Free Transform help box with handles.
You can edit the size and position of the photo in the following ways:
- Resize the photo by clicking-drag on the corner of the Free Transform box while holding down the Shift key to keep the photo size proportional.
- To move the photo, click-hold on the inside of the Free Transform box then drag it to the position of the letter you want.
- Rotate the photo by moving the mouse away from one corner of the Free Transform handle until you see two arrows. Click-hold, then drag.
- Press the Enter key when finished.
- Then select the Layer>Create Clipping Mask command or the keyboard shortcut Alt+Ctrl+G so that the image appears from within the letters.
- Use the Move Tool if the position of the image does not match the position of the letters.
- Reuse the Free Transform command if the photo size still doesn't fit the letter position.
Enter a photo.
7. Add Another Image
Repeat step 6 for the other letters.
Insert a picture for each letter.
8. Add an Outer Glow Style
I'm going to add an outer glow effect to the letters.
To do this, click on one of the Letter layers, then select Layer> Layer Style> Outer Glow.
For this outer glow effect I will fill it with a 15% spread and a size of 15 pixels.
Click OK.
Now your letter has an outer glow effect.
Copy this outer glow layer style to the other letters.
The trick, while holding down the Alt key, click-drag the outer glow layer style to other letter layers.
Add Outer Glow.
9. Save Document
Save the pictorial writing project that you have created by selecting the File>Save command (or Ctrl+S).
In the "Save in" drop-down menu above, please browse to the folder location to save the file location, in the "File name" column type the name of your illustrated writing project file then click the Save button.
Don't forget to save your project in PSD document format so we can edit it later.
If you want to upload to social media or for other purposes, select the File menu> Save As and save the photo in JPG or PNG format.
Please experiment on your own to get satisfactory results. Here are the results:


No comments:
Post a Comment