Learn how to create a sunset effect from a given image in Photoshop using Gradient Map. We’ll be using Gradient Map to create a gradient between two colors, in this case, red and yellow, change its blend mode to overlay, softlight or hardlight, then adjust image color and Tone using Curves.
Steps to make a sunset effect in Photoshop:
1. Open image
Choose File>Open or else just press Ctrl+O to Open up your base image in Photoshop. The standard Open dialog box appears. Navigate to the folder that contains your file then select the name of the file you want to open. If your file does not appear, try to view all files by selecting All Formats from the Files of type list. Click the Open button.
For this Photoshop tutorial, I'll use this image, 1587287, that I downloaded from Pixabay.
2. Add a gradient map adjustment layer
Now go to Layer> New Adjustment Layer> Gradient Map. The New Layer dialog box appears. In the New Layer dialog box, name the layer if you want, leave the other options at their defaults, then click OK. The Gradient Map controls display on the Properties panel. If it is not, double-click on the thumbnail in the Layers panel.
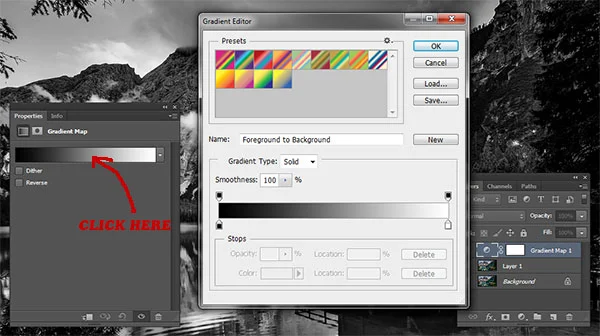
3. Open the gradient editor
Now change the two colors in the Gradient Bar by clicking on it. The Gradient Editor dialog box appears.
4. Choose red color for the left stop color
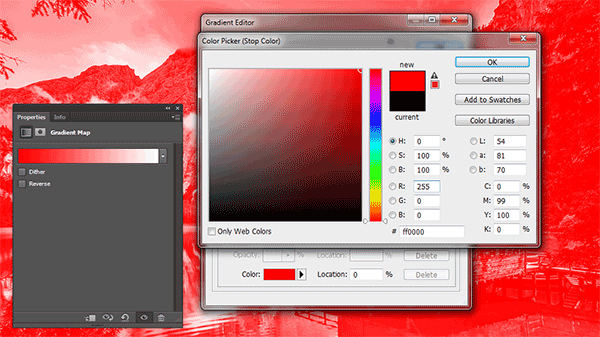
In the gradient editor window, click on the bottom left slider (Color Stop).
Then click the color box.
The Color picker window appear. Choose red color. Click OK to close the Color Picker dialog box.
5. Choose yellow color for the right stop color
In the gradient editor window, click on the bottom right slider (Color Stop) then click the color box.
The Color picker window appear. Choose yellow color. Click OK to close the Color Picker dialog box. Click OK to close the Gradient Editor dialog. Your photo should now yellowish red.
6. Change the Blend Mode to Overlay
Change the gradient map layer's blend mode to overlay, soft light, or hardlight and set the opacity to a value of 60 or 70%, depending on your image.
7. Adjust image's color and tone using curves
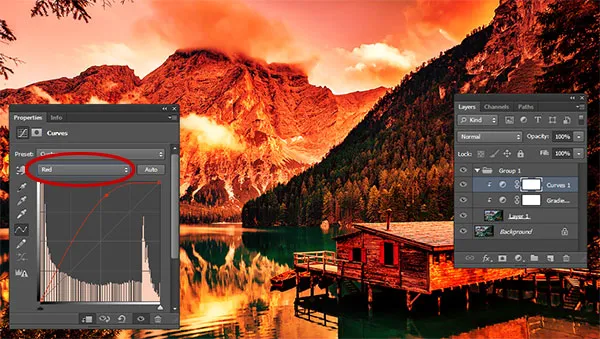
Create a Curves Adjustment Layer. Choose Layer>New Adjustment Layer>Curves. The New Layer dialog box appears. In the New Layer dialog box, name the layer if you want, leave the other options at their defaults, and click OK. The Curves controls display on the Properties panel. Choose a Preset you like that fit your image.
Choose Red, Green, or Blue individually from the drop down menu then you can drag a control point up or down to lightens or darkens that color from the image.
If you are not happy with the result and want to delete a control point, just select the control point and press Delete.
8. Save document
Choose File>Save or else just press Ctrl+S to save your project file. The Save As dialog box appears. Navigate to the folder where you want to store the file. Type a name in the File Name text box and leave the default Photoshop (*.PSD;*.PDD) format. Click Save to store the image.
Once you have finished, you will probably also want to save as/export the image in a more widely used format, such as JPEG, PNG, TIFF, etc.


No comments:
Post a Comment