In this Text Effects tutorial, we're going to learn how to make a metal text effect in Photoshop. This task is easy to do in Photoshop thanks to the power of Layer Style. We'll use Bevel & Emboss, Contour, Satin and Color Overlay Layer Style.
1. Create a new Document
Choose File> New (or Ctrl+N).
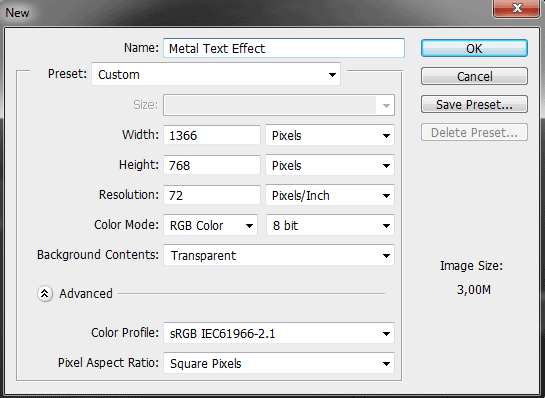
In the standard New dialog box, type a name in the Name field and enter the following information: Width 1366 pixels, Height 768 pixels, Resolution 72 Pixels/Inch, Color Mode RGB color, and Background contents Transparent or Black.
Click OK.
In the Layers panel, a layer with the default name of Layer 1 appears.
Create a new document.
2. Choose the Horizontal Type Tool
Select the Horizontal Type tool from the Tools panel, or else just press T.
Press Shift+T to cycle through the four available type tools until the one you want is active.
Your cursor will look like an I-beam, similar to the one you see in a word processing program.
Select type Options, such as font, style, size, and color, in the tool Options bar.
The Horizontal Type Tool.
Select type Options, such as font, style, size, and color, in the tool Options bar.
3. Type text on Document
Click on the part of the canvas where you want to add text in Photoshop then enter your text.
If you need to start a new paragraph, press Enter.
When finished, click the Commit button on the Options bar (or Ctrl+Enter).
Photoshop creates a new type layer.
Type text on Document.
4. Adjust Text Size Using Free Transform
Choose Edit>Free Transform (or Ctrl+T).
A bounding box surrounds the contents of your text.
It has four control points on corners, four control points on sides and the rotation center at the middle.
You can now edit the text as follows:
5. Add Layer Style
Go to Layer>Layer Style>Bevel & Emboss to open the Bevel & Emboss Layer Style dialog.
Apply the Bevel & Emboss, Satin, and Color Overlay style, using the settings below:
Bevel & Emboss:
Technique: Chisel Hard
Size: 12 px
Gloss Contour: Ring
Contour:
Contour: Cone
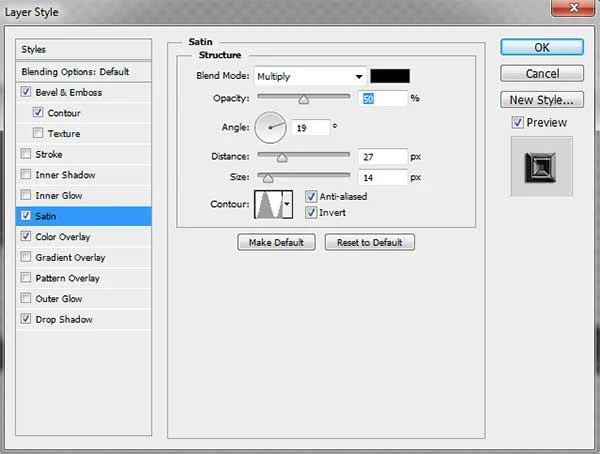
Satin:
Distance: 27 px
Size: 14 px
Contour: Ring
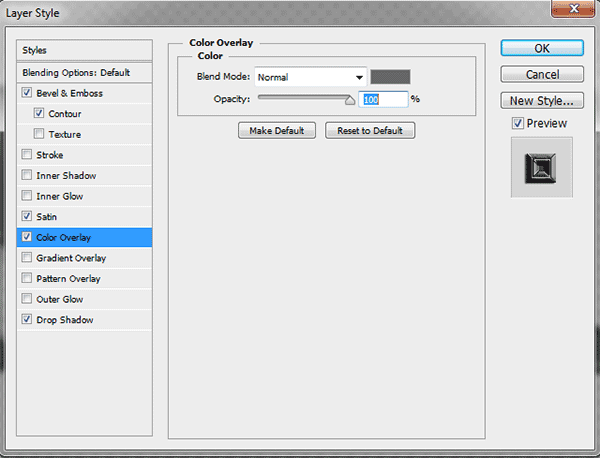
Color Overlay:
Choose a gray color: #666666
Bevel & Emboss settings.
Contour settings.
Satin settings.
Color Overlay settings.
6. Add a Background Image
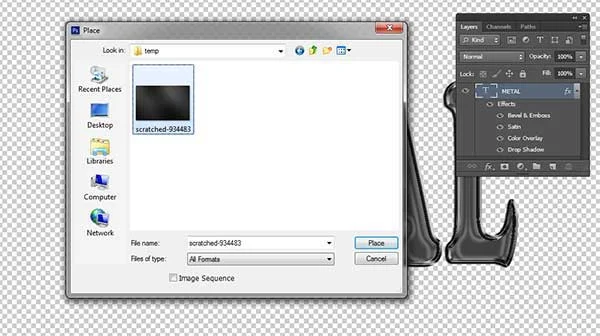
If you'd like a background image, choose File> Place.
In the Place dialog box, navigate to the folder that contains your file then select the name of the file you want to open and then click the Place button.
On the Layers panel, move this background to the bottom position.
In the standard New dialog box, type a name in the Name field and enter the following information: Width 1366 pixels, Height 768 pixels, Resolution 72 Pixels/Inch, Color Mode RGB color, and Background contents Transparent or Black.
Click OK.
In the Layers panel, a layer with the default name of Layer 1 appears.
2. Choose the Horizontal Type Tool
Select the Horizontal Type tool from the Tools panel, or else just press T.
Press Shift+T to cycle through the four available type tools until the one you want is active.
Your cursor will look like an I-beam, similar to the one you see in a word processing program.
Select type Options, such as font, style, size, and color, in the tool Options bar.
3. Type text on Document
Click on the part of the canvas where you want to add text in Photoshop then enter your text.
If you need to start a new paragraph, press Enter.
When finished, click the Commit button on the Options bar (or Ctrl+Enter).
Photoshop creates a new type layer.
4. Adjust Text Size Using Free Transform
Choose Edit>Free Transform (or Ctrl+T).
A bounding box surrounds the contents of your text.
It has four control points on corners, four control points on sides and the rotation center at the middle.
You can now edit the text as follows:
- To move text: Drag inside the rectangle.
- To rotate text: Drag outside the rectangle's corner.
- To change text's size: Drag its corners.
- To Scale horizontally or vertically: Drag its sides.
- Hold-down the Shift key to keep the text does not distort.
- When finished, click the Commit button on the Options bar or you can just press Ctrl+Enter.
5. Add Layer Style
Go to Layer>Layer Style>Bevel & Emboss to open the Bevel & Emboss Layer Style dialog.
Apply the Bevel & Emboss, Satin, and Color Overlay style, using the settings below:
Bevel & Emboss:
Technique: Chisel Hard
Size: 12 px
Gloss Contour: Ring
Contour:
Contour: Cone
Satin:
Distance: 27 px
Size: 14 px
Contour: Ring
Color Overlay:
Choose a gray color: #666666
6. Add a Background Image
If you'd like a background image, choose File> Place.
In the Place dialog box, navigate to the folder that contains your file then select the name of the file you want to open and then click the Place button.
On the Layers panel, move this background to the bottom position.
For this Photoshop Tutorial, I'm using this image background, 934483, from Pixabay.
The Place dialog box.
On the Layers panel, move this background to the bottom position.
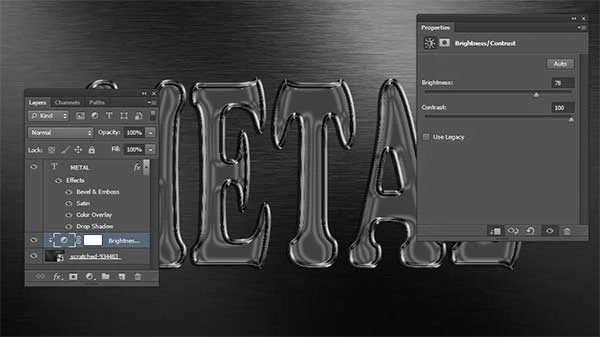
7. Apply Brightness/Contrast to the Background Image Layer
Now adjust brightness contrast using the Brightness/Contrast adjustment layer.
Select the Background image layer on the Layers panel.
Choose Layer>New Adjustment Layer>Brightness/Contrast.
In the New Layer dialog box, just click OK.
Drag the Brightness an Contrast slider to the right or left.
Click the clipping mask icon to clip the Brightness/Contrast adjustment to the layer below it.
The New Layer dialog box appears, just click OK.
Drag the Brightness and Contrast slider to the right or left depending on your image.
8. Save Your Document
Choose File>Save (or Ctrl+S) to save your metal text effect project file.
In the Save As dialog box, navigate to the folder where you want to store your project file.
Type a name in the File Name text box and leave the default Photoshop (*.PSD;*.PDD) format.
PSD is Photoshop's native format and is useful because it stores everything about your image and will allow you to later edit your image in Photoshop, in case you notice a problem.
Click Save to store the project file.
Once you have finished, you will probably also want to export the image in a more widely used format, such as JPEG, PNG, TIFF, etc.
7. Apply Brightness/Contrast to the Background Image Layer
Now adjust brightness contrast using the Brightness/Contrast adjustment layer.
Select the Background image layer on the Layers panel.
Choose Layer>New Adjustment Layer>Brightness/Contrast.
In the New Layer dialog box, just click OK.
Drag the Brightness an Contrast slider to the right or left.
Click the clipping mask icon to clip the Brightness/Contrast adjustment to the layer below it.
8. Save Your Document
Choose File>Save (or Ctrl+S) to save your metal text effect project file.
In the Save As dialog box, navigate to the folder where you want to store your project file.
Type a name in the File Name text box and leave the default Photoshop (*.PSD;*.PDD) format.
PSD is Photoshop's native format and is useful because it stores everything about your image and will allow you to later edit your image in Photoshop, in case you notice a problem.
Click Save to store the project file.
Once you have finished, you will probably also want to export the image in a more widely used format, such as JPEG, PNG, TIFF, etc.
Here is the result:
How to make a metal text effect in Photoshop.
More on Photoshop Tutorials:






No comments:
Post a Comment