Learn How To make a Face in Typography using Photoshop. The method used here is to make a selection using the Select>Color Range command. Make a selection of Shadows, Midtones, and Hightlights using the Color Range, then make each a separate layer. The three are then copied to the text layer using a Mask in order to obtain a face shape based on the Color Range selection.
If you liked my tutorials, please subscribe to my YouTube channel - JTSGraph.
1. Prepare the texts.
Write using word or notepad. I have prepared 10 pages of OpenOffice writing. The goal is that we can form a typographic effect using a smaller font size so that the writing can follow the shape of the face.
2. Open photo, make selection, then split.
Select menu File>Open to open your photo. I will use the Magnetic Lasso Tool to create a selection. Click the Magnetic Lasso Tool icon in the Tool panel.
Then make a selection. Separate the selection into separate layers by pressing Ctrl+J. The photo source used in this Photoshop tutorial is taken from Morguefile.
3. Desaturate, eliminate visibility background.
Click the eye icon to the left of the Background then click Layer 1 and select the Image>Adjustments>Desaturate menu.
4. Make selection with the color range command.
Select the menu Select> Color Range. In the Select drop down, select Shadows, then click the OK button.
You will see a selection outline in the photo. Split this selection into separate layers by pressing Ctrl+J. To make it easier rename it to Shadows.
Repeat these steps to create Midtones and Highlights.
5. Create a new layer and fill it with white.
Click the Create a New Layer icon. Press the D key to reset the foreground/background color to default, then press Ctrl+Backspace to fill it with white.
6. Copy the text.
Open your writing in notepad and copy it to the clipboard. The trick is to press Ctrl+A then Ctrl+C, click the Horizontal Type Tool icon.
Then click at the top end of the canvas, drag to the bottom right.
Then press Ctrl+V to paste the text onto the canvas. Press Ctrl+Enter. The next step, press Ctrl+J twice to duplicate the text layer. Rename the three texts with the names Shadows, Midtones, Highlights.
7. Copy the shadows to the clipboard.
Click on the visibility of the Shadows layer and also click on the shadows thumbnail to activate it, press Ctrl+A and Ctrl+C.
8. Create a layer mask on the text shadows.
Click the shadows text then click the Add Layer Mask icon.
9. Paste clipboard onto the text layer mask.
While holding down the Alt key, click the text layer's layer mask box, then press Ctrl+V to paste the clipboard.
10. Deselect then invert.
Press Ctrl+D to deselect then press Ctrl+I to invert.
11. Repeat steps 7 to 10 for midtones and highlights.
Repeat step 7 to step10 to copy Midtones to text Midtones and copy hightlights to text hightlights.
12. Set the type, thickness, and font size of each text.
Click the Shadows, midtones, and hightlights text to adjust them. Click the Horizontal Type Tool icon, then Click the toggle icon to display the toggle for the Horizontal Type Tool.
Please set the font size and type. Also set the opacity.
13. Create one layer for the gradient color.
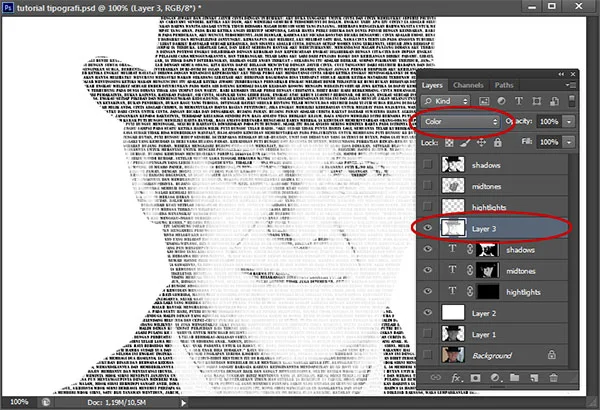
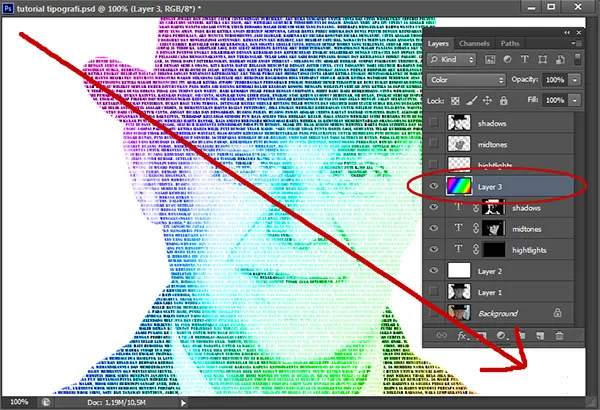
Click the top text, then press Ctrl+Alt+Shift+E. A new layer will form above the shadows text. Change the blend mode to Color.
14. Set the Gradient tool.
Click the gradient tool icon in the tool panel.
Then select the gradient color in the options bar.
15. Apply gradient.
Click then drag to apply the gradient.
Actually the method is very easy, only because the tutorial is too long so it looks complicated.
There you have it! How To make a Face in Typography using Photoshop.


No comments:
Post a Comment