Learn How To make a Lightsaber Effect in Photoshop. The technique is simple, which is to hide the blade using masking then create a glow effect using the brush tool, and finally give it an outer glow style.
If you liked my tutorials, please subscribe to my YouTube channel - JTSGraph.
1. Open photo.
After opening the Photoshop application, press Ctrl+O to open the photo to which you want to add the lightsaber effect. The source of the sword photos in this Photoshop tutorial is taken from the site http://www.coldsteel-uk.com/store/Training-Swords.html.
2. Separate the Sword from the Background.
Since the background is the same white, I'm going to make a selection using the Magic Wand Tool. Click the Magic Wand Tool.
Click the photo background, then select Select>Inverse to invert the selection. Then press Ctrl+J to move the selection to a separate layer. Double click the Layer 1 name then rename it to the hilt of the sword.
3. Create a lightsaber layer.
Click the sword hilt layer and select the menu Layer> New> Layer. Name the lightsaber then click the OK button.
4. Use the Brush Tool to create a lightsaber.
Click the Brush Tool.
Set the brush size.
Select the color in the foreground box.
I'll choose pink with the code #ffcdce.
Make sure the lightsaber layer is active. Click on the tip of the hilt of the sword, then while holding down the Shift keyboard key, click on the tip of the blade. Now the outline for the lightsaber has been formed.
5. Add a background color.
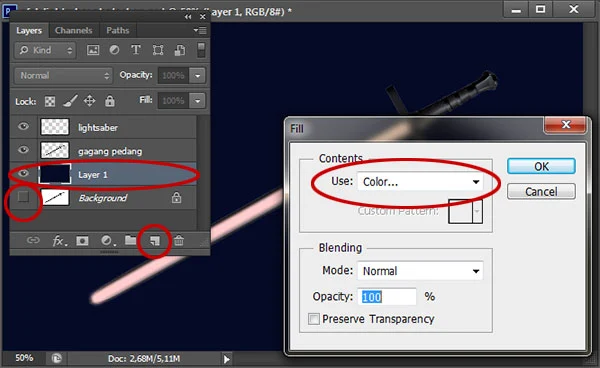
Click the background layer. Click the eye icon to remove the background visibility option. Click the Create a new layer icon. Then select the menu Edit> Fill. In the Use dropdown, select Color then select the background color you want in the color picker. I will choose a color for the dark blue background with the code #050a26. Click the OK button.
6. Select the hilt of the sword and create a mask.
Click the Lasso Tool.
Click the sword hilt layer and make a selection around the sword hilt. Click the Add layer mask icon. Now all that is visible is the hilt of the sword.
7. Apply outer glow style.
Double click the lightsaber layer thumbnail to display the layer style.
Click outer glow, select a color, set the size and size range. For the outer glow color I will choose a bright red color with the code #ff0000. Click the OK button.
8. Slide the sword hilt layer to the topmost position.
Click the sword hilt layer and then drag it to the top position so that the lightsaber effect doesn't appear to stick out from the sword hilt.
Here is the result: How To make a Lightsaber Effect in Photoshop.


No comments:
Post a Comment