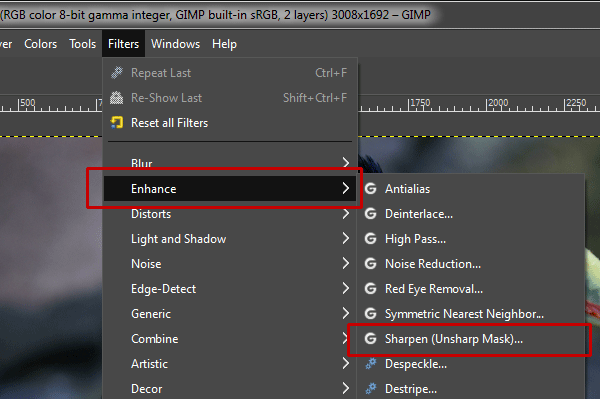
Making sure your images are sharp is a necessity. By applying sharpening effect, we can remove fuzziness from our images. In this tutorial, you will learn how to sharpen an image in GIMP using Filters>Enhance>Unsharp Mask command. If you want to enhances fine details, you can use high pass filter, instead.
If you liked my tutorials, please subscribe to my YouTube channel - JTSGraph.
Steps to sharpen an image in GIMP:
1. Open image
In the “Open Image” dialog, navigate through your folders in the Places panel and the Name panel until your images' name appears in the Name panel. Click the image you want to open. Click Open.
2. Duplicate Layer
Preserve your original image by duplicating the image layer. Go to Layer>Duplicate Layer (or Shift+Ctrl+D). This creates a new perfect copy of the currently active layer just above.
3. Zoom Image up to 100%
Use View> Zoom>1:1 (100%). This option maximizes the image.4. Apply the Unsharp Mask filter on duplicate layer
Activate the duplicate layer by clicking on it.Then use Filters>Enhance>Sharpen (Unsharp Mask).
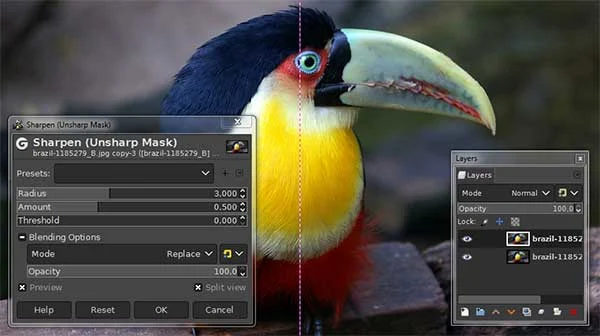
In the Unsharp Mask pop-up window, enter a value for the Radius, Amount and Threshold either through the up and down arrows or with the slider.
- Radius, adjusts how many pixels on either side of an edge you wish to process.
- Amount, strength of sharpening.
- Threshold, the minimum difference in pixel values that indicates an edge where sharpen must be applied.
Experiment with different values and discover values that works best for your image. Once you are satisfied with the result, click "OK" to apply them to the image.
And here is the image after applying unsharp mask filter:
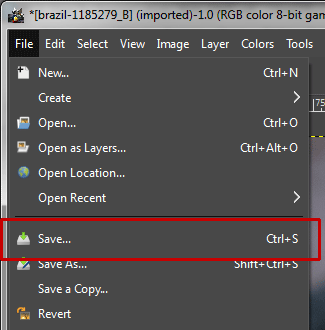
5. Save document
It's better you save it using the extension “.xcf”. XCF is GIMP's native format, and is useful because it stores everything about your image and will allow you to later edit your image in GIMP, in case you notice a problem.
Once you have finished, you will probably also want to export the image, using File>Export As, in a more widely used format, such as JPEG, PNG, TIFF, etc.


No comments:
Post a Comment