Learn how to add a graphic watermark to an image in GIMP with these simple steps where the graphic remains editable. You can just add a text watermark using the Text tool or a simple graphic watermark to your images using “Open as Layers” command. Then resize the graphic using the Scale Tool, adjust its position using the Move Tool, and you can adjust its opacity on the Layers dialog.
Design your watermark
Step 1: Create a New Image
Use File>New (or press Ctrl+N). In the Create a New Image dialog box, you can Set the Width and Height of the new image manually or through the up and down arrows. Click Advanced Options, select Transparency for “Fill with”. Click OK.
Step 2: Add a graphic
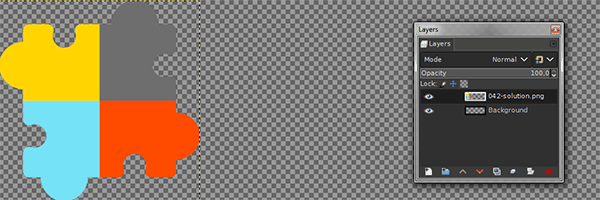
Choose File>Open as layers. In the Open as Layers dialog box, navigate to the image you want to use. Click the image you want to open and then click Open (graphic from Elegantthemes).
Step 3: Adjust the Graphic Position
Grab the Move Tool from the toolbox.
Click and drag on any portion of the graphic. It gets moved as you move the cursor.
Step 4: Adjust the Graphic Size
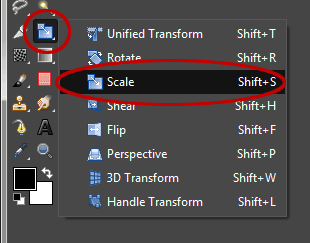
Select the Scale Tool from the toolbox (or Tools>Transform Tools>Scale).
Click on any portion of the graphic. In the Scale dialog box, set Width and Height you want to give to the graphic or you can just drag handles.
Drag the center handle in you want to move the graphic. Click the Scale button when you're done.
Step 5: Select the Text Tool
Select the Text Tool from the toolbox by clicking the tool icon (or choose Tools>Text).
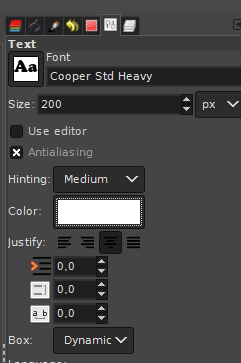
In the Text Tool Options dialog, choose the Font type, color, and size.
Click on any portion in the image, then type the text.
Adjust text size and position using the Scale Tool.
Step 6: Crop Your Watermark
Select the Crop tool from the Toolbox (Tool>Transform Tools>Crop).
Click and drag out a cropping border around the area you want to keep then press Enter (or Image>Crop to content).
Step 7: Save Your Watermark
Use File>Save (or Ctrl+S) to save your watermark project file. In the Save Image dialog box, navigate to the folder where you want to store your project file. Type a name in the Name text box and leave the default GIMP (*.XCF) format. XCF is GIMP's native format and is useful because it stores everything about your image and will allow you to later edit your image in GIMP, in case you notice a problem. Click Save.
Step 8: Export Your Watermark
Once you have finished, you will probably also want to export the image in a more widely used format, such as JPEG or PNG. Use File>Export As to export the watermark in PNG format.
Apply watermark to your image
Step 9: Open Image in GIMP
Use File>Open to open your image. In the Open Image dialog, navigate to the file and click on its name. Click Open. For this GIMP tutorial, I'll use this image, 5286863, downloaded from Pixabay.
Step 10: Add Watermark to Your Image
Choose File>Open as layers. Navigate to your watermark (PNG) file then click Open.
Step 11: Adjust its position Using the Move Tool
If you need to move the graphic on canvas, you have to select the Move tool and click on the graphic to drag the frame. Select the watermark layer on the Layers dialog. Select the Move Tool from the toolbox by clicking the tool icon (or Tools>Transform Tools>Move). Just click and drag on any portion of the watermark. The watermark gets moved as you move the cursor.
Step 12: Adjust Watermark Size Using the Scale Tool
Make sure the watermark layer is selected on the Layers dialog. Select the Scale Tool from the toolbox by clicking the tool icon or else use Tools>Transform Tools>Scale. In the Scale dialog box, you can set the Width and Height you want to give to the watermark or you can just drag handles.
If you prefer using handles, you can scale your watermark as follows:
• Drag a side handle if you want to scale just the height or width.
• Drag a corner handle if you want to scale both the height and the width.
• Drag the center handle to move it.
• Click the Scale button when you're done.
Step 13: Adjust the Watermark Opacity
Select the watermark layer on the Layers dialog then alter the layer's opacity to about 50% or less.
There you have it! Add a Graphic Watermark to Photo in GIMP.
Step 14: Save Your Document
Use File>Save (or Ctrl+S) to save your project file. In the Save Image dialog box, navigate to the folder where you want to store your project file. Type a name in the Name text box and leave the default GIMP (*.XCF) format. XCF is GIMP's native format and is useful because it stores everything about your image and will allow you to later edit your image in GIMP, in case you notice a problem. Click Save to store the project file.
Once you have finished, you will probably also want to export the image in a more widely used format, such as JPEG, PNG, TIFF, etc.


I recommend to use simple and solid tool for watermarking photos from ToolsBlast.com - it is free.
ReplyDeletedeez big nouts
ReplyDelete