Creating a cartoon effect in Photoshop involves using various filters, adjustments, and tools to transform a regular photo into a stylized, illustrated look. Filters that turn your photos into cartoons have been around in Photoshop for years. In this tutorial, I will show you how to make cartoon in Photoshop from a given image without using the pen tool. We'll be using Photoshop filters. There are many different ways to do this and here I will show you other alternative tutorial using Surface Blur filter and Poster Edges Filter.
Steps to make a Cartoon Effect in Photoshop:
1. Open image.
Choose File>Open (Ctrl+O). Navigate to the folder that contains your file then select the name of the file you want to open. If your file does not appear, try to view all files by selecting All Formats from the Files of type list. Click Open.
For this Photoshop tutorial, I'll use this image, 890877, downloaded from Pixabay.
For this Photoshop tutorial, I'll use this image, 890877, downloaded from Pixabay.
2. Create a selection.
Grab the Quick Selection tool (or press W).
Start making a selection by dragging the cursor in a part of the area you want to select. You will see a line of marching ants appear around the object. Keep adding to it by continuing to drag the cursor within the area. To deselect areas, hold the Alt key as you drag the cursor around the area you want to remove from the selection.
Use the Refine Edge to refine the selection by choosing Select> Refine Edge (Ctrl+Alt+R). Tick Smart Radius checkbox and click refine radius icon and then adjust the slider tool radius. Click OK.
3. Turn the selection into a layer.
Choose Layer>New>Layer via copy (Ctrl+J). Now we transfer the selected pixels to a new layer while leaving the original layer unchanged. In the Layers panel, a layer with the default name of Layer 1 appears above the Background layer.
4. Apply Surface Blur filter.
Choose Filter>Blur>Surface Blur to smooth the image surfaces. In the Surface Blur dialog box, check Preview. I'll choose 30 Pixels Radius and 30 Pixels Threshold. Click OK.
5. Apply Poster Edges filter.
Choose Filter> Filter Gallery. In the Filter Gallery dialog box, choose the Artistic. The Artistic folder expands and displays the filters in that category. Choose the Poster Edges filter. For this image, I will fill in the value of Edge Thickness: 1, Edge Intensity: 1, and posterization: 1. Click OK. Adjust this value depends on your photo. The Poster Edges filter gives the image an artsy, posterlike look, and also enhances the edges to make the object's outline appear sharper.
6. Create a new layer for background.
Select the Background layer on the Layers Panel.
Create a new layer by choosing Layer>New>Layer (Shift+Ctrl+N). The New Layer dialog box appears. Leave the default settings and click OK.
In the Layers panel, a layer with the default name of Layer 2 appears above the Background layer.
Create a new layer by choosing Layer>New>Layer (Shift+Ctrl+N). The New Layer dialog box appears. Leave the default settings and click OK.
In the Layers panel, a layer with the default name of Layer 2 appears above the Background layer.
7. Fill the new layer with color.
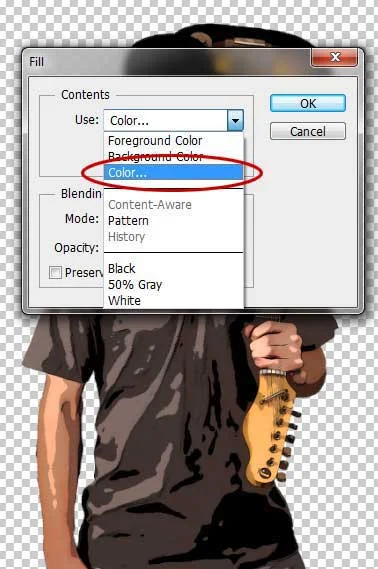
Choose Edit>Fill (Shift+F5). In the Fill dialog box, under Contents, you can choose a color you like to fill the new layer. In the dropdown Use: select Color.
Please select the color in the Color Picker. Click OK.
Now, the color that you choose fills the layer.
8. Grab the Custom Shape tool.
Your Custom Shape Tool can be found in the left-hand toolbar.
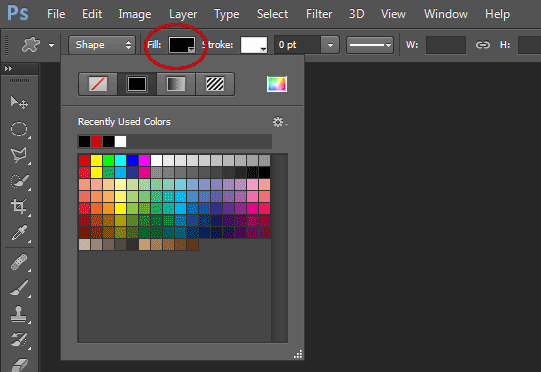
In the Options Bar, make sure Shape is chosen from the menu then choose shape color. To choose the color of the shape, click the color swatch in the options bar, and then choose a color available.
You can also choose a color from the Color Picker.
Click the gear icon, click Defined proportion and check from the center. Lastly, enter a value for the stroke size and select the Registration Target2 shape from the Custom Shape pop-up panel. Once you click on the pop-up panel, you’ll see a whole host of premade options.
If you do not find the Registration Target2 shape in the panel, click the gear icon in the upper-right corner, and choose “All”.
When asked to replace current shapes, click OK to replace current shapes with the shapes form “All”.
9. Draw the Registration Target2 shape.
Zoom out the canvas by pressing Ctrl + -. To draw the Registration Target2 Shape, click inside your document and drag away from the starting point.
When you release your mouse button, Photoshop completes the shape and fills it with your chosen color.
Press Ctrl + H to remove the shape.
When you release your mouse button, Photoshop completes the shape and fills it with your chosen color.
Press Ctrl + H to remove the shape.
10. Save document.
Choose File>Save (Ctrl+S). Navigate to the folder where you want to store the file. Type a name in the File Name text box and leave the default Photoshop (*.PSD;*.PDD) format. Click Save to store the image.Once you have finished, you will probably also want to use File>Save As (Shift+Ctrl+S) to export the image in a more widely used format, such as JPEG, PNG, TIFF, etc.
There you have it! Easy Photo to Cartoon Effect in Photoshop.


No comments:
Post a Comment