There are plenty of collage maker tools out there, but none are quite as satisfying as creating your own collage using Photoshop. In this tutorial, I'm going to take you through the process of creating a hexagon/honeycomb photo collage using the tools that come with Photoshop. We'll use the Custom Shape Tool to create Hexagon shape, Free Transform command to resize/reposition images and shapes, Clipping Mask to clips the image layer into the Hexagon layer, and the Horizontal Type Tool.
Download This Template
Download Hexagon/HoneyComb Photoshop Collage template here or find others free Photoshop Collage Templates here.
Step 1: Create a new Document
Choose File> New (or Ctrl+N). In the pop-up window, type a name in the Name field and enter the following information: Width 3000 pixels, Height 2000 pixels, Resolution 300 Pixels/Inch, Color Mode RGB color, and Background contents Transparent or White. Click OK.
Step 2: Grab The Custom Shape Tool
Select the Custom Shape Tool from the Tools panel (or just press U). Press Shift+U to cycle through the six available shape tools until the one you want is active.
In the Options Bar, make sure Shape is chosen from the menu then choose shape color. To choose the color of the shape, click the color swatch in the options bar, and then choose a color available.
You can also choose a color from the Color Picker. Lastly, enter a value for the stroke size.
Select a hexagon shape from the Custom Shape pop-up panel.
If you do not find a hexagon shape in the panel, click the arrow in the upper-right corner, and choose “All”.
Click OK to replace current shapes with the shapes form “All”.
Step 3: Draw a Hexagon Shape
To draw a Hexagon Shape, click inside your document and drag away from the starting point. When you release your mouse button, Photoshop completes the shape and fills it with your chosen color.
Step 4: Rotate 90 degrees The Hexagon (Optional)
Select Edit> Transform Path> Rotate 90 CW.
Step 5: Duplicate Shape
Now duplicate the Hexagon shape by going to Layer> Duplicate Layer, or else by pressing Ctrl+J. Then reposition your duplicate shape layer using Edit> Free Transform Path. You can edit the shape as follows:
- Resize the Hexagon shape by dragging any corner while holding down the Shift key to keep the shape does not distort (if you need to resize it).
- Move the Hexagon shape by clicking and hold anywhere inside the shape and drag.
- Rotate the Hexagon shape by moving your cursor farther out from any corner until you see two arrows. Click and hold, then drag the shape (if you need to rotate it).
- Press Enter key when you are done.
Duplicate the Hexagon shape layer as many as you want and then arranged it all to your satisfaction.
Step 6: Insert Image
Stock images used in this Photoshop Collage tutorial: vegetables-573958, spice-370114, soup-1006694, sausage-556491, potatoes-637370, parmesan-1002838, lasagna-1900529, greens-266560, food-712665, food-516044, clay-pot-622750, bell-pepper-569070.
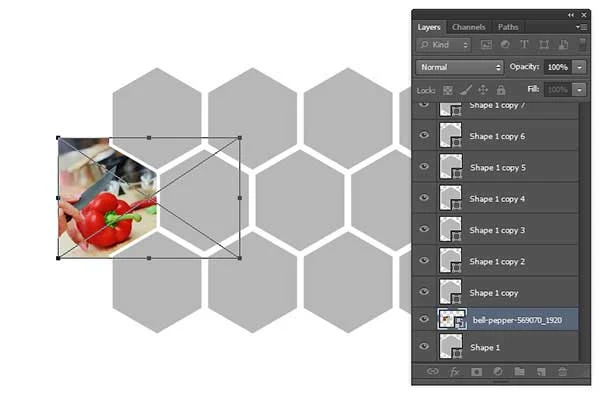
Select the hexagon layer to which you want to insert a picture. Go to File> Place to open the picture you'd like to insert. Navigate to the folder that contains your image file then select the name of the file you want to open. If your file does not appear, try to view all files by selecting All Formats from the Files of type list. Click Place.
You can now edit the picture as follows:
- Resize the picture by dragging any corner while holding down the Shift key to keep the picture does not distort.
- Move the picture by clicking and hold anywhere inside the image and drag.
- Rotate the picture by moving your cursor farther out from any corner until you see two arrows. Click and hold, then drag the picture.
- Press Enter key when you are done.
Step 7: Create Clipping Mask
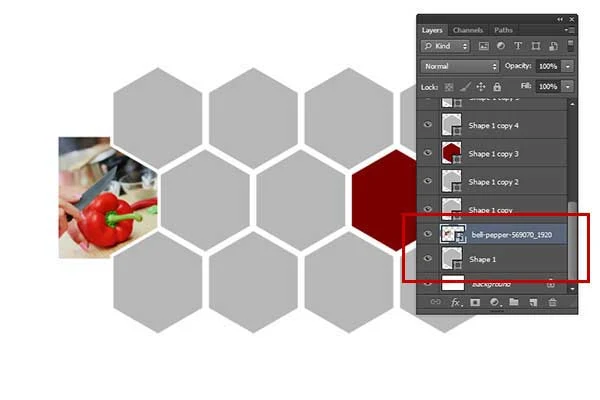
On the Layers panel, make sure the layers to be clipped are listed consecutively. Remember, you must stack the image layer above the Hexagon layer.
Click the image layer to be clipped, then choose Layer>Create Clipping Mask (or press Alt+Ctrl+G) to create clipping mask. When layers are put into a clipping mask, the content of the bottommost layer (the Hexagon layer), clips the layers above it (the image layer).
Step 8: Insert Other Images
Repeat steps 6 through 7 to open and manipulate each picture you'd like to insert.Step 9: Group All Hexagon Layer
While holding down the Shift key, click all the hexagons and images layer.
Then choose Layer>Group Layer.
Then choose Layer>Group Layer.
Step 10: Add Text
Select the Horizontal Type tool from the Tools panel (or press T). Press Shift+T to cycle through the four available type tools until the one you want is active.
Your cursor will look like an I-beam, similar to the one you see in a word processing program. Select type Options, such as font, style, size, and color, in the tool Options bar. Click on the part of your image where you want to add text in Photoshop. Enter your text. To start a new paragraph, press Enter. When finished, click the Commit button on the Options bar or you can just press Ctrl+Enter. Photoshop creates a new type layer. You can a add drop shadow layer style to your text by choosing Layer>Layer Style>Drop shadow.
Step 11: Save Your Document
Choose File>Save (or Ctrl+S) to save your project file. The Save As dialog box appears. Navigate to the folder where you want to store your project file. Type a name in the File Name text box and leave the default Photoshop (*.PSD;*.PDD) format. Click Save to store the project file. Once you have finished, you will probably also want to use File>Save As (Shift+Ctrl+S) to export the image in a more widely used format, such as JPEG, PNG, TIFF, etc.
There you have it! HoneyComb Photoshop Collage.


How do i reorder the images after i have inserted all images onto layers?
ReplyDeleteNo, you can't. You must reorder all the images and the shape layers together
Deletehow to put 1 image into multi hexagon ?
ReplyDeletePlease see this tutorial https://youtu.be/dFpbDbaPq2o thank you
Deletehow to put an photo into multi hexagon?
ReplyDeletePlease see this tutorial https://youtu.be/dFpbDbaPq2o
DeleteThank you! This saved me a ton of research and trial and error!
ReplyDeletejis chij k lye yaha p redirect kiya h wo kha h bhai mre shapes download k lye agr shapes usme mil jti to tri video delhte kya yr hadd h
ReplyDelete