In today's tutorial, I am going to take you through the process of creating a multi diamond photo collage in Photoshop from multiple images and you can download the photoshop collage template for you to use. We will use Guides to help us position polygon shapes precisely, the Polygon tool to draw polygon shapes, Drop Shadow Layer Style and Clipping Mask to clips the image layer into the Polygon layer.
If you liked my tutorials, please subscribe to my YouTube channel - JTSGraph.
Download Multi Diamond Photoshop Collage templates here:
template#1, template#2, template#3, template#4, template#5 and jump to step 6.
Steps to make a collage in Photoshop:
1. Create new document
Choose File> New (or Ctrl+N).
In the pop-up window, type a name in the Name field and enter the following information: Width 3000 pixels, Height 2000 pixels, Resolution 300 Pixels/Inch, Color Mode RGB color, and Background contents Transparent or White.
2. Create 5 vertical guides
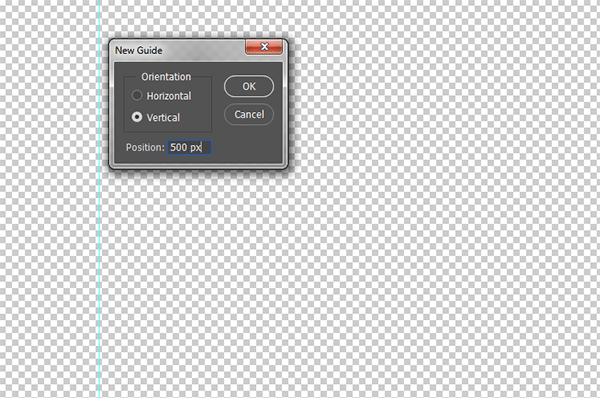
Guides help you position any object (shapes or images) precisely. We will create 3 horizontal and 5 vertical guidelines. Choose View> New Guide.
In the dialog box, select Vertical orientation, enter 500 px position and click OK.
Repeat this step for 1000 px, 1500 px, 2000 px and 2500 px.
3. If you didn't see the guidelines
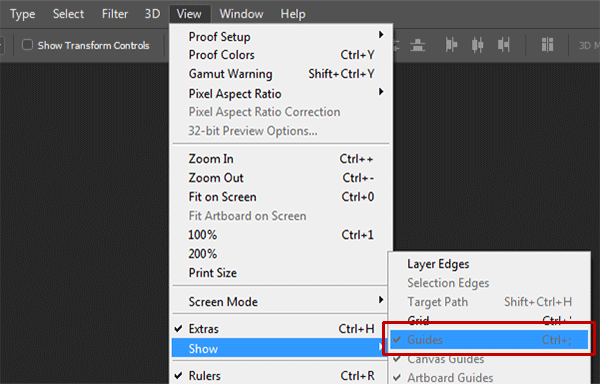
If you didn't see the guidelines, choose View> Show> Guides.
If you want to lock all guides, choose View>Lock Guides. This way you can't move them by accident.
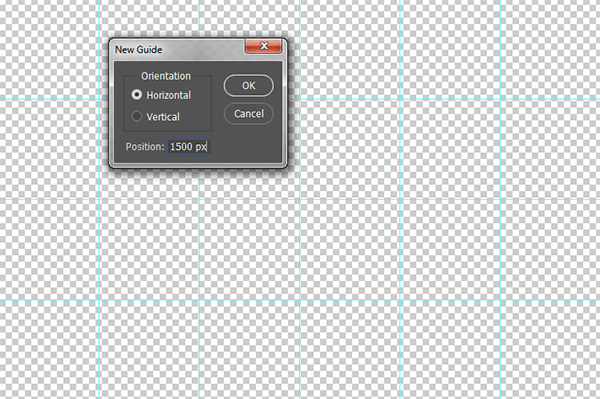
4. Create 3 horizontal guides
Choose View>New Guide. In the dialog box, select Horizontal orientation, enter 500 px position and click OK. Repeat this step for position 1000 px and 1500 px.
5. Grab the Polygon tool
Grab the Polygon Tool (or just press U).
Grab the Polygon Tool (or just press U).
In the Options Bar, make sure Shape is chosen from the menu. Choose the shape color by clicking the color swatch in the options bar, and then choose a color available. Lastly, fill the stroke size.
And set the number of sides in Sides field with 4.
6. Draw a diamond shape
To draw a diamond/Polygon shape, click inside your document and drag away from the starting point.
To draw a diamond/Polygon shape, click inside your document and drag away from the starting point.
When you release your mouse button, Photoshop completes the shape and fills it with your chosen color.
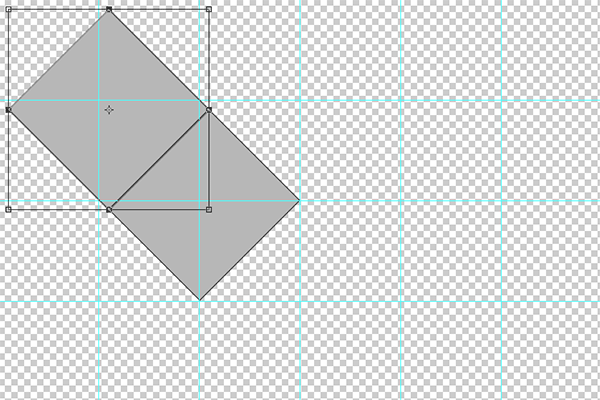
7. Duplicate and resize
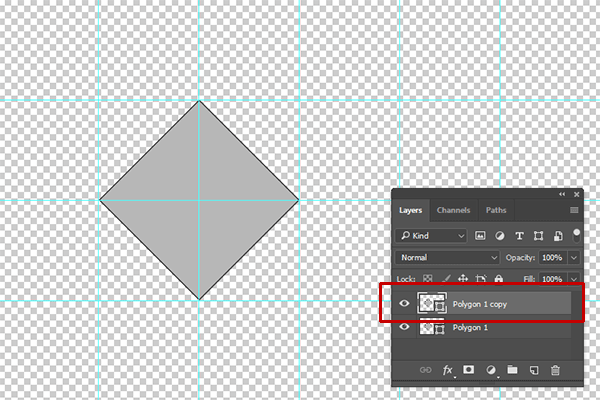
Duplicate the diamond/polygon shape by going to Layer> Duplicate Layer (or press Ctrl+J).
The Duplicate Layer dialog box.
The new polygon/diamond shape created.
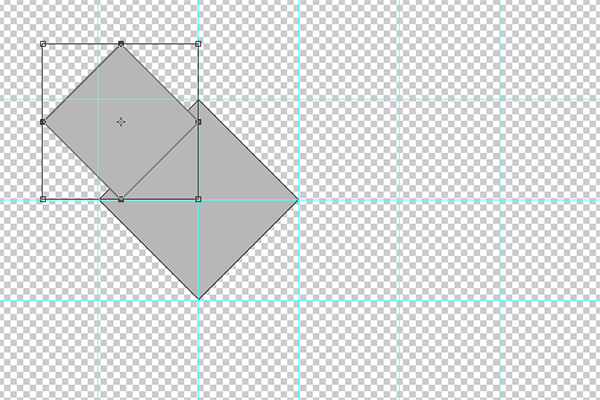
Then resize and reposition your duplicate shape layer using Edit> Free Transform.
You can edit the shape as follows:
- Move the shape by clicking and hold anywhere inside the shape and drag.
- Resize the shape by dragging any corner while holding down the Shift key to keep the shape does not distort.
- Rotate the shape by moving your cursor farther out from any corner until you see two arrows. Click and hold, then drag the shape.
- Press Enter key when you are done.
- Hide guides by going to View>Show>Guides.
8. Add drop shadow
Choose Layer> Layer Style> Drop Shadow.
In the Layer Style dialog box, set your desired angle, distance, and size. Click OK.
Now add a drop shadow to each polygon shape layer. You can copy drop shadow layer style to another layer by dragging the Drop Shadow layer style to the other layer--while pressing the Alt key.
Layer Style copied.
9. Insert image
Stocks for this Photoshop Collage tutorial: friendship-1081843, hiker-1082297, man-1527374, mountain-1436079, person-984059, photographers-1150033, shoes-1638873, walking-1694137.
Background: snow-1185474.
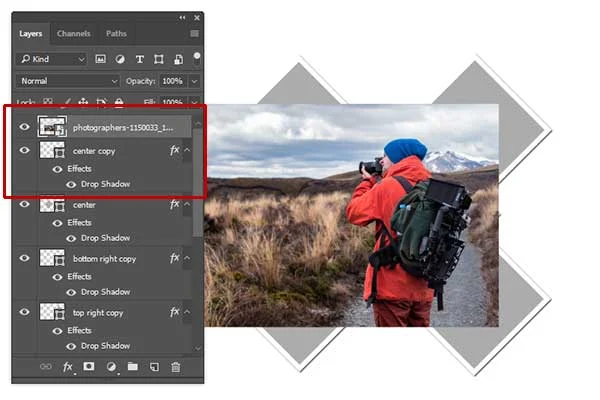
You must stack the image layer above the Polygon layer. Select the Polygon layer to which you want to insert a photo.
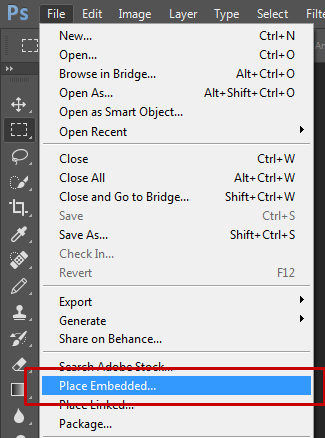
Go to File> Place Embedded to open the picture you'd like to insert.
In the Place Embedded dialog, navigate to the folder that contains your image file then select the name of the file you want to open. Click Place.
Image inserted.
You can now manipulate the image as follows:
- Resize the picture by dragging any corner while holding down the Shift key to keep the picture does not distort.
- Move the picture by clicking and hold anywhere inside the image and drag.
- Rotate the picture by moving your cursor farther out from any corner until you see two arrows. Click and hold, then drag the picture.
- Press Enter key when you are done.
10. Create clipping mask
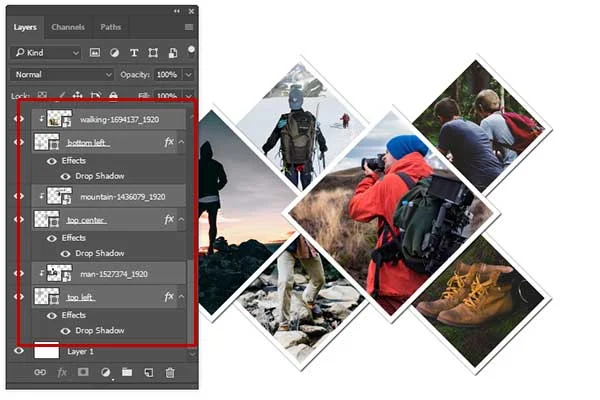
On the Layers panel, make sure the layers to be clipped are listed consecutively.
On the Layers panel, make sure the layers to be clipped are listed consecutively.
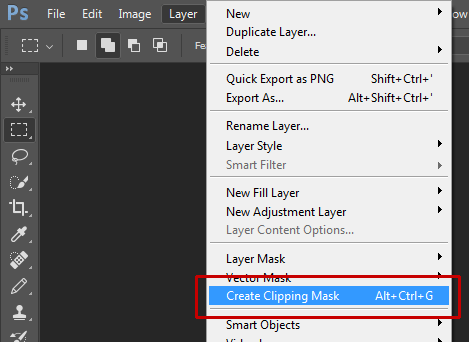
Click the image layer to be clipped, then choose Layer>Create Clipping Mask (or press Alt+Ctrl+G).
When layers are put into a clipping mask, the content of the bottommost layer (the Polygon layer), clips the layers above it (the image layer).
11. Insert all the images
Repeat steps 7 through 8 to open and manipulate each picture you'd like to insert.
12. Group all the diamond layers
While holding down the Shift key, click on all diamond layers.
All the diamond layers grouped.
13. Add background
If you'd like a background for your Collage, choose File>Place Embedded. Navigate to the folder that contains your background image file then select the name of the file you want to open. Click Place.
14. Save it!
Choose File>Save (or Ctrl+S) to save your project file. In the Save As dialog box, navigate to the folder where you want to store your project file. Type a name in the File Name text box and leave the default Photoshop (*.PSD;*.PDD) format. Click Save to store the project file.
Once you have finished, you will probably also want to use File>Save As (Shift+Ctrl+S) to export the image in a more widely used format, such as JPEG, PNG, TIFF, etc.
There you have it! Multi Diamond Collage in Photoshop.
There you have it! Multi Diamond Collage in Photoshop.















thanks
ReplyDeleteYou're welcome.
DeleteThanks!
ReplyDeleteIt's my pleasure.
DeleteHelpful.. TYSM
ReplyDeleteYou're very welcome.
Deletecan you please email me the template so dat i can place ma 4tos ryt away emai to 7788kavindu@gmail.com
ReplyDeleteDownload here http://bit.ly/35xdk60
DeletePlease like or subscribe to my youtube channel if you downloaded my work and liked this Photoshop tutorial. Thank you.
Thanks for this Nice photoshop tutorial.
ReplyDeleteGlad you liked it :)
Deletehi may i kindly have the Template download link
ReplyDeleteDownload here http://bit.ly/35xdk60
DeletePlease like or subscribe to my youtube channel if you downloaded my work and liked this Photoshop tutorial. Thank you.
Awesome sir, but I can not find download link..
ReplyDeleteYou can doownload it here http://bit.ly/35xdk60
DeleteI put the download link just below the youtube video
Fantastic... you are very generous! I have seen people charging for the template. Liked!
ReplyDeleteGlad you liked it :)
Deletethank u so much broo
ReplyDeleteYou're welcome :)
DeleteI ,CANT FIND THE DOWNLOAD BOTTOM
ReplyDeleteDownload the 4 Sided Polygon Photoshop Collage template here http://bit.ly/35xdk60
Deletethanks
ReplyDeleteYou're welcome. If you liked my work, please Subscribe to my Youtube channel. Thank you.
Deletethis is great , thank you so much.
ReplyDeleteGlad you liked it. Thanks for visiting.
Deleteyour work was mind-blowing it helps me a lot keep editing bro.....
ReplyDeleteThank you :)
Deletecant able to download this psd
ReplyDeleteBroken link fixed! Please try again. Thanks you.
Delete