In this Text Effects tutorial, we're going to learn how to make a simple gold text effect in Photoshop. This task is easy to do in Photoshop thanks to the power of Layer Style. We'll use Bevel & Emboss, Satin and Color Overlay Layer Style. Let's get started!
1. Create a new Document
Choose File> New command in the top menu or else just press Ctrl+N.
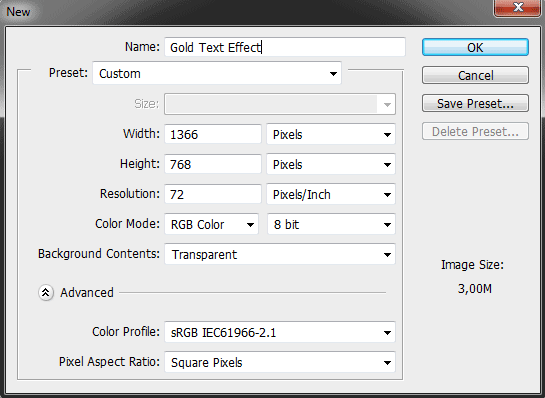
The standard New dialog box appears.
In the pop-up window, type a name in the Name field and enter the following information: Width 1366 pixels, Height 768 pixels, Resolution 72 Pixels/Inch, Color Mode RGB color, and Background contents Transparent or Black.
Click OK.
In the Layers panel, a layer with the default name of Layer 1 appears.
Create a new document.
In the Layers panel, a layer with the default name of Layer 1 appears.
2. Fill Layer with Black Color
We will fill the entire layer with black color.
Choose Edit>Fill or else just press Shift+F5.
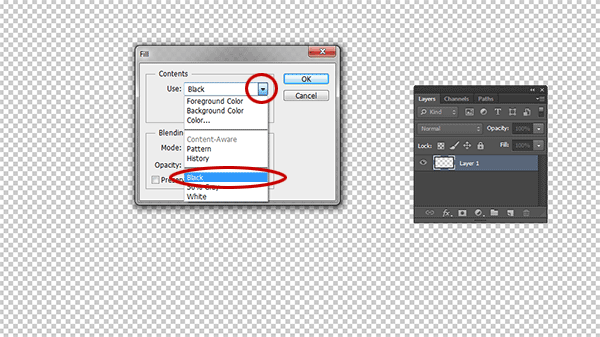
The Fill dialog box appears.
In this dialog box, under Contents, you can select whether to fill with the foreground or the background color.
Choose Black then click OK.
Now, the black color that you choose fills the layer.
The Fill dialog box.
The black color that you choose fills the layer.
3. Choose the Horizontal Type Tool
Select the Horizontal Type tool from the Tools panel, or else just press T.
There are four available type tools to choose from, the Horizontal Type Tool, the Vertical Type Tool, the Horizontal Type Mask Tool, and the Vertical Type Mask Tool.
Press Shift+T to cycle through the four available type tools until the one you want is active.
Your cursor will look like an I-beam, similar to the one you see in a word processing program.
Select type Options, such as font, style, size, and color, in the tool Options bar.
The Horizontal Type Tool.
Select type Options, such as font, style, size, and color, in the tool Options bar.
4. Type text on Document
Click on the part of the canvas where you want to add text in Photoshop then enter your text.
If you need to start a new paragraph, press Enter.
When finished, click the Commit button on the Options bar or you can just press Ctrl+Enter.
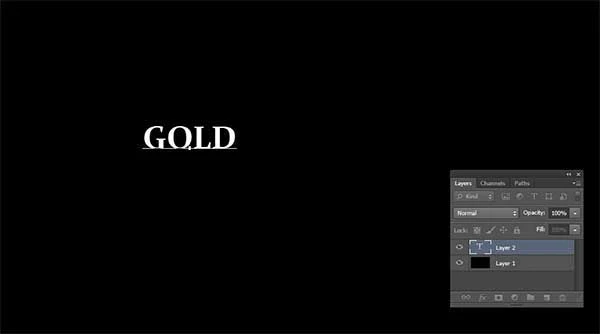
Photoshop creates a new type layer.
Now we have two layers, Layer 1 and the type layer.
Type text on Document. Now we have two layers, Layer 1 and the type layer.
5. Adjust Text Size Using Free Transform
Make sure the type layer is selected.
Choose Edit>Free Transform or else just press Ctrl+T.
A bounding box surrounds the contents of your text.
It has four control points on corners, four control points on sides and the rotation center at the middle.
You can now edit the text as follows:
- To move text: Drag inside the rectangle.
- To rotate text: Drag outside the rectangle's corner.
- To change text's size: Drag its corners.
- To Scale horizontally or vertically: Drag its sides.
- Hold-down the Shift key to keep the text does not distort.
- When finished, click the Commit button on the Options bar or you can just press Ctrl+Enter.
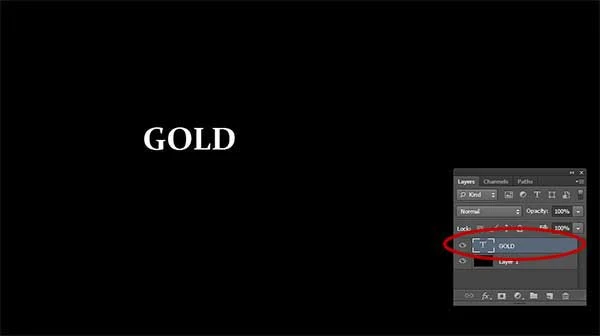
Adjust Text Size Using Free Transform.
6. Add Layer Style
Make sure the Text layer on the Layers panel is selected.
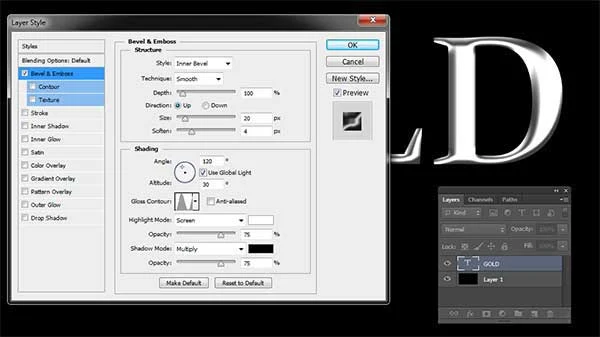
Go to Layer>Layer Style>Bevel & Emboss to open the Bevel & Emboss Layer Style dialog.
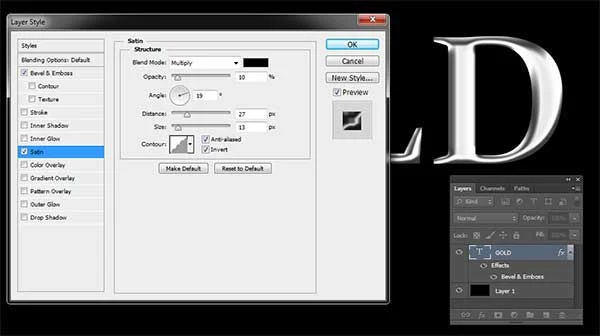
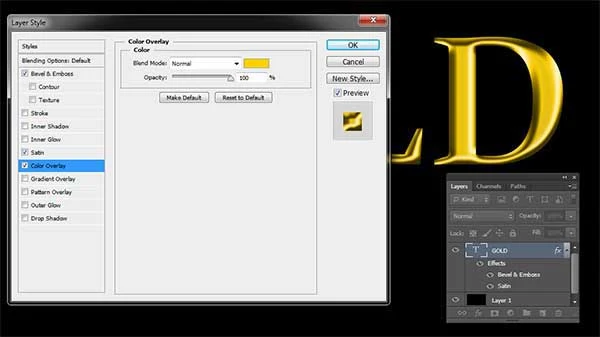
Apply the Bevel & Emboss, Satin, and Color Overlay style, using the settings below:
Bevel & Emboss:
Style: Inner Bevel
Technique: Smooth
Size: 20 px
Soften: 4 px
Gloss Contour: Ring
Satin:
Opacity: 10%
Distance: 27 px
Size: 13 px
Tick Anti-Aliased
Contour: Rounded Steps
Color Overlay:
Choose an orange color: #ffd100
Bevel & Emboss settings.
Color Overlay settings.
7. Duplicate the Text layer for Reflection
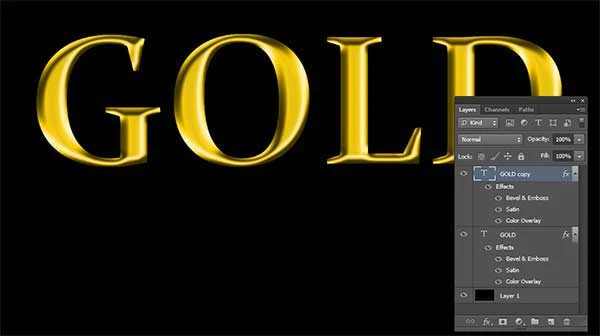
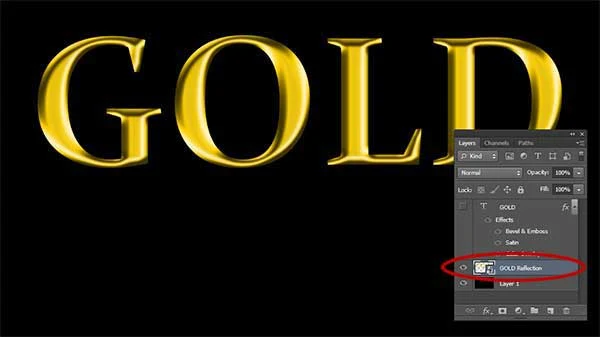
Duplicate the text layer by going to the top menu and choose Layer>Duplicate layer or else just press Ctrl+J.
In the Layers panel, a duplicate text layer with the default name of “your-text copy” appears above the original text layer.
Now we have three layers, Layer 1, the type layer, and the duplicate type layer.
You can rename the duplicate type layer with a new name like “Reflection”.
In the Layers panel, a duplicate text layer with the default name of “your-text copy” appears above the original text layer.
8. Convert the Duplicate Text Layer into Smart Object
Select the duplicate/reflection type layer on the Layers panel.
Choose Layer>Smart Objects>Convert to Smart Object.
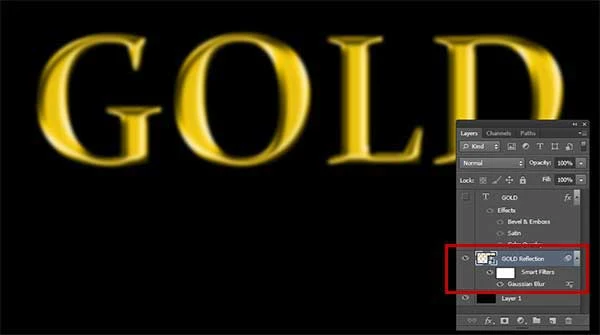
Convert the duplicate text layer into a smart object.
9. Apply Gaussian Blur to the Reflection Layer
Choose Filter>Blur>Gaussian Blur.
The Gaussian Blur dialog box appears.
In the dialog, tick the Preview checkbox, then move the Radius slider until the text starts to look smooth and blurry.
For this tutorial, I chose a Radius value of 4 pixels.
In the dialog, tick the Preview checkbox, then move the Radius slider until the text starts to look smooth and blurry.
Gaussian Blur filter applied.
10. Move The Reflection Down Below The Original Text
Select the Move tool from the Tools Panel.
Move the reflection text down below the original text.
With the Move tool chosen, do either of the following: drag the reflection text using your mouse or you can press the down arrow key to move the reflection text by one pixel at a time, or press Shift-arrow to move it by 10 pixels at a time.
The Move tool.
Move the reflection text down below the original text.
11. Flip Vertical the Reflection
Select the reflection layer on the Layers panel.
Choose Edit>Transform>Flip Vertical.
Flip Vertical.
12. Add Layer Mask to the Reflection Layer
With the text reflection layer selected, click the Add layer mask button at the bottom of the Layers panel or you can choose Layer>Layer Mask>Reveal All in the top menu.
A white layer mask thumbnail appears on the selected layer, revealing everything on that layer.
Click the Add layer mask button at the bottom of the Layers panel.
A white layer mask thumbnail appears on the selected layer.
13. Select the Gradient Tool
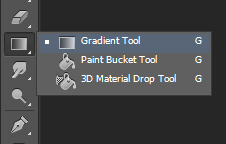
Select the Gradient Tool from the Tools panel, or else just press G.
There are three available tools to choose from, the Gradient Tool, the Paint Bucket Tool, and the 3D Material Drop Tool.
Press Shift+G to cycle through the six available shape tools until the one you want is active.
Choose Black to White color and Linear Gradient in the options bar.
The Gradient tool.
Choose black to White and Linear Gradient.
14. Create a Reflection
While holding the Shift key down, click and drag your mouse up and let go when you get near the top of your reflection (you’ll see a line drawing the gradient spread).
Adjust the reflection opacity on the Layers panel.
Access the Opacity slider by clicking the right-pointing arrow or entering a percentage value in the Opacity text box.
Adjust the reflection opacity on the Layers panel.
15. Save Your Document
Choose File>Save or else just press Ctrl+S to save your gold text effect project file.
The Save As dialog box appears.
Navigate to the folder where you want to store your project file.
Type a name in the File Name text box and leave the default Photoshop (*.PSD;*.PDD) format.
PSD is Photoshop's native format and is useful because it stores everything about your image and will allow you to later edit your image in Photoshop, in case you notice a problem.
Click Save to store the project file.
Once you have finished, you will probably also want to export the image in a more widely used format, such as JPEG, PNG, TIFF, etc.












No comments:
Post a Comment