Learn how to turn a picture into a Watercolor in GIMP. We'll create the watercolor effect using different textures and different layer's modes. Add the texture to canvas using Open as layers command and scale it using the Scale tool. Once you have arranged it to your satisfaction, you can play around with other Blend Modes.
1. Open your main image.
Choose File>Open... (Ctrl+O). Navigate through your folders in the Places panel and the Name panel until your images' name appears in the Name panel. Click the image you want to open. Click Open. For this GIMP tutorial, I'll use this image, 66940, downloaded from Pixabay.
2. Add a texture to the image.
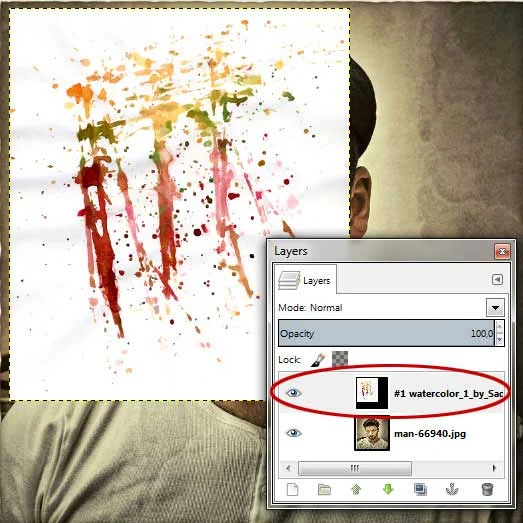
Use File> Open As Layers (Ctrl+Alt+O) to open the texture image you'd like to insert. The texture files source is taken from Lostandtaken. Click on the image, then click Open.
3. Adjust/Resize your texture
Make sure the texture layer is selected on the Layers dialog. Grab the Scale Tool from the toolbox by clicking the tool icon (or Tools>Transform Tools>Scale (Shift+S)). Click on the texture.
In the Scale dialog box, can set Width and Height you want to give to the texture or you can just drag handles in the texture.
If you prefer using handles, you can scale your texture as follows:
- Drag a side handle if you want to scale just the height or width of the texture.
- Drag a corner handle if you want to scale both the height and the width of the texture.
- Click the Scale button when you're done.
After finish resizing, you can move the texture using the Move Tool.
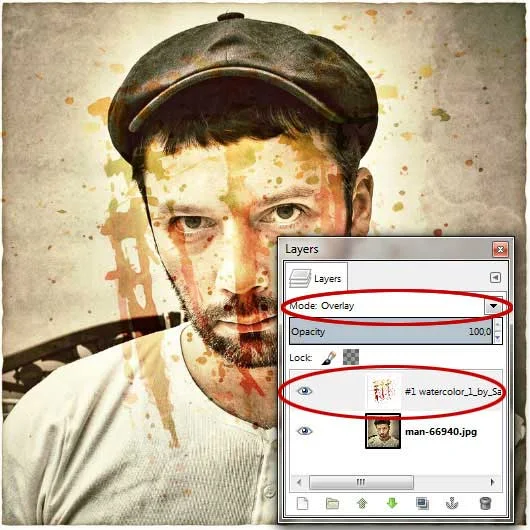
4. Change its mode to Overlay.
For this image, I'll change the texture layer blend mode to Overlay. Set its Opacity.
5. Add other textures.
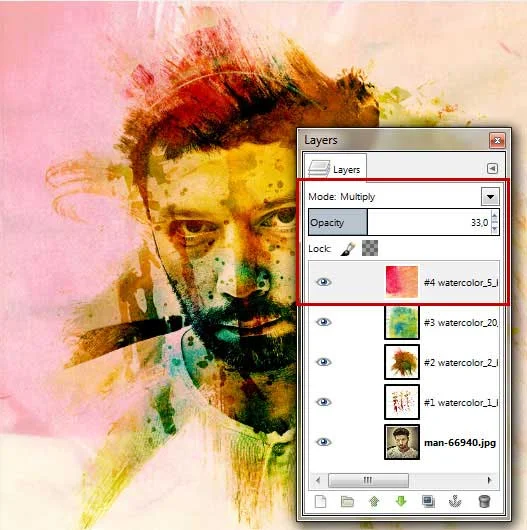
Repeat steps 2 until steps 4. Open (as layers) other textures, re-size it using the Scale tool, play/experiment with different blend mode, and set its Opacity.
Add a texture, scale it using the Scale Tool and change its mode to Lighten Only.
Add a texture, scale it using the Scale Tool and change its mode to Burn.
Add a texture, scale it using the Scale Tool and change its mode to Multiply.
Add a texture, scale it using the Scale Tool and change its mode to Subtract.
Ther you have it! How to Turn a Picture into a Watercolor in GIMP.
6. Save your project.
Use File>Save (or Ctrl+S). In the Save Image dialog box, navigate to the folder where you want to store your project file. Type a name in the Name text box and leave the default GIMP (*.XCF) format. XCF is GIMP's native format and is useful because it stores everything about your image and will allow you to later edit your image in GIMP, in case you notice a problem. Click Save to store the project file.
Once you have finished, you will probably also want to export the image in a more widely used format, such as JPEG, PNG, TIFF, etc.


No comments:
Post a Comment