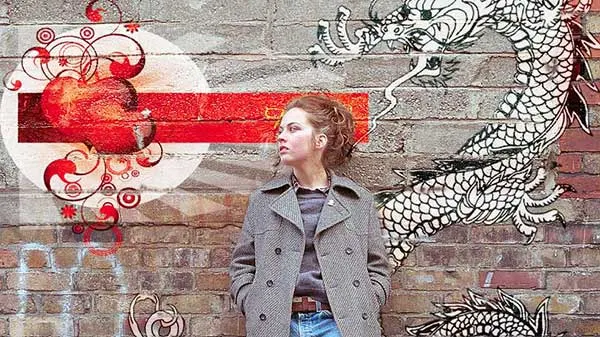
Simply just open vector files you want to use for the graffiti, then copy and paste to your desire image.
Adjust its size and position using Free Transform, add layer mask to the vector layer, chenge its blend mode to overlay and then use the Brush tool to remove the unwanted part of your vector.
Video: 5 Steps to Make Graffiti (Street Art) in Photoshop.
1. Prepare a Vector Image
If you don't have a vector image yet, please visit a website that provides free vector images such as vectoropenstock.com.We can download vector images on this website as long as they are not used for commercial purposes and provide a link to the source.
Download the vector image that you like then uncompress it using the Winzip, Winrar or 7zip application.
The vector images provided can be in EPS or AI format.
In fact, sometimes also included files with jpg format.
The photo source for this Photoshop tutorial is taken from the Microsoft Office Image site.
While the vector images are taken from the Vector Open Stock site.
2. Open the vector image using Photoshop
How to open an ai or eps file in photoshop.
Open the Photoshop application.
Press Ctrl+O, select your vector file then click the Open button.
If the file you open is in EPS format, a Rasterize EPS format dialog box will appear.
Next, please fill in the width, height and resolution.
You can fill in the resolution up to a maximum size of 999,999.
The higher the resolution, the greater the number of pixels in the image.
Then click the OK button.
But if the file you open is in AI format, the Import PDF dialog box will appear.
Click on Pages or Images.
Fill in the width, height and resolution, then click the OK button.
Open the vector file using Photoshop.
3. Remove the background of the vector image to make it transparent
Luckily, if the vector file that we download already has a transparent background, we can process it immediately.
But if the background of the image is not transparent, it means that we must first select the background and then delete it.
For the image I have, I will make a selection using the Magic Wand Tool on the background then press the Delete key on the keyboard.
4. Open the photo that will be used as the background
Press Ctrl+O to open the Open dialog box, click your photo file and then click the Open button.
Open your photo file.
5. Use the Move Tool to move the vector image to the background photo
Click the Move Tool icon.
Click the vector image then drag it to the background photo.
After the vector image has moved, Layer 1 will be formed.
Use Free Transform to adjust its size and position by pressing Ctrl+T.
You will see a Free Transform box surrounding the vector image.
To resize, click the corner of the Free Transform box and then drag it outward or drag it in while holding down the Shift key so that the image ratio is maintained.
Move the vector to the background photo.
Use Free Transform to adjust the size and position. Select Blend mode overlay or softlight.
6. Create a Mask and use a brush to erase the unwanted parts
Click Layer 1 to make sure it's active. Click the Create Layer Mask icon located at the bottom of the palette.
Next, reset the foreground/background color to the default black color by pressing the D key on the keyboard.
Then click the Brush Tool icon.
You can set the Soft Round brush and the hardness to 40%.
Click the layer mask box then brush the brush on the parts of the vector image that you want to get rid of.
In the photo I'm using, I'll be erasing the vector part that covers the woman's head and a few cracks in the wall for a natural graffiti effect.
Erase the unwanted parts using a layer mask and brush. The Create Layer Mask icon is circled in blue.
7. Repeat the steps above if you want to add another vector image
If the vector image is too strong you can reduce the percentage of opacity.
If it feels too transparent, click the vector layer and then duplicate it by pressing Ctrl+J.
Here are the results:
5 Steps to Make Graffiti (Street Art) in Photoshop.
More on Photoshop tutorial:


No comments:
Post a Comment