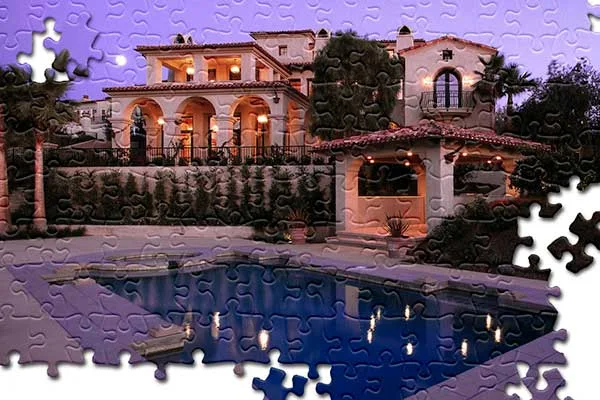
Learn how to create a jigsaw puzzle effects in Photoshop. We'll work with the jigsaw puzzle texture (Puzzle.psd), the Texturizer filter, the Pen Tool to create jigsaw pieces selection and Drop Shadow layer style to make this effect more realistic. Let's get started!
Step 1: Prepare the Puzzle.psd file
To make a puzzle using Photoshop, we need a Puzzle.psd file which we will use as a pattern in the Texturizer filter. If you don't have the Puzzle.psd file, please download the plugin first here: http://www.adobe.com/support/downloads/thankyou.jsp?ftpID=4688&fileID=4376.
Extract the file you have downloaded using WinZip or WinRar. Once extracted, open the PresetsTextures folder. You should find the Puzzle.psd file there.
Step 2: Open your photo
After opening the photo file by selecting the File>Open menu, unlock the background layer so that it can be edited by double clicking it while holding down the Alt key. Create a new layer for the background positioned below Layer 0. The trick while holding down the Ctrl key, click the Create a new layer icon. Double click then give the name background. Press the D key to reset the foreground/background color to default. Activate the background layer by clicking on it. Then Fill with white by pressing Ctrl + Backspace. The photo source for this Photoshop tutorial is taken from the Microsoft Office Images site.
Step 3: Apply Drop Shadow
Select menu Layer> Layer Style> Drop Shadow. Click the Drop Shadow checkbox. Next I'll fill it with 80% Opacity, 122 degree Angle, 8 pixels Distance and 9 pixels Size. Click OK.Step 4: Apply Texturizer Filter
Activate Layer 0 by clicking on it. Then select the Filter menu> Filter Gallery. Select the Texture folder then Texturizer. Click the arrow next to the Texture dropdown menu and then click Load Texture. Locate the Puzzle.psd file on your computer then click the Open button. I'll fill in Scaling:155%, Relief:5 and Light:Top. When finished click OK. Please adjust this setting according to your photo.
Step 5: Make Selections On The Jigsaws Pieces
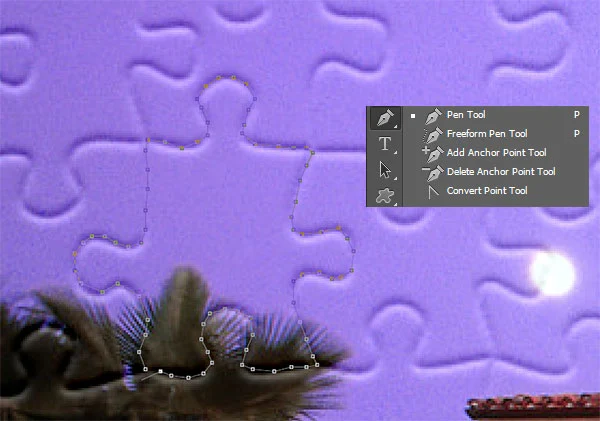
We will select a piece of jigsaws using the Pen Tool. Click the Pen Tool icon in the Tool Panel. On the options bar for the Pen Tool select Path.
Zoom your photo by pressing Ctrl+plus keyboard key.
Create a path using the Pen tool by following the path of a jigsaw piece. When finished creating the path, press Ctrl+Enter key to convert the path into a selection.
Step 6: Split Selection
Separate the selection into separate layers by pressing Ctrl+Shift+J. Use the Free Transform command to adjust its position on the photo. Press Ctrl+T to call Free Transform. To move the position of the jigsaw click inside the Free Transform box then drag it out. To tilt the jigsaw, hover the mouse cursor slightly above the corner of the Free Transform box. Once the cursor shape changes to a curved arc, drag the mouse slightly to tilt it. Press Enter when you're done with Free Transform.
Step 7: Edit the Drop Shadows
We see that Layer 1 already has the Drop Shadow effect that is built into Layer 0. I'm going to reduce the Distance Drop Shadow value a bit so the jigsaws don't look too floating. Double click on the Drop Shadow Text below Layer 1 to edit it.The Drop Shadow settings window will appear. I will change the Distance value to 6 pixels.
Step 8: Make Selections For The Other Jigsaws Pieces
Repeat step 5 to step 7 to make another jigsaw fragment. You can use the same technique to create a puzzle photo collage. You can give other backgrounds such as wood textures or table textures. The trick is to open your wood texture file, press Ctrl+A to select all images, press Ctrl+C to copy the image to the clipboard, then return to your puzzle photo, click the background layer to activate it then Paste the image by pressing Ctrl+V. Press Ctrl+T to resize the wood texture image to fit the size of your puzzle photo. There you have it! How to create a Jigsaw Puzzle Effects in Photoshop.

More on Photoshop tutorial:


No comments:
Post a Comment