

Learn How to Create a Silky Water Effect in Photoshop. To produce the Silky Water effect using Photoshop, the basic idea is to use a motion blur filter to blur the water flow. If the water flow is in the same direction, it will be easy to blur. But if the water flow has a different direction, then we have to make a selection on small parts of the water flow. So that we can provide motion blur filters more accurately.
Photo source for this Photoshop tutorial is taken from the site www.morguefile.com.
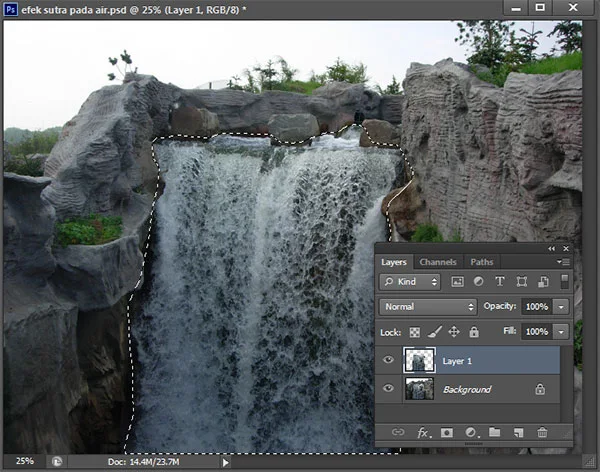
Step 1: Make an Outline Selection of the Water
After opening your photo using the File>Open menu, make a selection in the water flow area using the Polygonal Lasso Tool (L). Click the Polygonal Lasso Tool icon.

In the Option Bar, click the New Selection icon and fill in feather 10 pixels.

Make an outline selection on the water stream. Make sure the end point of the selection that we make meets the starting point of the selection. No need to worry about the boundary between water and rocks, because we will clean it using the Eraser Tool.

Step 2: Turn Selection Into Layers
After the end point of the selection that we made meets the starting point of the selection, the selection will turn into a dotted line.

Turn this selection into a separate layer, press the Ctrl+J key. Click Layer 1 to make sure it's active.

Step 3: Apply Motion Blur
The next step is to apply a motion blur filter to the waterfall. Because the selection is lost after creating Layer 1, show the selection again, press Ctrl+Click on the Layer 1 thumbnail. Select menu Filter>Blur>Motion Blur.
The Motion Blur dialog box will appear. Fill in the degree angle / Angle according to the direction of the water flow, check the preview checkbox and fill in the pixels distance you want. I'm going to fill in an Angle of 90 degrees and a distance of 40 pixels. Click OK.

Step 4: Clean Up Using the Erase Tool
Remove motion blur in unwanted areas like rocks. Click the Erase Tool icon.

Set the opacity in the options bar. I'm going to fill it with 80% opacity. Set the brush size using the open bracket keyboard keys [ to zoom out and the closing bracket ] to zoom in.

Swipe the mouse (click then drag) on the parts you want to get rid of the blur.

Step 5: Use Warp Transform (Optional)
If there is a winding direction of the water flow, we can use the Warp function. Select the Edit>Transform>Warp menu. Use the mouse to adjust the direction of the water bend. Press the Enter key when you are finished editing.

Step 6: Clean Up Using Liquify
The final step is to tidy up certain parts to make it look natural using the Filter>Liquify menu. The Liquify window will appear. Click the Forward Warp Tool (W) icon located at the top left of the Liquify window. Please set the Brush size and Brush pressure according to your needs. Then click and drag in certain parts of the water flow to make it look more natural. When finished click the OK button.

Save the project, select File>Save, give it a name and then click the Save button.
There you have it! How to Create a Silky Water Effect in Photoshop.
More on Photoshop tutorial:
No comments:
Post a Comment