Learn How To Make Graffiti Text Effect in Photoshop. Here's a tutorial How to Make Graffiti With Photoshop. After writing text on the wall texture, you can style the text. For 3-dimensional effects can be created by using the Move Tool. By pressing the Alt key and arrow keys simultaneously and repeatedly, we will get a 3-dimensional writing effect. And finally, for the blending mode we will use the Style blending options so that the font color we choose does not change.
Download the Photoshop graffiti effect project (PSD) file here.
Download the displacement file (PSD) here.
If you liked my tutorials, please subscribe to my YouTube channel - JTSGraph.
Steps to make graffiti in Photoshop:
1. Open wall texture.
For this Photoshop text effect tutorial I will download a photo of a wall texture for free on cgtextures.com, then select File> Open to load it into Photoshop.
2. Convert the wall's texture to Black and White.
Select Image>Adjustments>Desaturate, then you adjust the contrast using the Image>Adjustments>Levels command.
Please adjust the Input Levels slider until a good contrast is obtained.
3. Save Displace image.
Select File>Save As, name the file, in the format column select Photoshop then click the Save button. Please close your displacement file by selecting File>Close.
4. Prepare the fonts for graffiti.
The website dafont.com has many graffiti fonts that we can download for free. We can use this font to create a graffiti writing effect using Photoshop. After downloading the font we want, extract the file and then install it on the computer so we can use it in Photoshop.
Go to the dafont.com website, download the graffiti font you want. Once downloaded, extract the font if it is in the form of a zip file then install it. How to install, using windows explorer, right-click the font file and click Preview. In the preview window, click the Install button.
5. Reopen the wall texture.
Close the Photoshop application first, then reopen the Photoshop application so that the font we just installed is read by Photoshop. Reopen the photo of the wall texture.
6. Type the text.
Click the Horizontal Type Tool icon.
Choose a font type, font size, and font color, then click on the canvas and type your text.
Press Ctrl+Enter when you are finished typing.
7. Add Style.
I'm going to add a stroke to the text twice. Select Layer>Layer Style>Stroke. Fill in the Size and color then click OK. Next, convert the text into a smart object, by selecting Layer> Smart Objects> Convert to smart object. Reapply the stroke with Layer>Layer Style>Stroke.
8. Transform with perspective.
Before you can apply a perspective transform, first convert the text layer into a smart object. Select Layer>Smart Objects>Convert To Smart Object. Then select Edit>Transform>Perspective.
9. Add 3D effect.
Click the Move Tool icon.
Then while holding down the Alt key, press the up arrow key about 15 times to give it a 3-dimensional effect.
Next while holding down the Shift key, click the 2nd to 15th duplicate text layers, then choose Layer>Merge Layer.
10. Apply a gradient overlay.
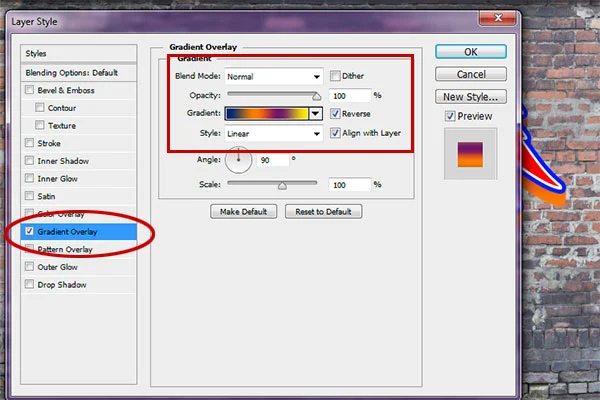
Click the second text layer, select Layer>Layer Style>Gradient Overlay. Please set the gradient overlay color you want.
Gradient Overlay for the second text layer.
11. Merge both text's layers.
While holding down the Shift key, click both text layers, then choose Layer>Merge Layer.
12. Apply Displace.
Select Filter>Distort>Displace. Fill in the horizontal scale and vertical scale then click OK.
Next you will be asked to choose a displacement file. Please select the displacement.PSD file that we created before.
13. Adjust color blending.
Select Layer>Layer Style>Blending Options. In the Blend If column, fill in Gray. Then move the Underlying Layer slider until the appropriate blending is obtained. Up here we have finished our graffiti effect.
There you have it! How To Make Graffiti Text Effect in Photoshop.


No comments:
Post a Comment