Learn how to make a Wedding Photo Collage Template in Photoshop with a four-panel shape. First, create a new document as a template so that we can reuse this document over and over, then display a grid to make it easier to create panel shapes. Next is to make a shape using four rounded rectangle tool. Finally, copy your photo just above the shape layer then create a clipping mask. Let's get started!
If you liked my tutorials, please subscribe to my YouTube channel - JTSGraph.
For the purposes of this Photoshop collage tutorial I used the following photos downloaded from Pixabay: bride-458119, engagement-519811, ring-260892, wedding-458102, wedding-663213.
Steps to make a wedding collage in Photoshop:
1. Create new document.
Choose File>New (or Ctrl+N). I will create a document with a size of width: 3000 pixels, height: 3000 pixels, resolution: 300 Pixels/Inch, Color Mode: RGB Color and Background Contents: White. Click OK.
2. Show the Grid.
Now we will display the Grid to assist us in arranging the collage boxes symmetrically. Showing the Grid in Photoshop is very easy, choose View>Show>Grid (or Ctrl+'). Choose View>Snap (or Ctrl+Shift+;). The Snap command will make it easier for us to arrange collage boxes. Check out the tutorial on how to create a Grid here.
3. Adjust the Grid.
Open Grid preferences to set the grid size, by selecting Edit>Preferences>Guides, Grid & Slices. I will set the “Gridline every” column to 5 percent and the “Subdivision” column to 1.
4. Draw shapes.
Grab the Rounded Rectangle tool icon on the toolbar.
In the options bar, select Shape, select the Fill color and stroke size.
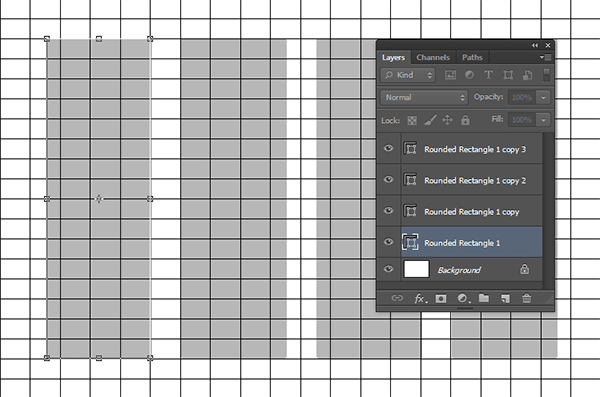
By looking at the grid help box, please click-drag to create a shape.
Create another shape. A layer will be formed for each shape. For each shape we created in the document, Photoshop will automatically create the shape layer. When you're done creating shapes, you can remove the grid by selecting View>Show>Grid.
5. Adjust each shapes using Free Transform.
Click a shape layer, then choose Edit>Free Transform (or Ctrl+T). You will see a Free Transform help box around your shape. Please set the position and size as follows:
- Please use the arrow keys or click-drag with the mouse to adjust the position.
- To increase the size of the shape, while holding down the Shift key, click the Free Transform guideline and then drag it out.
- Meanwhile, to reduce the size of the shape, while holding down the Shift key, click the Free Transform guideline and then drag it in.
- Hold down the Shift key to keep the shape size proportional.
- Or you can also click on the corner of the Free Transform box and then drag it in or out without pressing the Shift key.
- Press Enter key to commit Free Transform.
You can remove the grid by selecting View>Show>Grid menu.
6. Add stroke.
You can add a stroke by clicking on one of the Rounded Rectangle layers then clicking the Rounded Rectangle Tool on the tool panel, then on the option bar select the stroke color and stroke size. Do the same for each shape.
7. Add Drop Shadow.
We will give a 3D effect by giving a shadow effect or Drop Shadow. Click on one of the Rounded Rectangle layers then select Layer > Layer Style > Drop Shadow. For this drop shadow effect I'm going to fill it with an Angle of 120 degrees, a Distance of 5 px and a Size of 5 px. Click the OK button.
Now your Rounded Rectangle layer has a drop shadow effect. Do the same for each Rounded Rectangle layer.
8. Group layers.
To make it easier to position and duplicate the Rounded Rectangle layer, we will group the four layers. While holding down the Shift key, click the entire layer and then select the Layer menu>Group layers.
9. Insert image.
Start loading the photos into the document to compose your collage. Select the layer (rounded rectangle) that you want to insert the photo into. Select File>Place to open the photo you want to insert. Click on the photo, thenthen click the Place button. Your photo will appear in the document with a Free Transform box around it.
You can edit photos in the following ways:
- Resize the photo by clicking-drag on the corner of the Free Transform box while holding down the Shift key to keep the photo size proportional.
- To move a shape, click-hold on the image then drag it to the position you want.
- Rotate the photo by moving the mouse away from one corner until you see two arrows. Click-hold, then drag.
Press the Enter key when finished.
10. Create Clipping Mask.
Choose Layer>Create Clipping Mask (or Alt+Ctrl+G).
11. Insert another images.
Repeat steps 10 and 11 to insert all your photos into the document.
12. Add background's image.
Click the Background layer then select File>Place, select a photo for the background then click the Place button. Please set the size and position in the document, then click the Ctrl+Enter button.
13. Save document.
Save the wedding photo collage project that you have created by selecting the File>Save command (or Ctrl+S). In the "Save in" drop-down menu above, please browse to the folder location to save the file location, in the "File name" column, type the file name of your wedding photo collage project then press the Save button.
Don't forget to save your project in PSD document format so we can edit it later.
If you want to upload to social media or for other purposes, select the File menu> Save As and save the photo in JPG or PNG format.
There you have it! Wedding Photo Collage Template in Photoshop.


No comments:
Post a Comment