Learn how to make a Photo Collage with Polaroid Effect in Photoshop. We will use the rectangle marquee tool selection tool. To form a photo frame, create a frame-shaped selection on a separate layer, then fill the border with white. Then give an emboss or drop shadow style. Adjust its position in the photo using Free Transform. Next we just need to duplicate the layers of the frame and adjust each position using Free Transform. As for the background, you can choose a table photo or just create an empty layer and fill it with black.
If you liked my tutorials, please subscribe to my YouTube channel - JTSGraph.
Steps to make a collage with polaroid effect in Photoshop:
1. Open photo then create a new layer.Select File>Open, select your photo then click Open. Duplicate the layer if you want to back up your photo by pressing the keyboard keys Ctrl+J (or Layer>Duplicate Layer).
Remove the visibility option Background. We'll be working with a Background copy. Next create a new layer by selecting the menu Layer> New Layer (or Shift + Ctrl + N).
The photos used for this Photoshop collage tutorial I took from Pixabay.com.
2. Grab the Rectangular Marquee tool.
Click the Rectangular Marquee Tool icon. In the options bar, click the Add to selection icon.
3. Make selection with photo frame.
With the active Layer 1 position, click the photo and then drag to form a selection in the form of a photo frame.
Then make a second selection in the first selection box.
Next Fill the selection area using white by selecting Edit> Fill. In the fill box, click the Use dropdown, select white, then click OK. Now you have a frame with a white border. Press Ctrl+D to deselect.
4. Add Bevel or Drop Shadow.
Give a layer style to our photo collage. Select Layer>Layer Style>Blending Options. Please check Bevel & Emboss then click the OK button.
5. Adjust frame position using Free Transform.
Use Free Transform, press the keyboard keys Ctrl+T (or Edit>Free Transform). Use the mouse to adjust the Free Transform box. Press Enter when you are satisfied with setting your frame position.
6. Duplicate the frame layer then arrange using Free Transform.
Duplicate the layer by pressing Ctrl+J (or Layer>New>Layer via copy). Use Free Transform to adjust the frames.
7. Erase the inside of the frame with the Eraser Tool.
Click the Eraser Tool icon.
To make deletion easier, you can disable the visibility option of all frame layers, then enable them one by one while deleting them.
8. Make Selection And Masking.
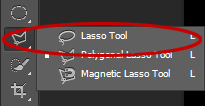
Grab The Polygonal Lasso Tool.
Make sure Background is active. Make a Selection Using the Polygonal Lasso Tool around all the frames then go to Layer>Layer Mask>Reveal Selection to create a mask.
9. Add Photo Background.
Select File>Open to open the background photo.
Then select Select>All, then Edit>Copy. Go back to our photo frame then select Edit> Paste. Please set the size and position using Free Transform.
There you have it! Photo Collage with Polaroid Effect in Photoshop.


No comments:
Post a Comment