

In today’s tutorial, I’m going to take you through the process of creating a custom shape contact sheet in Photoshop. A contact sheet is an arrangement of image thumbnails that is a useful way to catalog images. With contact sheet, we can automatically place multiple images in a grid. One of the tasks Photoshop can perform is the ability to make contact sheets of multiple images and print them to your printer or save them as files that can be used later.
Want to do it instantly without Photoshop?
Using our Free Online Contact Sheet Generator below, you can select an entire folder of images, and it will instantly generate a high-resolution grid. Your original files remain untouched and completely secure, as everything is processed locally right inside your browser. Try it out now!
If you liked my tutorials, please subscribe to my YouTube channel - JTSGraph.
Steps to make a custom contact sheet in Photoshop:
1. Create two folders.
Start the Windows Explorer then create a folder by clicking the New Folder button at the top. The new folder appears, with blue highlighted text. Type a new name for that folder (like “source”) then press Enter. Create two folders. One folder for the source images (you can name it “source”) and another one for the custom/modified images (name it “resized & cropped”).

2. Copy your source images.
Use the Navigation pane on the left to navigate to a location on your computer where you have some images. Select the ones you want to add to your new folder. Once you have selected your images, right click on any of them. From the menu that appears select Copy. Now navigate back to the “SOURCE” folder you've just created. Double click the “SOURCE” folder to move inside of it. Right-click anywhere inside of the big white area and from the menu, select Paste. The images will be copied and pasted over to the “SOURCE” folder.

3. Open an image.
Choose File>Open to open an image.

4. Create a new action.
Select Windows>Actions or Alt+F9 to open the Action panel. The New Action dialog box appears. Named the Action "Images-Crop", set to Default Actions then click the Record button.


5. Resize the image.
Choose Image> Image Size to perform the operations to resize the image. Enter the new Width and Height then click OK.

6. Crop the image.
Grab the Crop Tool from the Tools bar then perform the operations to crop the image.

In the Options bar choose 1x1 (square).
.")
You can drag mouse to move the cropped area then press Enter or click Commit button.

7. Create custom shape.
Choose Layer>New>Layer from Background to unlock the Background Layer.

Grab the Custom Shape Tool.

Make sure Shape is selected.
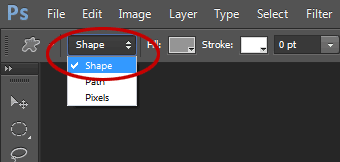
In the Options Bar, choose a Shape you like.

Drag over the image to draw shape.

Move the shape layer down below the image's layer.

Click the image's layer then create clipping mask by going to Layer>Create Clipping Mask.

8. Save image.
Choose File>Save As to save the modified image in the "Modified" folder. The Save As dialog box appears. Navigate to the “Modified” folder where you want to store the file. Type a name in the File Name text box. Click Save to store the image.

9. Stop recording the action.
Stop recording by clicking the Stop Playing/Recording button.

Close the image. You can just delete the modified image.

10. Create custom shape images using batch processing.
Go to File>Automate>Batch. Choose the Images-Crop Actions you created earlier.

Choose the images source folder.

Choose the destination folder. Check "Override Action Save As Command".

Type the file naming. Choose Document Name and Extension. Click OK.

Wait for a moment until Photoshop finishes modifying your images. You can see the results in your Destination folder.

11. Create custom contact sheet.
Choose File > Automate > Contact Sheet II. Choose your source folder (your modified images). Choose Width, Height, and Resolution values for the contact sheet file. Uncheck Flatten All Layers to have the command create a separate image layer (with a mask) for each image. Choose across first and the desired number of Columns and Rows. Click OK.
Please wait, while Photoshop opens each image and creates the contact sheet.

There you have it! How to Make a Custom Shape Contact Sheet in Photoshop.
11. Save your document.
Choose File>Save or else just press Ctrl+S to save your contact sheet project file. The Save As dialog box appears. Navigate to the folder where you want to store your project file. Type a name in the File Name text box and leave the default Photoshop (*.PSD;*.PDD) format.PSD is Photoshop's native format and is useful because it stores everything about your image and will allow you to later edit your image in Photoshop, in case you notice a problem. Click Save to store the project file.
Once you have finished, you will probably also want to use File>Save As (Shift+Ctrl+S) to export the image in a more widely used format, such as JPEG, PNG, TIFF, etc.
See also other Photoshop Collage tutorials:
Great job, it helped me so much;)
ReplyDeleteGlad you liked it :) thanks
Delete