Learn how to create selective coloring in Paint.NET. We'll begin by duplicating the image layer, desaturate the duplicate layer using Black and White Adjustments, remove parts of the active layer using the Eraser tool, adjust brightness/contrast using brightness/contrast adjustments, adjust hue/saturation, and add noise to the image.
If you liked my tutorials, please subscribe to my YouTube channel - JTSGraph.
Steps to make a seletive coloring in Paint.NET:
1. Open Image
Launch Paint.NET, then go to File>Open... (Ctrl+O) to open your image. In the Open dialog, use the Navigation pane on the left to navigate to a location on your computer where you have your images. Click the image you want to open, then click Open.
The opened image displayed in the Editing Window. For this Paint.NET tutorial, I'll use this image, stockvault-dahlia-flowers116760, downloaded from Stockvault.
2. Duplicate Layer
Choose Layers>Duplicate Layer or else just press Ctrl+Shift+D. In the Layers window, a duplicate layer with the default name of Background appears above the original Background layer. Double-click the duplicate layer in the Layers window or choose Layers>Layer Properties (F4). The Layer Properties dialog appears.
Type a new name for the duplicate layer, like “Black & White”, in the Name textbox.
3. Desaturate Image
Apply Black and White adjustments to the Black & White layer. Select the Black & White layer in the Layers Window. Choose Adjustments>Black and White or else just press Ctrl+Shift+G. The Black & White layer now rendered in grayscale.4. Grab the Eraser Tool
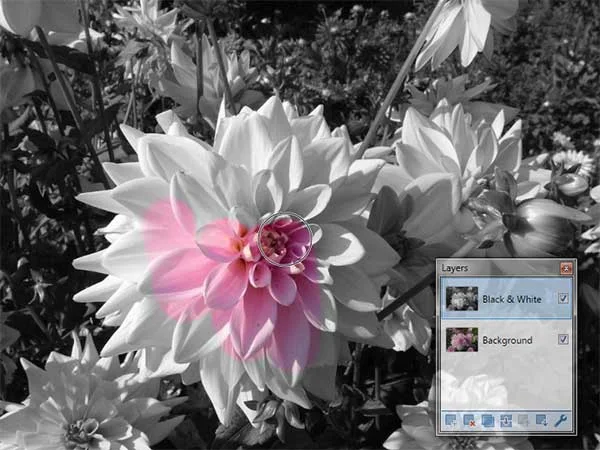
Remove parts of the active layer using the Eraser tool. Select the Eraser Tool from the Tool Window or else just press E. Choose Brush width on the Options Bar.
5. Zoom Image
Zoom your photo by choosing View> Zoom In or else just press Ctrl++. Zooming in or enlarging an image is useful if you need to work with high precision.6. Strokes using the Eraser Tool
We'll use the Eraser Tool to remove parts of the active layer (the black & white layer) and resulting the portions of the Black & White erased will allow lower layers to show through. Using your mouse, apply brush strokes to the layer to reveal some of the underlying images.7. Adjust Brightness / Contrast
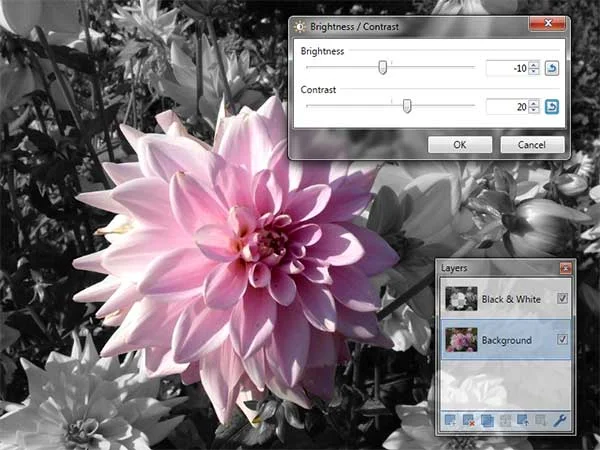
Select the Background layer in the Layers Window. Adjust the brightness/contrast of the Background layer using the Brightness / Contrast adjustments. Choose Adjustments>Brightness / Contrast or else just press Ctrl+Shift+T. The Brightness / Contrast dialog appears. Drag the Brightness slider to the left to darken the image. Drag the Contrast slider to the right to increase the contrast. Click OK.
8. Adjust Hue / Saturation
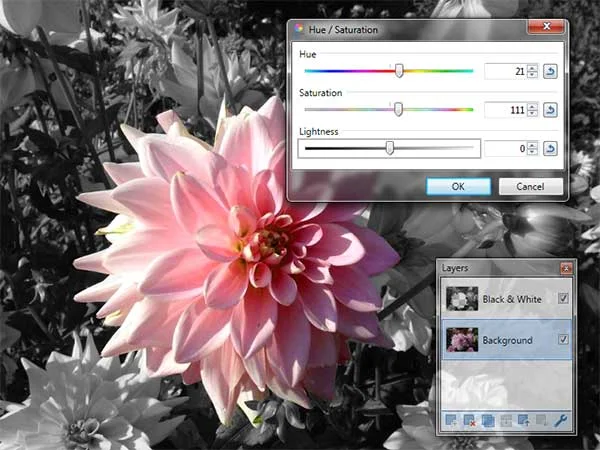
Change the saturation of the colors in the Background layer using the Hue/Saturation adjustments. Choose Adjustments>Hue/Saturation or else just press Ctrl+Shift+U. The Hue/Saturation dialog appears. Drag the Hue and Saturation slider slightly to the right or left to get a more vivid image. Click OK.The Add Noise dialog appears. Drag the Intensity slider slightly to the left and Color Saturation to 0. Click OK.
There you have it! Selective Coloring in Paint.NET.
10. Save Document
Choose File>Save command in the top menu or else just press Ctrl+S to save your project file. The Save As window appears. Navigate to the folder where you want to store your project file. Type a name in the File name text box and leave the default Paint.NET (*.pdn) format. Pdn is Paint.NET's native format and is useful because it stores everything about your image and will allow you to later edit your image in Paint.NET, in case you notice a problem. Click Save to store the project file.Once you have finished, you will probably also want to export the image in a more widely used format, such as JPEG, PNG, TIFF, etc.
More on Paint.NET Tutorials:


No comments:
Post a Comment