In this tutorial, I'll show you how to sharpen an image in Paint.NET. Every digital photo needs some amount of sharpening because any digital camera always blurs an image to some extent. That's why sharpening an image is something every photographer has to learn. Sharpening will make the image look crisper and making the edges more distinct. It all depends on the file and the final medium.
If you liked my tutorials, please subscribe to my YouTube channel - JTSGraph.
Steps to sharpen an image in Paint.NET:
1. Open Image in Paint.NET
Go to File>Open... (or Ctrl+O) to open your image. In the Open dialog, use the Navigation pane on the left to navigate to a location on your computer where you have your images. Click the image you want to open, then click Open. The opened image displayed in the Editing Window.
2. Duplicate the image's layer
Choose Layers>Duplicate Layer (or Ctrl+Shift+D). In the Layers window, a duplicate layer with the default name of Background appears above the original Background layer. Double-click the duplicate layer in the Layers window or choose Layers>Layer Properties (F4).
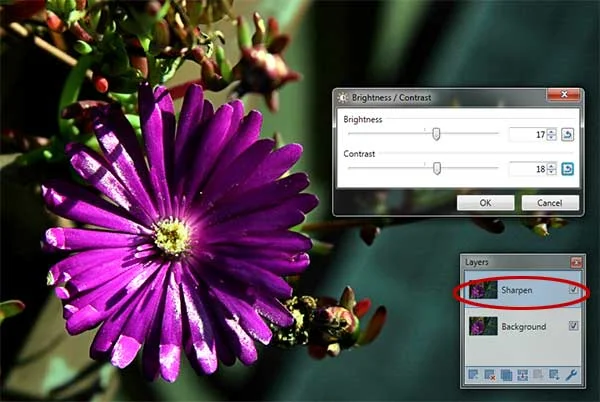
In the Layer Properties dialog, type a new name for the duplicate layer, like “Sharpen”, in the Name textbox. We will apply the Sharpen effect to this duplicate layer.
3. Adjust brightness / contrast
Select the Sharpen layer in the Layers Window. Adjust the brightness/contrast of the Sharpen layer using the Brightness / Contrast adjustments. Choose Adjustments>Brightness / Contrast (or Ctrl+Shift+T). In the Brightness / Contrast dialog, drag the Brightness slider to the right to brighten the image.Drag the Contrast slider to the right to increase the contrast. Click OK to apply them to the image.
4. Apply sharpen
Choose Effects>Photo>Sharpen. In the Sharpen dialog, drag the Amount slider slightly to the right until you are happy with the result. Click OK. If you're still not happy with the result, you can quickly undo a step at any time by going to Edit>Undo (or Ctrl+Z). Experiment with different values and discover values that work best for your image.
There you have it! Sharpen an image in Paint.NET.
5. Save document
Choose File>Save (or Ctrl+S) to save your project file. In the Save As window, navigate to the folder where you want to store your project file. Type a name in the File name text box and leave the default Paint.NET (*.pdn) format. Pdn is Paint.NET's native format and is useful because it stores everything about your image and will allow you to later edit your image in Paint.NET, in case you notice a problem. Click Save to store the project file.Once you have finished, you will probably also want to export the image in a more widely used format, such as JPEG, PNG, TIFF, etc.
More on Paint.NET Tutorials:


Although I duplicated the photo,I could not get either the properties or the "sharpen " box to appear
ReplyDeleteyou have to go to effects
ReplyDelete