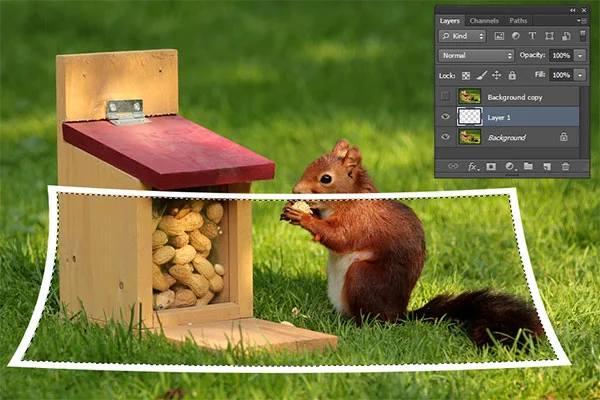
In this tutorial, I'll show you how to create an out of frame photo collage from multiple images in Photoshop. We will use the Rectangular Marquee Tool and the Quick Selection Tool to create selections, adding a stroke to it to create a frame border, Free Transform to adjust frame perspective and folded effect, drop shadow, and a layer mask.
For this Photoshop Collage tutorial, I'll use images that I downloaded from Pixabay.
Background photo https://pixabay.com/en/stone-floor-old-textured-vintage-701919/
Squirrel 1 photo https://pixabay.com/en/animal-squirrel-sciurus-bird-meal-927904/
Squirrel 2 photo https://pixabay.com/en/animal-squirrel-sciurus-foraging-927929/
Step 1: Open Image
Choose File>Open or else just press Ctrl+O to Open up your image in Photoshop. In the Open dialog box, navigate to the folder that contains your file then select the name of the file you want to open. If your file does not appear, try to view all files by selecting All Formats from the Files of type list. Click Open.
Step 2: Create New Layer
Create a new layer for the frame by choosing Layer>New>Layer or else just press Shift+Ctrl+N. The New Layer dialog box appears allowing you to name your layer and specify other options. Leave the default settings and click OK.
In the Layers panel, a layer with the default name of Layer 1 appears above the Background layer.
Step 3: Draw Rectangle Selection
Grab the Rectangular Marquee Tool by selecting it from the toolbar on the left. There are four available tools to choose from, the Rectangular Marquee Tool, the Elliptical Marquee Tool, the Single Row Marquee Tool, and the Single Column Marquee Tool. Press Shift+M to cycle through the four available marquee tools until the one you want is active.
Drag mouse in the document window to draw a rectangular selection. To keep the rectangular selection doesn't distort, drag the mouse in the document window while holding down the Shift key.
Step 4: Add Stroke
Choose Edit> Stroke. In the Stroke dialog box, enter a value for the stroke size in the Width textbox.
Click the Color box and choose a white color, and click Inside for Location. Click OK. Now you can remove the selection by choosing Select>Deselect or else just press Ctrl+D.
Step 5: Adjust Using Free Transform
Select Layer 1 on the Layers panel. Adjust the frame size and position using Free Transform. Choose Edit>Free Transform or else just press Ctrl+T to invoke Free Transform command. Resize the frame by dragging any corner while holding down the Shift key to keep the frame does not distort. Press Enter key when you are done.
Step 6: Adjust Perspective
Adjust the frame perspective using Edit>Transform>Perspective command. Change the frame perspective by dragging any corner to wherever you like. Press Enter key when you are done.
Step 7: Warp the Frame
You can warp the frame using Edit>Transform>Warp command. Warp the frame by dragging any corner to wherever you like. Press Enter key when you are done.Step 8: Duplicate the Background Layer
Select the Background layer on the Layers panel. Duplicate the Background layer by going to the top menu and choose Layer>Duplicate layer or else just press Ctrl+J. In the Layers panel, a duplicate layer with the default name of Background copy or Layer 1 appears above the Background layer.
Drag the duplicate layer (Background copy or Layer 1) to the top position.
Hide the Background copy layer by clicking on the eye icon on the left.
Step 9: Draw Selection Inside the Frame
Grab the Magic Wand Tool by selecting it from the toolbar on the left. There are two available selection tools to choose from, the Quick Selection Tool and the Magic Wand Tool. If the Magic Wand Tool is not visible, press Shift+W to cycle through the two available selection tools until the one you want is active.
In the Options bar, select Point Sample, Tolerance: 5, Tick Anti Alias and Contiguous.
Select the frame layer (Layer 1) on the Layers panel.
Click inside the frame to create a selection. The selection line will be visible inside the frame.
Select the frame layer (Layer 1) on the Layers panel.
Click inside the frame to create a selection. The selection line will be visible inside the frame.
Step 10: Add Layer Mask
Select the Background layer on the Layers panel then choose Layer>Layer Mask>Reveal Selection. Or you can click the Add Layer Mask icon located at the bottom of the Layers panel.
Step 11: Main Object Selection
Select the duplicate Background layer. Click the eye icon on the left to enable its visibility. Now, create a selection using the Quick Selection Tool.
In the Tools panel, select the Quick Selection tool or else just press W. There are two available tools to choose from, the Quick Selection Tool and the Magic Wand Tool. Press Shift+W to cycle through the two available tools until the one you want is active.
Start making a selection by dragging the cursor in a part of the area you want to select. You will see a line of marching ants appear around the object. Keep adding to it by continuing to drag the cursor within the area. To deselect areas, hold the Alt key as you drag the cursor around the area you want to remove from the selection.
Use the Refine Edge to refine the selection by choosing Select> Refine Edge. Tick Smart Radius checkbox and click refine radius icon and then adjust the slider tool radius. Click OK.
Step 12: Create Masking For Main Object
Choose Layer> Layer Mask> Reveal Selection. Your background will disappear, showing only the areas you’ve selected.
Step 13: Group Layers
Hold the Shift key as you click on all layers.Then choose Layer>Group Layers.
Step 14: Add Background
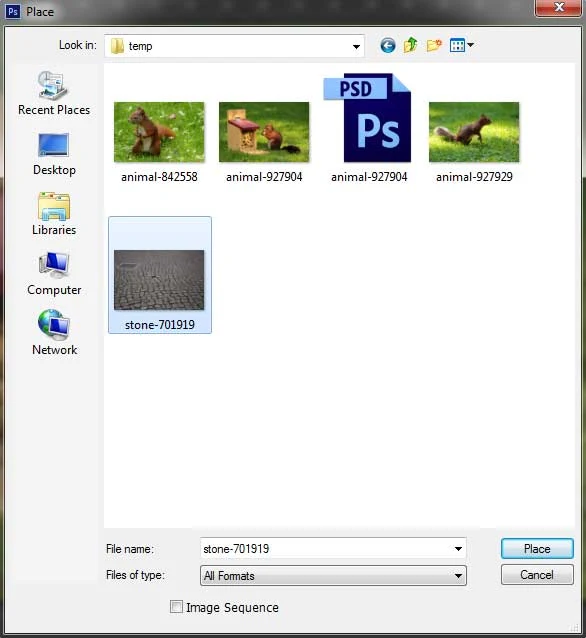
If you'd like a background image, choose File> Place. In the Place dialog box, navigate to the folder that contains your file then select the name of the file you want to open and then click the Place button.
Move this background to the bottom position.
Move this background to the bottom position.
Step 15: Add Drop Shadow
Select Layer 0 on the Layers panel. Go to Layer>Layer Style>Drop Shadow. In the Layer Style dialog box, choose a Distance value (in pixels) by which you want the shadow to be offset from the edge of the frame. Choose a Spread value (in percentage) to control where the shadow begins to fade. Choose an overall size value (in pixels) for the shadow.
Step 16: Save Document
Choose File>Save or else just press Ctrl+S to save your project file. In the Save As dialog box, navigate to the folder where you want to store your project file. Type a name in the File Name text box and leave the default Photoshop (*.PSD;*.PDD) format. Click Save to store the project file. Once you have finished, you will probably also want to use File>Save As (Shift+Ctrl+S) to export the image in a more widely used format, such as JPEG, PNG, TIFF, etc.
There you have it! Out of frame photo collage in Photoshop.


stock image link plz
ReplyDeleteHere are the links:
DeleteBackground photo https://pixabay.com/en/stone-floor-old-textured-vintage-701919/
Squirrel 1 photo https://pixabay.com/en/animal-squirrel-sciurus-bird-meal-927904/
Squirrel 2 photo https://pixabay.com/en/animal-squirrel-sciurus-foraging-927929/