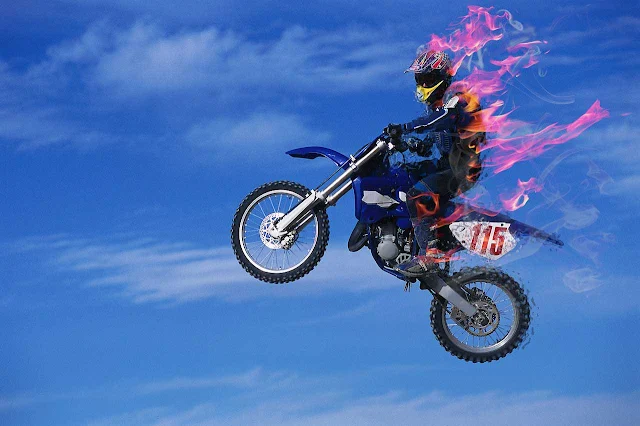
Learn how to make a fire effect in Photoshop. How to use the command File>Place fire photos to the main photo. Next the size and position are set using the Free Transform command. So that the fire photo can look together, use the Lighten blend mode for the fire. And to make it easier to adjust this fire effect, it is necessary to prepare photos of variations in the shape of the flames and photos of variations in the shape of smoke. The final step is to give the effect of hot steam around the flames using a Glass Filter. If there are certain parts of the fire or smoke that we don't want, we can smooth them out using the Brush Tool.
1. Prepare the necessary photos
I'll be using a photo of a biker as the main photo, photos of fire and smoke in various variations.
The photo source of the motorbike rider for this Photoshop tutorial I took from the Microsoft Office Image.
Fire Image Source from http://cgtextures.com/ site.
Smoke Image source taken from the site http://bgfons.com/
2. Open the photo that will be given the Photoshop effect on fire
Choose File>Open menu or use the keyboard shortcut Ctrl+O, it will open the Open dialog box.
Select your main photo file then click the Open button.
Open the main photo.
3. Open the fire file then place it on the image and change the blend mode to Lighten
Select menu File>Place.
In the Place dialog box, please select the fire photo you want to add and then click the Place button.
The fire photo will be added above the main photo.
In the fire photo, you can see the Free Transform box around it as a sign that we can resize and adjust its position on the main photo.
Press the Enter key to remove the Free Transform box.
Next change the blend mode to Lighten.
Fire photo above the main photo.
The fire layer's Blend Mode is changed to Lighten.
4. Adjust the position and size of the fire on the main photo
Use the Free Transform command to change the size and position of the flames on the main photo.
Press the keyboard shortcut Ctrl+T.
To change the size of the fire, click the corner of the Free Transform box and then drag it outward or inward.
Click the mouse while holding down the Shift key if you want to keep the image ratio.
Press the arrow keys to adjust the position of the fire on the main photo.
Adjust the opacity if the fire effect is too strong.
I'm going to set the fire layer's opacity to a value of 75-90%.
Edit the size of the fire using Free Transform.
5. Add more flames
We can duplicate the existing fire layer by pressing Ctrl+J then repeat step 4 to adjust the position of the fire on the main photo.
Or if you have many other variations of the fire photo, add the fire photo back to the main photo by repeating step 3 and then adjusting its position by repeating step 4.
Add another fire on the main photo.
6. Open the smoke photo then place it on the main photo and change the blend mode to Lighten
The next step is to add a smoke effect.
Do adding smoke photos to the main photo like adding fire photos.
Select menu File>Place.
In the Place dialog box, select your smoke photo and then click the Place button.
The smoke photo will be placed on the main photo.
Press the Enter key to clear the Free Transform box.
Select the Lighten blend mode.
Add a smoke photo using the File>Place menu.
Change the smoke photo layer's blend mode to lighten.
7. Adjust the position and size of the smoke on the main photo
Use Free Transform to resize and position the smoke in the main photo.
Press Ctrl+T to use Free Transform and press Ctrl+Enter when you are satisfied with the result.
I'm going to set the smoke layer's opacity to 25% so the smoke effect doesn't look too thick.
Adjust the position of the smoke effect.
8. Remove unwanted fire and smoke effects using the Brush
Click the Brush Tool icon.
Select the Brush size in the options bar.
Set the foreground color to black by pressing the D key on the keyboard.
Then make a mask on each fire layer or smoke layer that we will tidy up.
For membersremove the fire effect, click the fire layer mask layer, then delete using the mouse the parts of the fire that we don't want.
Do the same for the smoke layer.
Smooth out the fire and smoke effects using a Layer Mask and the Brush Tool.
9. Add Photoshop filter glass effect
We're going to add a hot steam effect around the flames.
We have to convert the background layer to smart filters.
Click the background layer to activate it then select the Filter menu> Convert for Smart Filters.
Click the OK button in the dialog box that appears.
Then select the Filter menu> Filter Gallery.
In the Filter dialog box, select Distort>Glass.
Fill in the distortion between 9 to 13, Smoothness 4, Frosted Textures and Scaling about 50%.
Apply Filter Glass.
10. Create a heat effect using the brush tool
Do the inversion of the filter glass that we have made.
Click Layer Mask Layer 2 (formerly the background layer).
Inversion by pressing Ctrl + I or the menu option Image>Adjustment>Invert.
Choose a light gray color for the foreground.
Then click the Brush Tool.
Please click on the back of the motorbike that is burning in flames to give the effect of hot steam.
Use the Brush Tool to give the effect of hot steam on the back of the biker.
After giving the hot steam effect, the Photoshop fire effect is finished with the fire that we created.
Here is the result:
Fire Effect in Photoshop.

No comments:
Post a Comment