1. Open Photo.
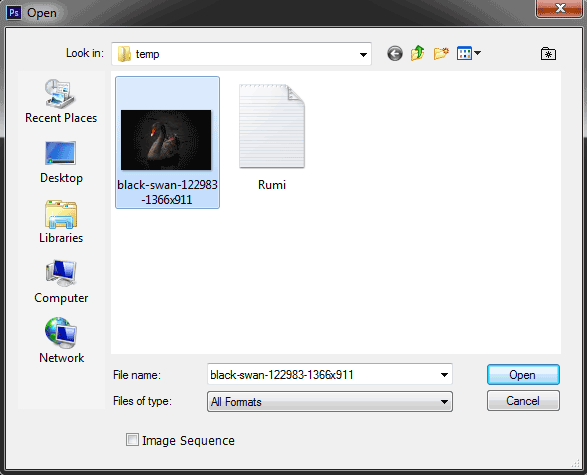
Select the File>Open command in the menubar above or you can also press the keyboard shortcut Ctrl+O to open your photo into the Photoshop application.
The “Open” dialog box will open.
Please find your photo location folder then click your photo.
If your file is not visible, try to display the entire file by selecting “All Formats” in the “Files of type” column.
Then click the Open button. By default, your photo will be loaded into a layer named Background.
For the purposes of this Photoshop text effect tutorial I'll be using the following photo, 122983, downloaded from Pixabay.
Open dialog box.

Open Photo. By default, your photo will be loaded into a layer named Background.
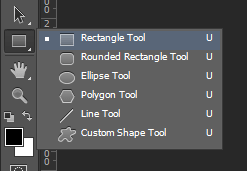
2. Select the Rectangle Tool.
Click the rectangle tool icon on the toolbar. The Rectangle Tool is a group with the Rounded Rectangle Tool, Ellipse Tool, Polygon Tool, Line Tool and Custom Shape Tool.
So if you don't find the Rectangle Tool, please right-click or click-hold on one of the tools above to bring up all the available tools in one group.
Make settings in the options bar for the rectangle tool located below the menu bar.
Since we will be creating a simple path, click the Path icon in the options bar.
![]()
Select Path on the Options bar.
3. Create a Path on the photo where you will write the text.
Please click on the top left corner then drag to the bottom right to create a rectangle-shaped path.

Make a Selection on the photo where you will write the text.
4. Select the Ellipse Tool.
Click the Ellipse tool icon on the toolbar. The Ellipse Tool is a group with the Rectangle Tool, the Rounded Rectangle Tool, the Polygon Tool, the Line Tool and the Custom Shape Tool.
So if you don't find the Ellipse Tool, please right-click or click-hold on one of the tools above to bring up all the available tools in one group.
Make adjustments to the options bar for the Ellipse Tool which is located at the bottom of the menu bar.
Since we're going to separate areas of the photo so the text doesn't fall on them, select Path and Subtract Front Shape on the option bar.
Select Path and Subtract Front Shape.
5. Create an Ellipse Path.
We don't want the text we write to overwrite the bird image.
Please click then drag to create an ellipse-shaped path around the bird.

Create an ellipse path around the bird.
6. Select the Horizontal Type Tool.
Click the Horizontal Type Tool icon on the Tools panel or you can also use the keyboard shortcut T. The Horizontal Type Tool is grouped together with the Vertical Type Tool, Horizontal Type Mask Tool and Vertical Type Mask Tool.
So, if you don't find the Horizontal Type Tool, please right-click or click-hold on one of the tools above to bring up all the available tools in one group.
You can also press the keyboard shortcut Shift + T until the tool you want is active.
Then please set the font type, font color and font size on the option bar.

Set the font type in the options bar.
7. Write Text.
Click the mouse on the canvas in the area of the path rectangle that you have created.
Then write your text.
When finished typing press Ctrl+Enter or click the Commit button on the options bar.
Photoshop will automatically create a text layer.

Type your text in the path area of the rectangle tool.
8. Arrange the Text Using Free Transform.
If you are not satisfied with the ratio between the size of the image and the text, you can change the size of the rectangle using Free Transform.
Press Ctrl+T key.
Click on the periphery of the Free Transform box and drag it in or out to resize it.
PressCtrl + Enter key if you are satisfied with the size.
After resizing the selection rectangle you may want to adjust the font size again to match.
Click on the text, Press Ctrl+A to select all the text.
Then select a new font size in the options bar.

Arrange Text Using Free Transform.
Here is the result:
Add text to photos using Photoshop.
9. Save the Document.
Save the pictorial writing project that you have created by selecting the File>Save command in the menubar above or by pressing the keyboard shortcut Ctrl+S.
The "Save As" dialog box will appear.
In the "Save in" drop-down menu above, please browse to the folder location to save the file location, in the "File name" column type the name of your illustrated writing project file then press the Save button.
Don't forget to save your project in PSD document format so we can edit it later.
If you want to upload to social media or for other purposes, select the File menu> Save As and save the photo in JPG format.


No comments:
Post a Comment