Learn How to Make a Carve Wood Effect in Photoshop. Make a selection of our portrait photo then fill the selection using black with softlight blend mode so that the color blends with the wood color. As for the sculptural effect, Bevel & Emboss can be used. To make the selection of portraits easier, we will use a selection using channels. So we first change the portrait photo to black and white and apply a sketch> photocopy filter. This way it will be easy for the channel to read the black and white lines in the portrait to turn into a selection.
Step 1: Download the Wood Texture Image
Please download the picture of the wood texture that you like on the site http://cgtextures.com/. You must become a member first. No need to be afraid to become a member because it's free, with a download quota of 15MB per 24 hours.
Step 2: Open Photo
Select the File>Open command in the menubar above or you can also press the keyboard shortcut Ctrl+O to open your photo into the Photoshop application. The “Open” dialog box will open. Please find your photo location folder, click your photo then click the Open button. By default, your photo will be loaded into a layer named Background.
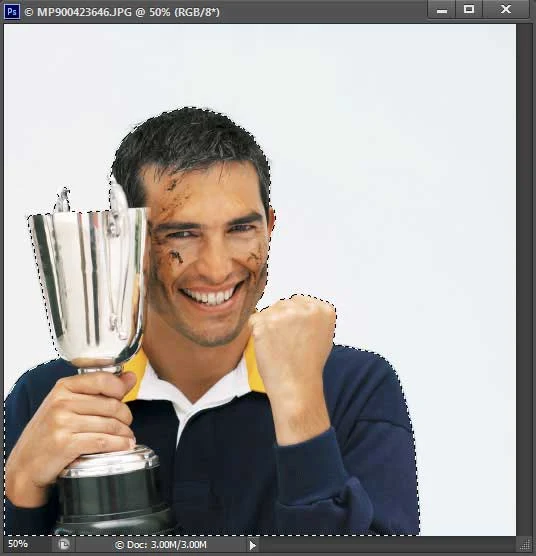
For the purposes of this Photoshop tutorial I will be using the following photo, MP900423646, downloaded from Microsoft Office Images.
Step 3: Main Image Selection
Make a selection using your favorite selection tool. For this tutorial I will be using the Quick Selection Tool. Click the Quick Selection Tool icon on the Tool Panel or you can also press the keyboard shortcut W or Shift + W. Click-drag on the photo background. You will see the selection line in the form of a dotted line. The Quick Selection Tool works based on color similarity so it will be easier to select the background. The Quick Selection Tool collects a group with the Magic Wand Tool. So if you don't find the Quick Selection Tool, please right-click or hold-click on the Magic Wand Tool to bring up all the available tools in one group.
Step 4: Selection Inversion
After the background is selected, invert the selection by selecting the Select>Inverse menu or pressing the keyboard shortcut Shift+Ctrl+I. Now the main object is selected.
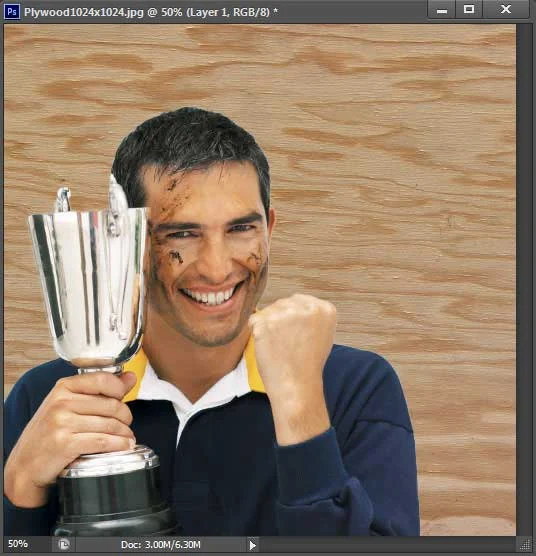
Step 5: Move Portrait Photo Into Wood Texture
Click the Move Tool icon or you can press the V keyboard key. Click on the portrait photo in the inside of the selection (inside the dotted line) then drag it towards the wood texture photo. Now your portrait photo has moved to a wood texture photo. Click then drag to adjust its position on the canvas. You should now see that there are two layers, namely the Background layer (wood texture) and Layer 1 (portrait photo).
The portrait has moved.
Step 6: Desaturate of portrait colors
Click Layer 1 to make sure it is the active layer. Remove color in portrait photos by selecting the Image>Adjustments>Desaturate menu or you can also press the keyboard shortcut Shift+Ctrl+U. Now the portrait photo has changed to black and white.
Step 7: Apply Photocopy Filter
The next step is to apply the Sketch>Photocopy filter on Layer 1. Previously, first reset the foreground/background color to default by pressing the D keyboard key.
Then select the Filter menu>Filter Gallery, and select Sketch>Photocopy. I'll fill in Detail:15 and Darkness:19. Set this number according to your photo. Click OK.
Photocopy filter result.
Step 8: Clean the Skin Area Using the Pencil Tool
We see that the face and neck appear black. Clean up the black color using the Pencil Tool. Click the Pencil Tool icon in the Tool Panel. The Pencil Tool is collected in a group with the Brush Tool, Color Replacement Tool and the Mixer Brush Tool. So if you don't find the Pencil Tool, please right-click or click-hold on one of the tools above to bring up all the tools available inone group.
Make sure the foreground is white. Swap foreground/background colors by pressing the X keyboard key.
Then sweep the mouse over the face and neck to clean it.
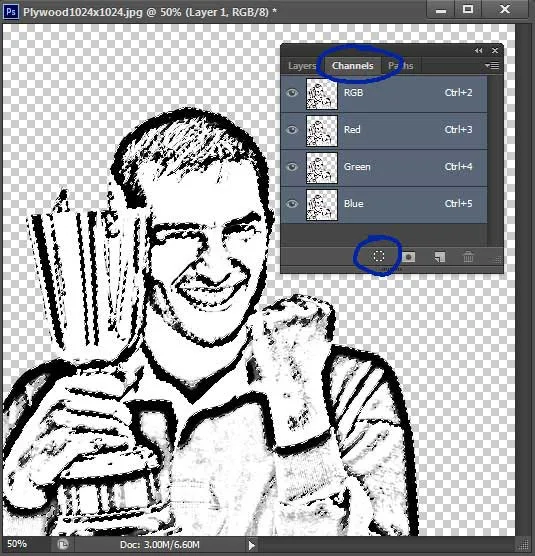
Step 9: Turn Portrait Photo Into Selection
The next step is turning the portrait into a selection. Remove the Background layer's visibility option by clicking on the eye icon located on the left.
Click the channel tab and click the Load channel as selection icon located at the bottom of the layer panel (see image). Now our portrait photo selection has been formed.
Click the layers tab again. Enable the background layer visibility options and hide the layer 1 visibility options.
Step 10: Fill Selection With Black Color
We will fill the selection with black on a new layer. Click the create new layer icon to create a new layer. Make sure the foreground color is black by pressing the D key. Then press Alt+backspace key to fill the selection with black.
Change the blend mode to softlight and press Ctrl+D to deselect.
Step 11: Add Bevel & Emboss
Add Bevel & Emboss. Click the photo layer then select the Layer menu> Layer Style> Bevel & Emboss or you can also click the fx icon at the bottom of the layers panel. The Layer Style Bevel & Emboss dialog window will appear.
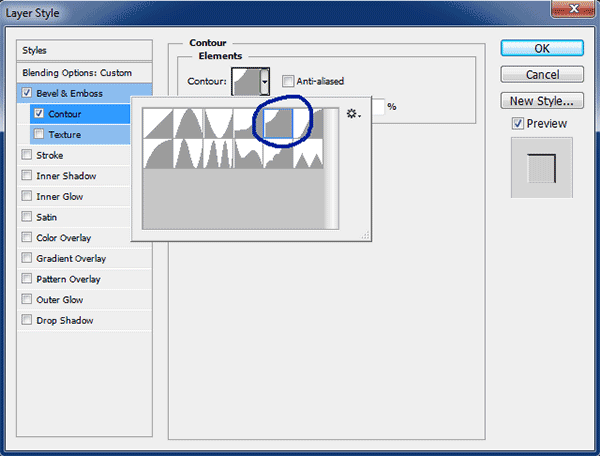
For this Bevel & Emboss effect, please fill in the Bevel & Emboss and Contour settings according to the image below. Then click OK.
Settings for Contour.
Step 12: Add Text If Needed
If needed, add text to our wood carving effect. Click the Vertical Type Tool icon on the Tool panel.
Select the font type and black color on the option bar.
Click on the canvas and type the text you want. Press Ctrl+Enter when you are finished typing. The Vertical Type Tool is collected in a group with the Horizontal Type Tool, Horizontal Type Mask Tool and Vertical Type Mask Tool. So, if you don't find the Vertical Type Tool, please right-click or click-hold on one of the tools above to bring up all the available tools in one group. Use Free Transform to adjust the position and size of the text in the document by pressing Ctrl+T. You will see a Free Transform box with handles around the text. Click on the Free Transform box and drag it out to resize it. Click inside the Free Transform then drag to move its position on the canvas. Press Ctrl+Enter when finished setting. Change the text layer's blend mode from normal to Softlight.
Finally apply Bevel & Emboss to the text with the settings as below.
Step 13: Save Document
Save the wood carving effect project that you have created by selecting the File>Save command in the menubar above or by pressing the keyboard shortcut Ctrl+S. The "Save As" dialog box will appear. In the "Save in" drop-down menu above, please browse to the folder location to save the file location, in the "File name" column, type the name of your wood carving effect project file then press the Save button. Don't forget to save your project in PSD document format so we can edit it later. If you want to upload to social media or for other purposes, select the File menu> Save As and save the photo in JPG format.
There you have it! How to Make a Carve Wood Effect in Photoshop.


No comments:
Post a Comment