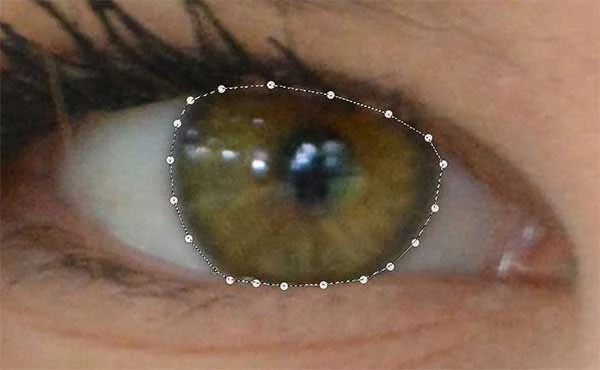
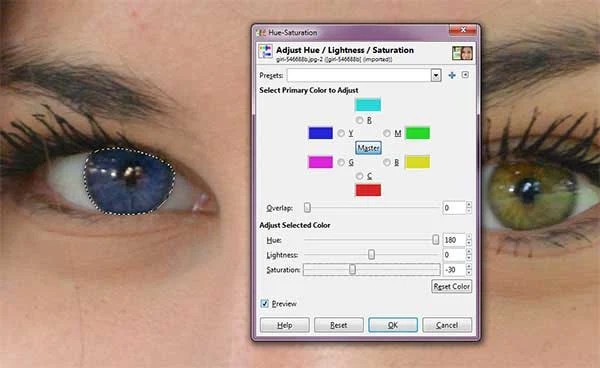
Here is a tutorial on how to change eye color in GIMP. Changing eye color with GIMP can be done by making a selection on the eyeball using path tool and then use the command Colors> Hue-Saturation. Colors can be changed simply by adjusting the slider "Hue, Lightness and Saturation". Maybe you want to duplicate the layer first so that the original image is safe.
Steps to change eyes color in GIMP:
1. Open photos, duplicate layer then zoomSelect File> Open to open your picture. For this GIMP tutorial, I'll use this image, girl-546688, that I downloaded from Pixabay. After the photo open, duplicate the layer by choosing Layer> Duplicate Layer. To make the selection process easier, zoom your photos by pressing Shift ++ or scroll the mouse while pressing the Ctrl keyboard.
2. Create selection using the Path tool
Click the Path icon Tool in the Toolbox. Make a selection around the eyeball by clicking around it. The initial path must be met by the end of the path. Press Enter to transform the path into a selection or click 'selection from path' button on the Tool Options.
3. Change color using Hue-Saturation
With the selection of the eyeball is still active, select the Colors> Hue Saturation. In the window Hue-Saturation, please slide-sliding slider Hue, Saturation and Lightness to obtain eyeball color you want. When finished click the OK button. Remove the selection by choosing Select> None. Perform the same steps for the other eye.
There you have it! Tutorial GIMP, Photo after the eyes color changed using GIMP.


No comments:
Post a Comment