In today's tutorial, I'll show you how to change hair color in GIMP from a given image. We will create a new layer, fill that layer with your chosen color, use a layer mask that will make your chosen color disappears, the Paintbrush Tool (you will notice any difference in the appearance of the layer if you paint on the layer mask using the Paintbrush Tool), the Gaussian Blur filter, and the Eraser Tool.
Steps to change hair color in GIMP:
1. Open image in GIMP
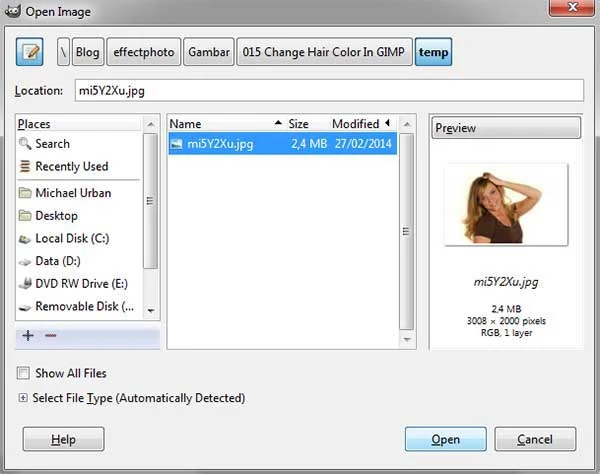
Use File>Open... command in the top menu or else just press Ctrl+O to open your image. The “Open Image” dialog will appear, allowing you to navigate to the file and click on its name. Navigate through your folders in the Places panel and the Name panel until your images' name appears in the Name panel. Click the image you want to open.
When an image file is selected, you can view the preview of the image file at the right-hand side of the box, although it's not easy to find an image based on a thumbnail.
Click the Open button.
For this GIMP tutorial, I'll use this image, mi5Y2Xu, that downloaded from RGBStock.
For this GIMP tutorial, I'll use this image, mi5Y2Xu, that downloaded from RGBStock.
2. Create a new layer
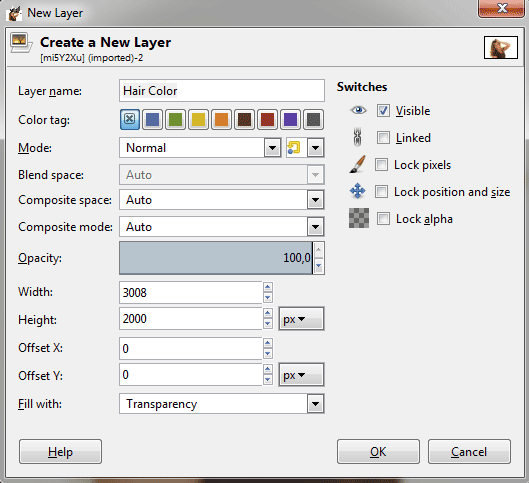
Use Layer> New Layer or press Shift+Ctrl+N to create a new layer in an image. The New Layer window open. Type a name in the Layer Name text box and for the Fill With, choose Transparency. Click OK.
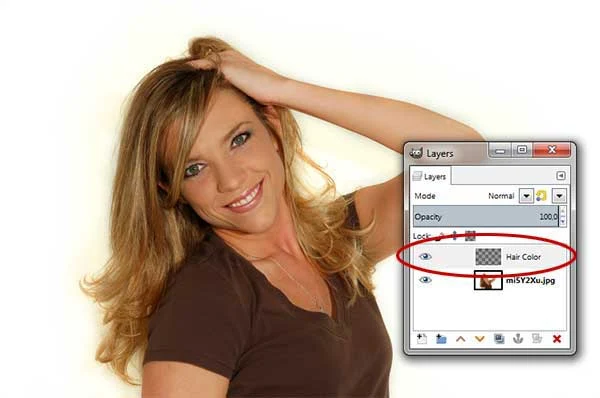
A new, empty layer, added to the layer stack of the image, just above the active layer.
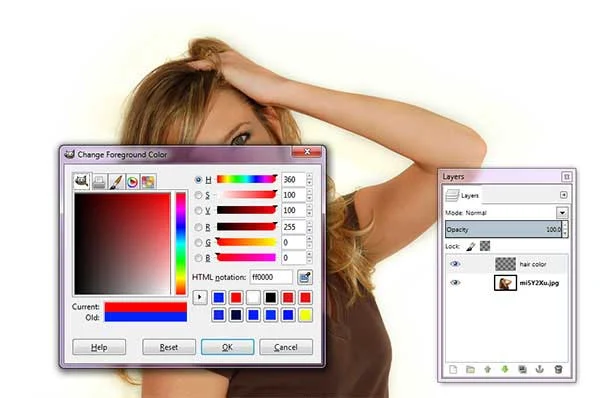
3. Choose a color for hair
Click the foreground color box.
4. Fill layer with foreground color
Go to Edit> Fill with FG color (or by using the keyboard shortcut Ctrl+,). Now your chosen color fills the active layer.
5. Create a Layer Mask (Black Full Transparency)
Make sure the Hair Color layer is selected in the Layers dialog. Use Layer> Add Layer Mask. The Add Layer Mask dialog box appears. Here you can choose “Black (Full Transparency)”. Click Add button.
A thumbnail of the layer mask appears to the right of the thumbnail of the Hair Color layer in the Layers Dialog. Your chosen color that fills the active layer has disappeared. To make any part of the Hair color layer visible, you will need to paint on the layer mask using the Paintbrush Tool later.
6. Change the Foreground Color to White
Choose white color for the foreground color by pressing D on the keyboard to reset the foreground color/background to default and then press X to swap its color.
7. Select the Paintbrush Tool
Select The Paintbrush Tool from the toolbox or else use Tools>Paint Tools>Paintbrush (P).
In the Tool Options dialog, choose a soft brush.
8. Apply Brush Strokes to Hair
Make sure you've select the layer mask thumbnail by clicking on it.
9. Apply Gaussian Blur filter
To gain natural color, we will give a gaussian blur filter. Choose Filter> Blur> Gaussian Blur. Fill in the value of blur you want then click the OK button.
10. Clean using the Eraser Tool
Clean up using the Eraser tool. Click the Eraser Tool icon and then apply brush strokes on the hair.
There you have it! Tutorial How to change hair color in GIMP.
11. Save Your Work
Use File>Save command in the top menu or else just press Ctrl+S to save your project file. The Save Image dialog box appears. Navigate to the folder where you want to store your project file. Type a name in the Name text box and leave the default GIMP (*.XCF) format. XCF is GIMP's native format and is useful because it stores everything about your image and will allow you to later edit your image in GIMP, in case you notice a problem. Click Save to store the project file.
Once you have finished, you will probably also want to export the image in a more widely used format, such as JPEG, PNG, TIFF, etc.
More on GIMP Tutorials:
More on GIMP Tutorials:
- Change eye color in GIMP
- How to sharpen image with GIMP
- How to create fisheye effect with GIMP
- Sharpen an Image in GIMP (High Pass Filter)


Thank you so much for the information. I'm gonna try this when I get home tonight.
ReplyDeleteGlad you liked it :)
DeleteHow do you change a dark hair color to a lighter hair color? I'm trying to turn a brunette into a blonde it basically makes her a red head.
ReplyDeleteI'm trying to do an ombre effect and can't get it to look natural...
ReplyDeleteThank you so much for this tutorial! I just used it to recolour grey roots and it worked brilliantly! ��
ReplyDeleteCould you do this in a video, and without making the hair look like it's one unnatural color, as if the entire hairpiece is just one blob of paint?
ReplyDeleteMy blonde to black hair turned partially red, yellow, orange. How is this possible?
ReplyDeleteTHIS IS USELESS
ReplyDelete