In this tutorial, I'll show you how to create a jigsaw puzzle photo collage in Photoshop (Free Template). We will use the Pen tool to draw the puzzle pieces, the Grid to assist us in laying out puzzle pieces precisely, Free Transform to move and resize the images and the puzzle pieces, Bevel & Emboss and Clipping Mask to clips the image layer into puzzle layer.
If you liked my tutorials, please subscribe to my YouTube channel - JTSGraph.
Download This Puzzle Photo Collage Template
Download Photoshop Jigsaws Puzzle Collage template here or find others free Photoshop Collage Templates here.
Steps to make a puzzle collage in Photoshop:
1. Create new document
Create a new, blank document. Choose File> New (or press Ctrl+N). In the pop-up window, type a name in the Name field and enter the following information: Width 3000 pixels, Height 2000 pixels, Resolution 300 Pixels/Inch, Color Mode RGB color, and Background contents Transparent. Click OK.
2. Show the Grid
Our first step is creating a grid to assist us in laying out puzzle pieces precisely. To add a grid, choose View>Show>Grid. Open up the grid preferences, choose Edit> Preferences> Guides, Grid & Slices. This will open a preference dialog box. Choose the color you want for the grid lines. I will set the “Gridline every” option to be 60 pixels and “Subdivisions” to be 1.
Choose View>Snap and then choose View>Snap to Grid, to enabling snaping that will help you to align any object (including shape) you want.
3. Grab the Pen tool
Grab the Pen tool by selecting it from the toolbar on the left. Right-click on one of the tools above, to see all available tools.
Make sure Path is chosen from the menu in the options bar.
4. Draw a puzzle piece
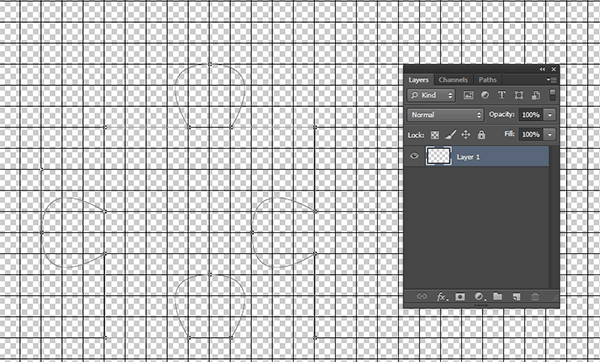
Select the Paths Tab on the Layers panel (or choose Windows>Paths). Create a new Path by clicking the Create new path icon.
Now start clicking on the canvas to draw your first puzzle piece.
5. Make selection from paths
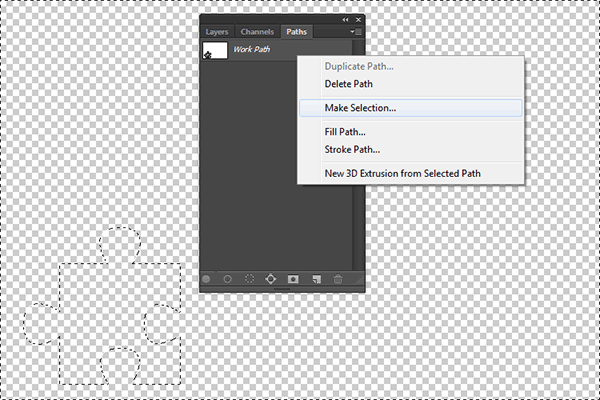
Select the Paths tab. Right-click on the Path name then choose Make Selection. Now inverse the selection by going to Select> Inverse.
6. Fill path with color
Click the layer tab then create a new layer by going to Layer> New Layer. Choose Edit> Fill (or press Shift+F5). The Fill dialog box appears. Choose 50% Gray from the Use drop-down menu and then click the OK button.
Your selection now fills with a gray color. You can now remove the selection by going to Select> Deselect.
Your selection now fills with a gray color. You can now remove the selection by going to Select> Deselect.
7. Create variations of other puzzle
Repeat steps 3 through 4 to draw other puzzle pieces.8. Arranged all the puzzle pieces
Select a puzzle layer on the Layers panel, then duplicate it by going to Layer> Duplicate layer, then rotate and adjust its position using Free Transform. Choose Edit> Free Transform command.
You can now rotate and adjust position the puzzle piece layer as follows:
- Move the puzzle piece layer by clicking and hold anywhere inside it and drag.
- Rotate the puzzle piece layer by moving your cursor farther out from any corner until you see two arrows. Click and hold, then drag the puzzle piece layer.
- Press Enter key when you are done.
9. Group all the puzzle layers
While holding down the Shift key, click on all the puzzle layers and then choose Layer> Group Layer.10. Adjusting size and position
Choose Edit> Free Transform command. You can now edit the Group Layer as follows:
- Resize the Group Layer by dragging any corner while holding down the Shift key to keep it does not distort.
- Move the Group Layer by clicking and hold anywhere inside it and drag.
- Rotate the Group Layer by moving your cursor farther out from any corner until you see two arrows. Click and hold, then drag the Group Layer.
- Press Enter key when you are done.
11. Add layer style
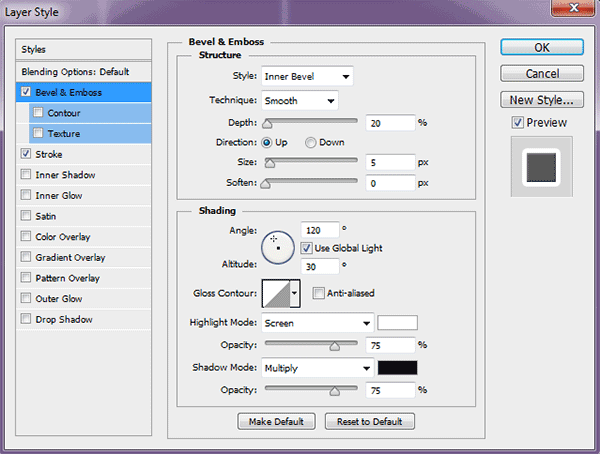
Once you have arranged all the jigsaws shape to your satisfaction, you can now add a Bevel & Emboss and a stroke. Choose Layer> Layer Style> Bevel & Emboss. The Layer Style dialog box appears with the Bevel & Emboss option checked. Set your desired Bevel & Emboss.
Tick the Stroke checkbox and set your desired Stroke style then Click OK.
You can copy Bevel & Emboss and Stroke layer style to another layer, --while pressing the Alt key, by click and then drag the Bevel & Emboss layer to the other layer.
12. Insert image
Stock images used in this Photoshop Collage tutorial: aroni-738287, as-children-1822704, beautiful-girl-1054377, children-817365, children-1347385, children-1807511, children-1822474, children-1822481, fashion-807566, girls-739071, kid-1241817, and teddy-bear-1718118.You can now edit and move the image as follows:
- Resize the image by dragging any corner while holding down the Shift key to keep the image does not distort.
- Move the image by clicking and hold anywhere inside the image and drag.
- Rotate the image by moving your cursor farther out from any corner until you see two arrows. Click and hold, then drag the image.
- Press Enter key when you are done.
13. Create clipping mask
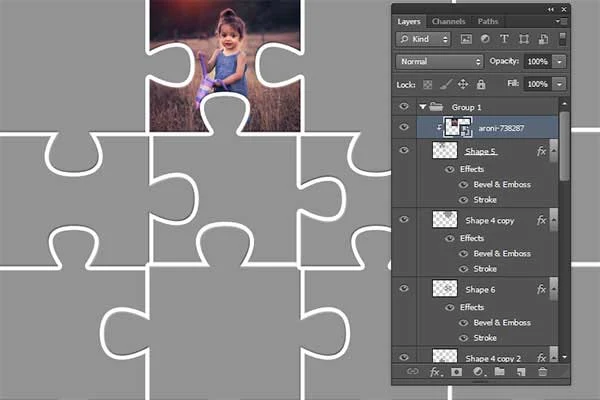
When layers are put into a clipping mask, the content of the bottommost layer (the jigsaw layer), clips the layers above it (the image layer). On the Layers panel, make sure the layers to be clipped are listed consecutively. Remember, you must stack the image layer above the jigsaw layer. Click the image layer to be clipped, then choose Layer>Create Clipping Mask (or Alt+Ctrl+G).
14. Insert other images
Repeat step 10 to open and manipulate each picture you'd like to insert.15. Save document
Choose File>Save (or Ctrl+S) to save your project file. The Save As dialog box appears. Navigate to the folder where you want to store the file. Type a name in the File Name text box and leave the default Photoshop (*.PSD;*.PDD) format. Click Save to store the image.Once you have finished, you will probably also want to use File>Save As (Shift+Ctrl+S) to export the image in a more widely used format, such as JPEG, PNG, TIFF, etc.
There you have it! How To Make a Puzzle Collage in Photoshop.


can you do one of a map
ReplyDeleteplease give me an example picture?
Deletecan you share soft file so that i can only replace the photos.
ReplyDeleteDownload it here http://bit.ly/2BBGRO4
DeletePlease share this tutorial if you downloaded my work. Thank you.
Thank you!
DeleteCould you share original file?
ReplyDeleteDownload it here http://bit.ly/2BBGRO4
DeletePlease share this tutorial if you downloaded my work. Thank you.
KINDLY SHARE THE ORIGINAL FILES
ReplyDeleteDownload it here http://bit.ly/2BBGRO4
DeletePlease share this tutorial if you downloaded my work. Thank you.
Thanks for the file! Is there a way to line up the corners of the puzzle pieces more evenly?
ReplyDeleteThanks for the template! Is there a way to even the corners of the puzzle pieces and possibly move them to different areas?
ReplyDeleteMaybe you can just disable layer effects or use this file for guides https://bit.ly/2OSI7TP
Delete