Here is a tutorial on how to create a 3D Photo Cube Collage in Photoshop CS6 Extended. The first step is creating two photo collage, one for the cube and the other one for the cube reflection. Then we create a 3D cube using Photoshop a 3D command 3D>New Mesh From Layer>Mesh Preset>Cube.
Watch the video for detailed instructions and use the written steps for quick reference.
If you liked my tutorials, please subscribe to my YouTube channel - JTSGraph.
Download This Template
Download Photoshop 3D Photo Cube Collage TEMPLATE here or find others free Photoshop Collage Templates here.
.
Download FULL PSD here.
Download FULL PSD here.
1. Create a new Document.
Choose File> New (or just press Ctrl+N). In the pop-up window, type a name in the Name field and enter the following information: Width 3000 pixels, Height 3000 pixels, Resolution 300 Pixels/Inch, Color Mode RGB color, and Background contents White. Click OK.
2. Show the Grid.
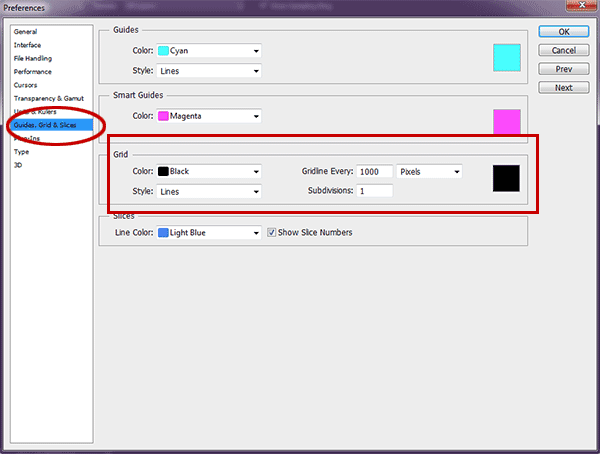
For faster way, see how to create a contact sheet in Photoshop and skip to step 8. Now we need to create a grid to assist us in laying out rectangle shapes precisely. To add a grid, choose View>Show>Grid. Open up the grid preferences, choose Edit> Preferences> Guides, Grid & Slices. This will open a preference dialog box. Choose the color you want for the grid lines. I will set the “Gridline every” option to be 1000 pixels and “Subdivisions” to be 1. Choose View>Snap to enabling snaping that will help you to align any object (including shape) you want.3. Grab the Custom Shape Tool.
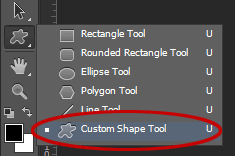
Grab the Custom Shape Tool. In the Options Bar, make sure Shape is chosen from the menu then choose shape color. To choose the color of the shape, click the color swatch in the options bar, and then choose a color available.
You can also choose a color from the Color Picker.
Lastly, enter a value for the stroke size and select a rounded square shape from the Custom Shape pop-up panel.
If you do not find a rounded square shape in the panel, click the arrow in the upper-right corner, and choose “All”.
When asked to replace current shapes, click OK to replace current shapes with the shapes form “All”.
4. Draw a rounded square Shapes.
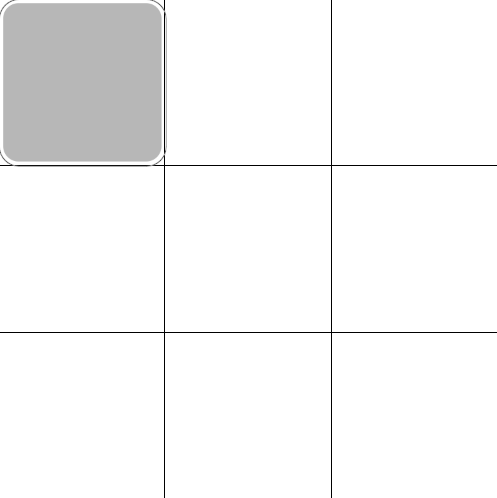
Click inside your document and drag away from the starting point. When you release your mouse button, Photoshop completes the shape and fills it with your chosen color. Now duplicate the rounded square shape by going to Layer> Duplicate Layer, or else by pressing Ctrl+J. Then resize and reposition your duplicate shape layer using Edit> Free Transform Path. You can edit the shape as follows:
- Resize the rounded square shape by dragging any corner while holding down the Shift key to keep the shape does not distort.
- Move the rounded square shape by clicking and hold anywhere inside the shape and drag.
- Rotate the rounded square shape by moving your cursor farther out from any corner until you see two arrows. Click and hold, then drag the shape.
- Press Enter key when you are done.
When you are done, hide/remove the Grid by going to View>Show>Grid.
5. Insert image.
Stock images used in this Photoshop Collage tutorial: 84552, 743247, 752188, 784608, 1546906, 865229, 1328454, 1628843.Select the rounded square shape layer to which you want to insert a picture. Choose File> Place to open the image you'd like to insert. Click on the picture, then click OK.
You can now edit the image as follows:
- Resize the image by dragging any corner while holding down the Shift key to keep the image does not distort.
- Move the image by clicking and hold anywhere inside the image and drag.
- Rotate the image by moving your cursor farther out from any corner until you see two arrows. Click and hold, then drag the image.
- Press Enter key when you are done.
6. Create Clipping Mask.
On the Layers panel, make sure the layers to be clipped are listed consecutively. Remember, you must stack the image layer above the rounded square layer. Click the image layer to be clipped, then choose Layer>Create Clipping Mask (or just press Alt+Ctrl+G). When layers are put into a clipping mask, the content of the bottommost layer (the rounded square layer), clips the layers above it (the image layer).
7. Insert Other Images.
Repeat steps 5 through 6 to open and manipulate each picture you'd like to insert.
8. Group The Layers.
While holding down the shift key, click all layers and then select Layer> Group Layers.9. Save In JPG format.
Choose the Save As menu, select JPG format, name it “Collage Up.jpg”. Open “Collage Up.jpg” photo, rotate it by choosing Edit > Transform> Flip Vertical. Choose the Save As menu again and name it “Collage Down.jpg”.10. Create a New Document For 3D Cube.
Choose File> New. In the pop-up window, enter the following information: Width 3000 pixels, Height 3000 pixels, Resolution 300 Pixels/Inch, Color Mode RGB color, and Background contents White. Click OK.11. Create a 3D Cube.
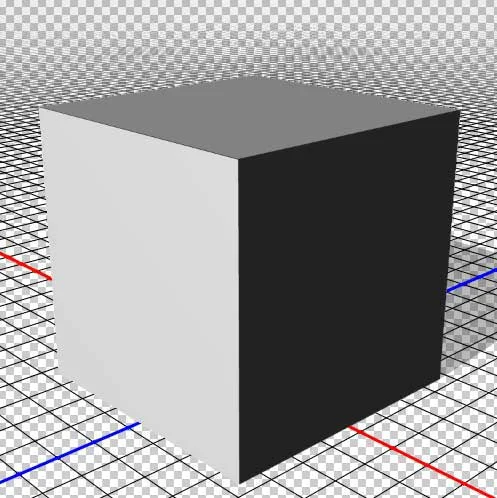
Go to 3D> New Mesh from Layer> Cube. Click the Move Tool icon in the toolbox then click and drag in the document window to move the cube.12. Duplicate Cube Layer For Cube Reflection.
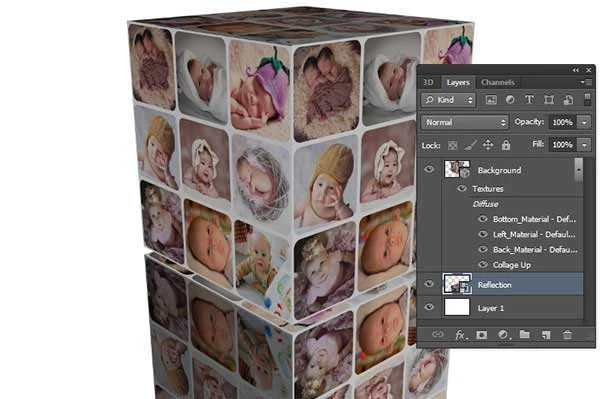
Click on the layer tab, click the cube layer then choose Layer> Duplicate Layer. Name the duplicate layer, “Reflection”.13. Add Texture.
Click on one side of the cube, then click on the material, click on the Material Properties diffuse and select replace texture, select the 'collage up.jpg' texture file.
Add texture to the other cube sides.
14. Add texture to the Reflection Cube.
Repeat step 11 for the reflection cube but by using the 'collage down.jpg' texture file.15. Increase Canvas Size.
Select the Background layer on the Layers Panel and then choose Image> Canvas Size. In the pop-up window, enter the following information: Width 1502 pixels, Height 0 pixels, click the Relative checkbox and choose center Anchor.16. Move the Reflection Cube Down.
Click and drag down on the 'Move Y on Axis' arrow to move the reflection cube down.17. Convert The Reflection Layer to Smart Object.
Select the reflection's layer on the Layers Panel then choose Layer> Smart Object> Convert to Smart Object.18. Add Layer Mask To Reflection Layer.
Choose Layer> Layer Mask> Reveal All.
Choose Black to White color and Linear Gradient in the options bar.
Make sure the layer mask is selected by clicking on it. Then apply the gradient by clicking and dragging from bottom to top in the document window to create a reflection effect. Adjust its opacity on the Layers Panel.
20. Apply Gaussian blur.
Go to Filter> Blur> Gaussian blur to make the reflection more natural. I will set the Radius to 4,7 Pixels. Click OK when you're done.19. Save document.
Choose File>Save (Ctrl+S). Navigate to the folder where you want to store your project file. Type a name in the File Name text box and leave the default Photoshop (*.PSD;*.PDD) format. Click Save to store the project file. Once you have finished, you will probably also want to use File>Save As (Shift+Ctrl+S) to export the image in a more widely used format, such as JPEG, PNG, TIFF, etc.
There you have it! 3D Photo Cube Collage in Photoshop.










No comments:
Post a Comment