In today's Photoshop tutorial, We're going to learn the process of creating a 3D hexagons photo collage in Photoshop. We'll be using the custom shape tool that comes with Photoshop and then converts it to 3D. There are plenty of 3D collage maker tools out there, but none are quite as satisfying as creating your own 3D collage using Photoshop.
Download This PSD file
Download 3D Hexagons Collage project (PSD) file here or find others free Photoshop Collage Templates here.1. Create a new Document
Choose File> New (or just press Ctrl+N).
In the pop-up window, type a name in the Name field and enter the following information:
Width 3000 pixels, Height 2000 pixels, Resolution 300 Pixels/Inch, Color Mode RGB color, and Background contents Transparent.
Click OK.
In the pop-up window, type a name in the Name field and enter the following information:
Width 3000 pixels, Height 2000 pixels, Resolution 300 Pixels/Inch, Color Mode RGB color, and Background contents Transparent.
Click OK.
2. Create a Grid
Now create a grid to assist us in laying out selections symmetrically.
To add a grid, choose View>Show>Grid.
To add a grid, choose View>Show>Grid.
Open up the grid preferences, choose Edit> Preferences> Guides, Grid & Slices.
This will open a preference dialog box.
Choose the color you want for the grid lines.
Set the “Gridline every” option to be 100 pixels and “Subdivisions” option to be 1.
This will open a preference dialog box.
Choose the color you want for the grid lines.
Set the “Gridline every” option to be 100 pixels and “Subdivisions” option to be 1.
Choose View>Snap and then choose View>Snap to>Grid, to enabling snaping that will help you to align any object, shape or selection you want.
3. Select the Custom Shape Tool
Select the Custom Shape Tool from the Tools panel (or just press U).
Press Shift+U to cycle through the six available shape tools until the one you want is active.
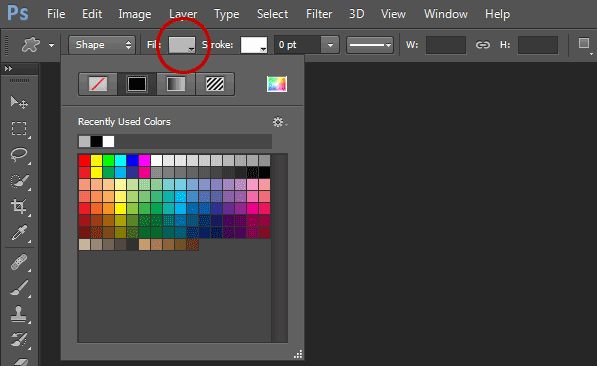
In the Options Bar, make sure Shape is chosen from the menu then choose shape color.
To choose the color of the shape, click the color swatch in the options bar, and then choose a color available.
You can also choose a color from the Color Picker.
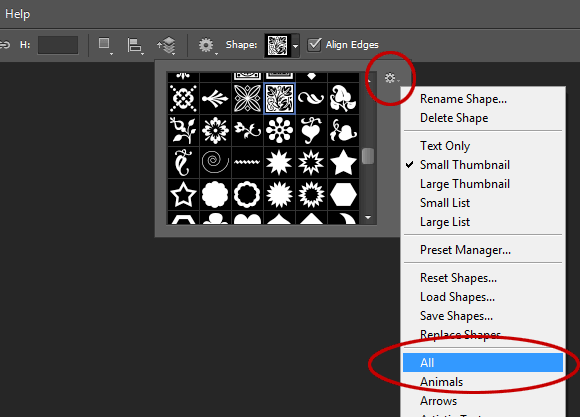
Lastly, enter a value for the stroke size and select a hexagon shape from the Custom Shape pop-up panel.
If you do not find a hexagon shape in the panel, click the arrow in the upper-right corner, and choose “All”.
When asked to replace current shapes, click OK to replace current shapes with the shapes form “All”.
Click OK to replace current shapes with the shapes form “All”.
4. Draw a Hexagon Shape
Now begin drawing a hexagon shape.
To draw a Hexagon Shape, click inside your document and drag away from the starting point.
Use the grid to assist us in laying out shape symmetrically.
When you release your mouse button, Photoshop completes the shape and fills it with your chosen color.
To draw a Hexagon Shape, click inside your document and drag away from the starting point.
Use the grid to assist us in laying out shape symmetrically.
When you release your mouse button, Photoshop completes the shape and fills it with your chosen color.
5. Duplicate Shape
Duplicate the hexagon shape layer by choosing Layer> Duplicate Layer, or by pressing Ctrl + J.
Then reposition it using Edit> Free Transform Path.
You can edit the shape as follows:
Then reposition it using Edit> Free Transform Path.
You can edit the shape as follows:
- If you need to resize it, resize the Hexagon shape by dragging any corner while holding down the Shift key to keep the shape does not distort.
- Move the Hexagon shape by clicking and hold anywhere inside the shape and drag.
- If you need to rotate it, rotate the Hexagon shape by moving your cursor farther out from any corner until you see two arrows. Click and hold, then drag the shape.
- Press Enter key when you are done.
6. Insert Image
Stock images used in this Photoshop Collage tutorial: cape-byron-lighthouse-1938716, kangaroo-2071265, milky-way-1063305, sunset-1373186, sydney-363244, and sydney-1970604.
Select the hexagon layer to which you want to insert an image.
Choose File> Place to open the picture you'd like to insert.
Navigate to the folder that contains your image file then select the name of the file you want to open.
If your image's file does not appear, try to view all files by selecting All Formats from the Files of type list.
Click the Place button.
7. Create a Clipping Mask
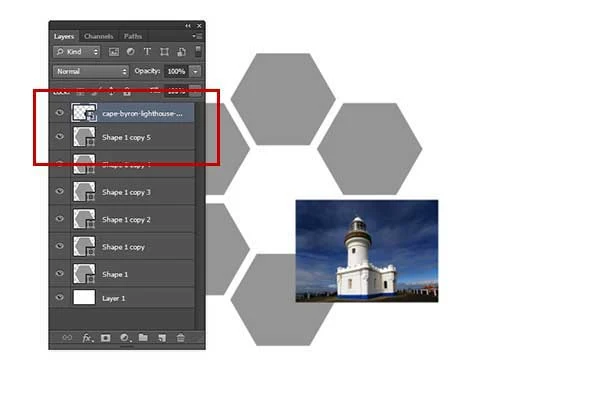
On the Layers panel, make sure the layers to be clipped are listed consecutively.
Remember, you must stack the image layer above the Hexagon layer.
Click the image layer to be clipped, then choose Layer>Create Clipping Mask (or just press Alt+Ctrl+G).
When layers are put into a clipping mask, the content of the bottommost layer (the Hexagon layer), clips the layers above it (the image layer).
Stack the image layer above the Hexagon layer.
Remember, you must stack the image layer above the Hexagon layer.
Click the image layer to be clipped, then choose Layer>Create Clipping Mask (or just press Alt+Ctrl+G).
When layers are put into a clipping mask, the content of the bottommost layer (the Hexagon layer), clips the layers above it (the image layer).
8. Edit Image
Click the image layer then go to Edit>Free Transform.
You can now edit the image as follows:
You can now edit the image as follows:
- Resize the image by dragging any corner while holding down the Shift key to keep the image does not distort.
- Move the image by clicking and hold anywhere inside the image and drag.
- Rotate the image by moving your cursor farther out from any corner until you see two arrows. Click and hold, then drag the image.
- Press Enter key when you are done.
9. Insert Other Picture
Repeat steps 6 through 8 to open and manipulate each picture you'd like to insert.
10. Merge the Image Layer and the Hexagon Layer
Click the image layer and the Hexagon layer while holding down the Shift key then go to Layer>Merge Layers.
Repeat these steps for other hexagon layer.
Click the image layer and the Hexagon layer while holding down the Shift key then go to Layer>Merge Layers.
Repeat these steps for other hexagon layer.
11. Convert to 3D
To create a 3D hexagons collage, we have to convert every hexagon layer to 3D.
Select a hexagon layer on the Layers panel then go to 3D>New 3D Extrusion from Selected Layer.
Repeat these steps for every hexagon layers.
Select a hexagon layer on the Layers panel then go to 3D>New 3D Extrusion from Selected Layer.
Repeat these steps for every hexagon layers.
12. Merge all visible layer into a new layer
Hold-down the Alt key then go to Layer>Merge Visible (or Ctrl+Alt+Shift+E).
This command will copy all the currently visible layers into a new layer while preserving the original, separate layers.
This command will copy all the currently visible layers into a new layer while preserving the original, separate layers.
13. Duplicate the Newly Merged Layer and then Flip Vertical (to create a reflection)
Select the newly merged layer then go to Layer>Duplicate Layer.
Flip vertically the duplicate layer by going to Edit>Transform>Flip Vertical, then select the Move tool and reposition accordingly.
Flip vertically the duplicate layer by going to Edit>Transform>Flip Vertical, then select the Move tool and reposition accordingly.
14. Create a Layer Mask
With the newly merged layer selected, choose Layer>Layer Mask>Reveal All.
15. Apply Gradient Tool
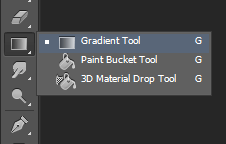
Select the Gradient Tool from the Tools panel, or else just press G.
Press Shift+G to cycle through the six available shape tools until the one you want is active.
Choose Black to White color and Linear Gradient in the options bar.
Make sure the layer mask is selected by clicking on it.
Drag mouse in the document window to create a reflection effect.
Press Shift+G to cycle through the six available shape tools until the one you want is active.
Choose Black to White color and Linear Gradient in the options bar.
Make sure the layer mask is selected by clicking on it.
Drag mouse in the document window to create a reflection effect.
Make sure the layer mask is selected by clicking on it. Drag the mouse on the document window to create a reflection effect.
16. Add Shadow
Create a new layer for shadow by choosing Layer>New>Layer or else just press Shift+Ctrl+N.
The New Layer dialog box appears allowing you to name your layer and specify other options.
Name it “shadow” and leave the default settings and click OK.
Move the new layer down just below the 3D Hexagons collage layer.
Click the Gradient Tool icon, on the options bar select Black-White and Radial Gradient.
Click in the middle of the document and drag it out. Arrange shadows using the Edit> Transform> Distort command.
You can click and drag to set the position of the shadow in the document.
17. Save Your Document
Choose File>Save (or Ctrl+S) to save your project file.
The Save As dialog box appears.
Navigate to the folder where you want to store your project file.
Type a name in the File Name text box and leave the default Photoshop (*.PSD;*.PDD) format.
Click Save to store the project file.
Choose File>Save (or Ctrl+S) to save your project file.
The Save As dialog box appears.
Navigate to the folder where you want to store your project file.
Type a name in the File Name text box and leave the default Photoshop (*.PSD;*.PDD) format.
Click Save to store the project file.
Once you have finished, you will probably also want to use File>Save As (Shift+Ctrl+S) to export the image in a more widely used format, such as JPEG, PNG, TIFF, etc.
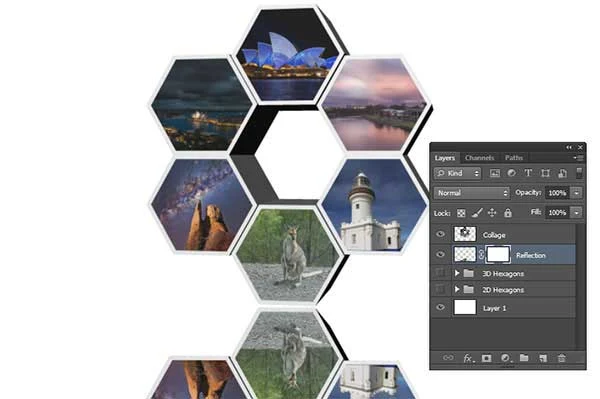
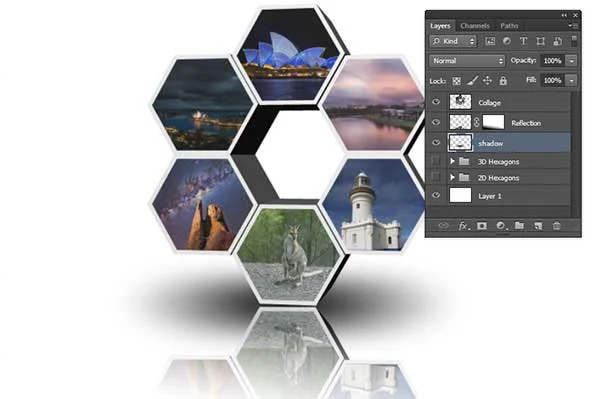
And here is the result:
How to create 3D Hexagons Collage in Photoshop.










No comments:
Post a Comment