In this tutorial, I am going to show you how to create a photo collage in Photoshop (family in circles) from multiple images. We'll use the Elliptical Marquee Tool to draw circle shapes, the Grid to assist us to lay out shapes symmetrically and Clipping Mask to insert images to which layer you want. Once you have arranged all the shapes to your satisfaction, you can play around with other Photoshop's tools to add your own artistic effects.
Download This Template
Download Photoshop Collage of Family in Circles template here or find others free Photoshop Collage Templates here.
1. Create a new Document
Choose File> New (or just press Ctrl+N).
In the pop-up window, type a name in the Name field and enter the following information:
Width 3000 pixels, Height 3000 pixels, Resolution 300 Pixels/Inch, Color Mode RGB color, and Background contents Transparent.
Click OK.
In the pop-up window, type a name in the Name field and enter the following information:
Width 3000 pixels, Height 3000 pixels, Resolution 300 Pixels/Inch, Color Mode RGB color, and Background contents Transparent.
Click OK.
2. Create a Grid
Now create a grid to assist us in laying out selections symmetrically.
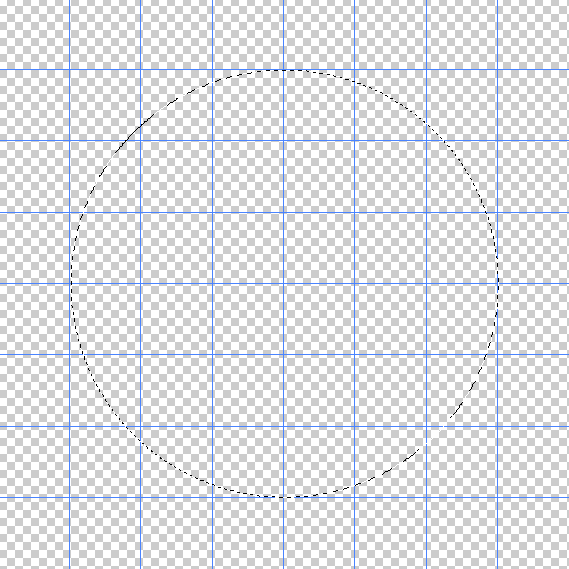
To add a grid, choose View>Show>Grid.
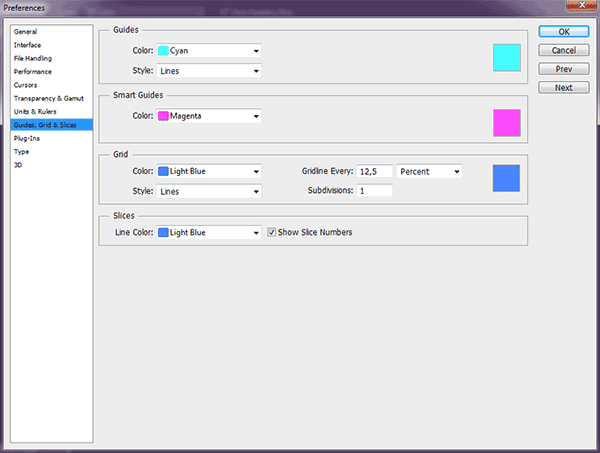
Open up the grid preferences, choose Edit> Preferences> Guides, Grid & Slices.
Choose the color you want for the grid lines.
I'll the “Gridline every” option to be 12,5 percent and “Subdivisions” option to be 1.
Choose View>Snap and then choose View>Snap to>Grid, to enabling snaping that will help you to align any object, shape or selection you want.
3. Make a Circle Selection
Grab the Elliptical Marquee Tool by selecting it from the toolbar on the left.
If the Elliptical Marquee Tool is not visible, press Shift+M to cycle through the four available marquee tools until the one you want is active.
If the Elliptical Marquee Tool is not visible, press Shift+M to cycle through the four available marquee tools until the one you want is active.
Drag mouse in the document window to draw an elliptical selection.
To keep the circle selection doesn't distort, drag the mouse in the document window while holding down the Shift key.
To keep the circle selection doesn't distort, drag the mouse in the document window while holding down the Shift key.
4. Create a New Layer
Create a new layer by going to Layer>New>Layer (or just press Shift+Ctrl+N).
The New Layer dialog box appears allowing you to name your layer and specify other options.
Leave the default settings and click OK.
In the Layers panel, a layer with the default name of Layer 2 appears above Layer 1.
The New Layer dialog box appears allowing you to name your layer and specify other options.
Leave the default settings and click OK.
In the Layers panel, a layer with the default name of Layer 2 appears above Layer 1.
5. Fill Selection With 50% Gray Color
Make sure Layer 2 is selected on the Layers panel.
Choose Edit> Fill (or just press Shift+F5).
Choose 50% Gray from the Use drop-down menu and then click the OK button.
Your selection now fills with a gray color.
You can now remove the selection by going to Select> Deselect.
Choose Edit> Fill (or just press Shift+F5).
Choose 50% Gray from the Use drop-down menu and then click the OK button.
Your selection now fills with a gray color.
You can now remove the selection by going to Select> Deselect.
6. Create Another Circle Layer
Repeat steps 3 through 5 to create another 2 circle layer but smaller.
Now you have 3 circle layer, big, medium and small size.
Now you have 3 circle layer, big, medium and small size.
7. Divide the Medium Circle into Four Parts
Select the medium circle layer on the Layers panel, then right-click and choose Load Pixels.
Use the Rectangular Marquee tool to make a selection of 1/4 part of the circle then go to Layer>New>Layer via cut.
Repeat these steps until the medium circle is separated into 4 parts.
Use the Rectangular Marquee tool to make a selection of 1/4 part of the circle then go to Layer>New>Layer via cut.
Repeat these steps until the medium circle is separated into 4 parts.
8. Divide the Big Circle into Eight Parts
Select the big circle layer on the Layers panel, then right-click and choose Load Pixels.
Use the Polygonal Lasso tool to make a selection of 1/8 part of the circle then go to Layer>New>Layer via cut.
Repeat these steps until the big circle is separated into 8 parts.
Use the Polygonal Lasso tool to make a selection of 1/8 part of the circle then go to Layer>New>Layer via cut.
Repeat these steps until the big circle is separated into 8 parts.
9. Insert an Image
Stock images used in this Photoshop Collage tutorial: affection-1866868, beach-1867271, brothers-457234, brothers-2107264, child-1141497, christmas-1919659, christmas-2260605, family-829308, family-838239, family-932245, family-1784371, and family-1784512.
To insert an image into the collage, you must stack the image layer above the shape layer.
Select the shape layer to which you want to insert an image.
Go to File> Place to open the image you'd like to insert.
Navigate to the folder that contains your image file then select the name of the file you want to open.
If your file does not appear, try to view all files by selecting All Formats from the Files of type list.
Click the Place button.
10. Create a Clipping Mask
On the Layers panel, make sure the layers to be clipped are listed consecutively.
Remember, you must stack the image layer above the shape layer.
Click the image layer to be clipped, then choose Layer>Create Clipping Mask (or just press Alt+Ctrl+G).
Remember, you must stack the image layer above the shape layer.
Click the image layer to be clipped, then choose Layer>Create Clipping Mask (or just press Alt+Ctrl+G).
When layers are put into a clipping mask, the content of the bottommost layer (the shape layer), clips the layers above it (the image layer).
11. Edit Image
Select the image layer on the Layers panel then choose Edit>Free Transform.
You can now edit the image as follows:
You can now edit the image as follows:
- Resize the image by dragging any corner while holding down the Shift key to keep the image does not distort.
- Move the image by clicking and hold anywhere inside the image and drag.
- Rotate the image by moving your cursor farther out from any corner until you see two arrows. Click and hold, then drag the image.
- Press Enter key when you are done.
12. Insert Other Picture
Repeat steps 9 through 11 to open and manipulate each picture you'd like to insert.
13. Save Your Document
Choose File>Save or else just press Ctrl+S to save your project file.
The Save As dialog box appears. Navigate to the folder where you want to store your project file.
Type a name in the File Name text box and leave the default Photoshop (*.PSD;*.PDD) format.
Click Save to store the project file.
The Save As dialog box appears. Navigate to the folder where you want to store your project file.
Type a name in the File Name text box and leave the default Photoshop (*.PSD;*.PDD) format.
Click Save to store the project file.
Once you have finished, you will probably also want to use File>Save As (Shift+Ctrl+S) to export the image in a more widely used format, such as JPEG, PNG, TIFF, etc.
Here is the result:
How to create a photo collage family in circles using Photoshop.


No comments:
Post a Comment