Learn How To Create An X-Ray Image Effect In Photoshop. In medical science, x-rays are commonly used to see the condition of human bones without the need for surgery. People know it by the name of the X-ray photo. To do this, make a selection on the bone, separate the selection into separate layers, make the background of the X-ray photo black, inversion of the bone skeleton, desaturate the bone color and finally adjust the Hue, Saturation and lightness of the X-ray color (usually blue or green).
Step 1: Open Photo
Open the Photoshop application then open the photo by selecting the File menu> Open. Select your photo then click the OK button. I'm going to use a photo of an animal bone skeleton to turn into an x-ray effect.
Step 2: Make Selection On Outline
Make a selection across the bones using your favorite selection tool. I will use the Quick Selection Tool. Click the Quick Selection Tool icon.
Click and drag on the bone to make a selection. To deselect a specific area, click the area while holding down the Alt key.
Step 3: Split the Selection Into Separate Layers
The next step is to separate the selection area into a separate layer by pressing Ctrl+J or selecting the Layer> New> Layer menu via copy.
Step 4: Create a Black Background
Click the Background layer to activate it then click the Create a New Layer icon at the bottom of the Layers panel. Layer 2 will be formed between the Background layer and Layer 1.
Press the D key to reset the foreground/background color to default.
With Layer 2 as the active layer, press Alt+Delete keys to fill it with black.
Step 5: Bone Inversion
Click Layer 1 to activate it then select the menu Image>Adjustments>Invert or press Ctrl+I.
Step 6: Bone Desaturation
With the active Layer 1 position, select the Image>Adjustments>Desaturate menu.
Step 7: Create a New Layer in the Top Position
Click the Create a New Layer icon to create a new layer then drag it to the top position.
Step 8: Fill the top layer with an X-ray color (blue or green)
With the position of the new layer as the active layer press Shift + F5 or select the Edit menu> Fill. In the Fill dialog box, select Color.
The Color Picker dialog box will appear. In the color picker, please select any green or blue color then click the OK button. We will adjust this color later using Hue/Saturation.
Change the blend mode to Color Burn.
Step 9: Apply Hue/Saturation to the top layer
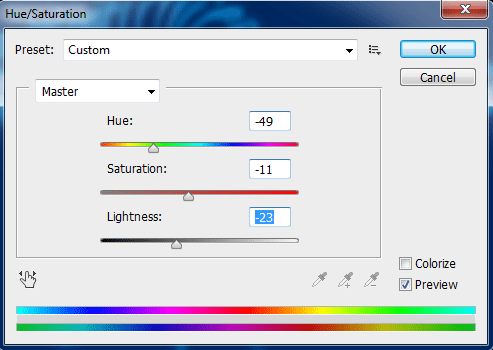
Click the top layer to make sure it's active. Then select the menu Image>Adjustments>Hue/Saturation. In the Hue/Saturation dialog box, please slide the Hue, Saturation and Lightness sliders to get an x-ray photo effect. This setting will be different depending on your photo.
There you have it! How To Create An X-Ray Image Effect In Photoshop.


No comments:
Post a Comment