Learn How to Make Realistic Dew in Photoshop. Dew effect in Photoshop can be done using the Elliptical Marquee Tool. Drop shadow and inner shadow styles were added to give a convex effect. So that the color of the dew looks clear, blending with the color of the leaves, you can use an overlay blend mode. The dew light reflection effect can be created using the brush tool. It's best if the dew and light reflection effects are created in separate layers. To make the work easier, we can combine the two layers in one group. In this way, we can duplicate the group to create more dews. Finally, if we still want to create a more realistic dew shape, we can use the liquify filter because it has the flexibility to shape the dew according to our wishes.
Step 1: Open Photo
Open the Photoshop application then select the File>Open menu to open your photo. I'm going to use a photo of the leaves to create this dew effect. The leaf photo source for this Photoshop tutorial is taken from cgtextures.com.
Step 2: Create a New Layer for the Dewdrops
Create a new layer by clicking on the Create a new layer icon located at the bottom of the layers panel.
Step 3: Create a Circle Shaped Selection
We will use the Elliptical Marquee Tool selection tool. Click the Elliptical Marquee Tool icon.
Click Layer 1 to activate it. Then while holding down the Shift key, click and then drag on the leaf to make a circular selection.
Step 4: Apply the Gradient Tool
To make the direction of the shadow on the dew drops can use the Gradient Tool. Press the D key to reset the foreground/background color to default.
Click the Gradient tool icon in the Tool panel.
In the options bar for the Gradient Tool, select foreground to background and Linear Gradient.
Next click from the top and drag down on the circle selection that we have created.
Step 5: Add Drop Shadow and Inner Shadow
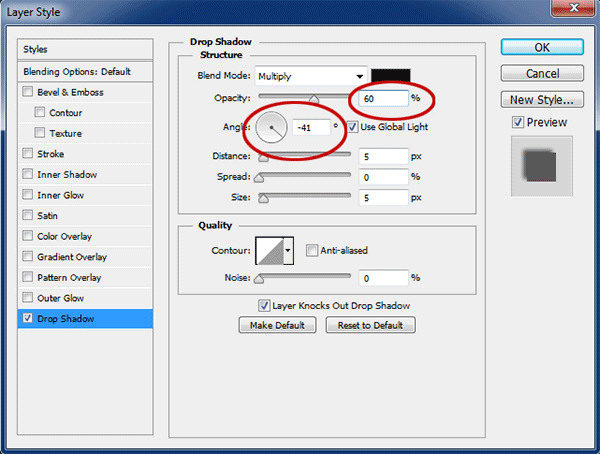
The next step is to apply a Drop Shadow and Inner Shadow Style to our dew circle. Select the menu Layer> Layer Style> Drop Shadow. Please fill in the Drop Shadow settings as desired or you can follow the settings below.
Done with Drop Shadow, check the Inner Shadow check box and fill in the settings as shown below. Click OK when finished.
Step 6: Change the Blend Mode to Overlay
Change the dew drops layer's blend mode from normal to overlay so that the color blends in with the leaves.
Step 7: Add Reflections to the Dew
Create a new layer to give the effect of dew light reflection, how to click the Create a new layer icon at the bottom of the layer panel.
The next step is to select the Brush Tool.
Fill in the size and hardness according to the image below. You can adjust the brush size depending on the size of your dew drop.
Press the X key to swap foreground/background colors. Make sure the foreground color is white and activate Layer 2 by clicking on it.
Then clicking on the dew drop to create a light reflection effect. Please see pictures.
Step 8: Create a Layer Group
Merge Layer 1 (dew drops) and Layer 2 (light reflections) to be one group. The goal is that we can duplicate if we want to make other dews. While holding down the Ctrl key, click both layers.
Then select the Layer menu> Group Layer or press the shortcut Ctrl + G. Now both layers look indented to the right as a sign that they are grouped together.
Step 9: Duplicate The Group To Create Another Dew Drop
Click Group 1 to activate it then press Ctrl+J. A copy group will appear with the name Group 1 copy. Click on Group 1 copy then click on the Move Tool icon on the Tool panel or press the V key. Then click on the dew drops on the leaves and drag them in another direction. Now you have two dew drops.
Step 10: Modify Dew Using Liquify
We are going to modify the dew shape on the Group 1 copy layer. Click the arrow to the left of the Group 1 copy to open it, then click Layer 1.
Then select Filter>Liquify menu. The Liquify window will open. Click the Forward warp Tool icon in the upper left corner of the window.
In the Tool options on the left, please fill in the brush size and brush pressure according to your needs. Then apply liquify to the dew by clicking on the dew and dragging it out to shape the dew to your liking. When finished, click the OK button. Until here, the basic tutorial for making photoshop dew is finished. Please modify it further.
Click then drag the dew drops.
There you have it! How to Make Realistic Dew in Photoshop.


Exciting pictures, thanks;)
ReplyDeleteGlad you liked it :)
Delete