Learn how to make a textured vintage polaroid photo collage in Photoshop. To form a photo frame, we can use the Rectangular Marquee Tool which we then fill with white. Additional effects such as stacks of polaroid photos can be done by duplicating the layer and adjusting it using Free Transform.
1. Prepare Photos
Open the photo file, how to press Ctrl + O.
In the Open dialog box, click our photo and then click the Open button.
Because the size of this sample photo is too wide for the polaroid effect, we will select the photo using the Rectangular Marquee Tool (M).
Click the Rectangular Marquee Tool icon.
Set the Option bar with Style: Fixed Ratio, Width:1, Height:1. Make a selection by clicking on the photo and then dragging it towards the bottom right.
Once the selection is made, press Ctrl+C to copy the photo area in the selection to the clipboard.
The photo source for this Photoshop collage tutorial is taken from the ational Geographic site, while the texture photo source is taken from the Microsoft Office Images.
Prepare Photo.
2. Copy the Photo Selection Results to a New Document
Create a new document, how to press Ctrl + N or menu options File> New.
I will fill in width: 1096 pixels, height:1096 pixels and resolution:300 pixels/inch.
Click the OK button.
Once the new document is created, press Ctrl+V to paste the photo from the clipboard.
Adjust the position and size of the photo in the document using Free Transform.
Press Ctrl+T to invoke the Free Transform command.
I will reduce the size of the photo.
While holding down the shift key to maintain the ratio of the photo, click the left corner of the photo and then drag it towards the bottom right.
Drag using the mouse or click the keyboard arrow keys to adjust its position.
Press the enter key when you are satisfied with the size and position of the photo.
Create a new document.
3. Create a Border for the Polaroid Effect
Click the Rectangular Marquee Tool icon again.
On the Option Bar, change the Style to Normal.
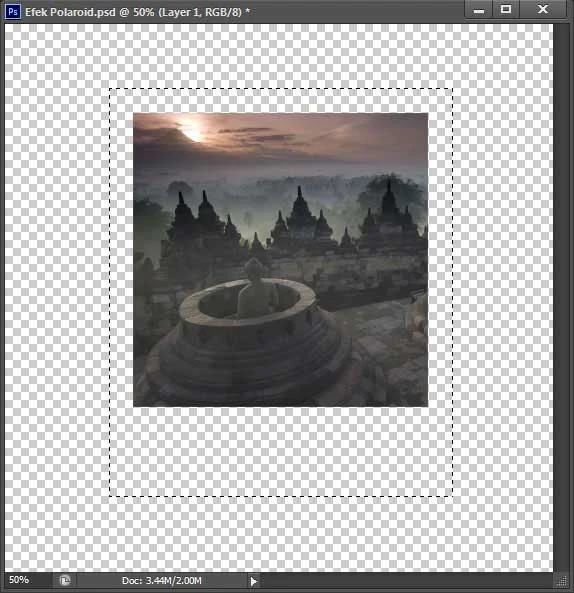
Make a selection on the outside of the photo shaped like a Polaroid photo.
Make sure the right, left and top are the same width.
Give it more width at the bottom of the photo.
Create Borders.
4. Fill the Border with White
Select menu Layer> New Fill Layer> Solid Color.
A New Layer dialog box will appear with the name Color Fill 1.
Click the OK button.
In the color picker select white, click the OK button.
Slide the color fill 1 layer down so that the Borobudur photo is visible.
Fill the Border with white.
5. Add Texture to Add an Old Photo Effect
To give the impression of an old photo, I will give a texture to this polaroid photo effect.
Open the wood texture photo.
Selection by pressing the keyboard keys Ctrl + A then copy to the clipboard by pressing the Ctrl + C keys.
Open our polaroid effects document then press Ctrl+V to paste the wood texture from the clipboard.
Use Free Transform to adjust the position in the document by pressing Ctrl+T.
When you have finished setting the paper texture, press the enter key as a sign of commit transform.
Move the texture layer to the lowest position.
Open the wood texture file, Ctrl+A then Ctrl+C.
Add texture.
6. Apply Texture
Click the texture layer to make sure it's active.
Then while holding down the Ctrl key, click the Color Fill 1 layer thumbnail to activate the selection on the polaroid.
Do an inversion of the selection, the trick is to select the menu Select>Inverse.
Press the delete key to delete the texture outside the polaroid frame.
Move the wood texture layer back to the top position.
Set the texture opacity to 20%.
At this point, your polaroid frame should have an effect like an old photo.
Deselect, press the keyboard key Ctrl+D.
Activate the selection then inverse the selection.
Delete the texture outside the polaroid frame then set the opacity.
7. Add a Stroke Style and a Drop Shadow
Click the Color Fill 1 layer. Select the Layer>Layer Style>Stroke menu.
Fill in Size 3 pixels, Position Center and click on the color box to choose a gray color.
Then click Drop Shadow.
Fill in Distance 10 pixels and size 6 pixels.
Click the OK button.
Settings for Stroke.
Settings for Drop Shadow.
8. Add Another Photo Stack Effect
While holding down the Ctrl key, click all the layers then create a group by pressing Ctrl+G.
Duplicate the group two or three times by pressing the Ctr . keyl+J.
Click on one of the groups then press Ctrl+T to invoke the Free Transform command.
Please set it using the mouse or arrows to give a stacked polaroid photo effect.
Do this step for the other groups.
Create a layer group then duplicate it a few times.
Create photo stack Effect.
9. Add Background
Open a texture photo file, for example a table wood texture.
Select it by pressing Ctrl+A then copy it to the clipboard by pressing Ctrl+C.
Go back to your polaroid effect document then paste it by pressing Ctrl+V.
Move this background to the bottom position.
We have finished our Polaroid photo effect.
Add background.
Here is the result:
Vintage Polaroid Photo Collage in Photoshop.
10. Save Project
Save the project by selecting File>Save menu.
Give the file a name then click the Save button.
Currently, many people use digital cameras or cell phones that have cameras.
So that the use of Polaroid instant photos while traveling has begun to be rarely used.
However, the unique shape of the photo frame is the main attraction that cannot be replaced.
To edit the photos we have into polaroid photos, we can outsmart them by using photo editor applications such as Photoshop.


No comments:
Post a Comment