In this tutorial, I'll show you how to create a puzzle photo collage in GIMP. We will use render filter to create a jigsaws pattern, the Fuzzy Select Tool to select jigsaws piece, Shrink Selection command to create a border, the Select by Color to select jigsaws piece, the Scale Tool to re-size images, the Move Tool to align images, and Layer Mask that comes with GIMP. Let's get started!
1. Create a New Image
Use File>New or else just press Ctrl+N.
The Create a New Image dialog box appears.
In the pop-up window, you can set the Width and Height of the new image.
Enter a value for the initial width with 3000 px and height with 3000 px manually or through the up and down arrows.
Click Advanced Options, select White for “Fill with”.
Click OK.
The Create a New Image dialog box appears.
In the pop-up window, you can set the Width and Height of the new image.
Enter a value for the initial width with 3000 px and height with 3000 px manually or through the up and down arrows.
Click Advanced Options, select White for “Fill with”.
Click OK.
2. Apply Jigsaw Filter
Go to Filters>Render>Pattern>Jigsaw.
The Jigsaw dialog box appears.
In the Jigsaw dialog, set the number of tiles (for both vertical and horizontal) and the jigsaw style you like, square or curved.
Click OK.
The Jigsaw dialog box appears.
In the Jigsaw dialog, set the number of tiles (for both vertical and horizontal) and the jigsaw style you like, square or curved.
Click OK.
3. Create Selection on Jigsaw
Select the Fuzzy Select Tool from the toolbox or else use Tools> Selection Tools> Fuzzy Select (U).
Click your mouse in one of the jigsaw pieces to make a selection.
Now, the selected portion of the document, in a jigsaw piece, has been picked.
Click your mouse in one of the jigsaw pieces to make a selection.
Now, the selected portion of the document, in a jigsaw piece, has been picked.
4. Create a New Layer
Use Layer> New Layer or else just press Shift+Ctrl+N to create a new layer.
The New Layer window open.
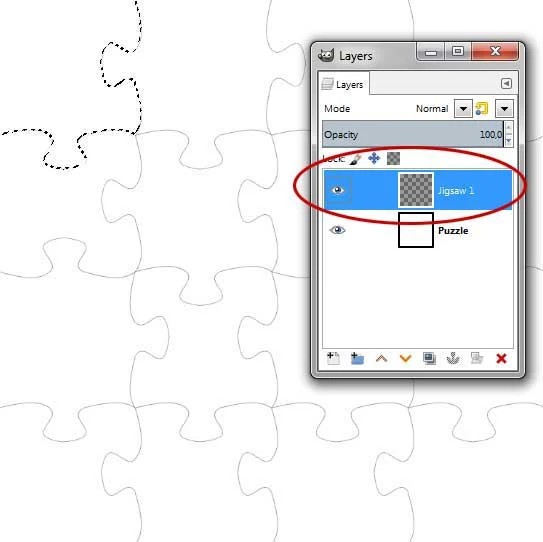
Type a name in the Layer Name text box (you can name it Jigsaw 1) and choose Transparency in the Fill with drop-down menu.
Click OK.
A new, empty layer, added to the layer stack of the image, just above the active layer.
The New Layer window open.
Type a name in the Layer Name text box (you can name it Jigsaw 1) and choose Transparency in the Fill with drop-down menu.
Click OK.
A new, empty layer, added to the layer stack of the image, just above the active layer.
Create a new layer.
A new, empty layer, added to the layer stack of the image, just above the active layer.
5. Fill Selection With White Color
Make sure the background color is white by pressing keyboard key D, then go to Edit> Fill with BG color (or by using the keyboard shortcut Ctrl+.).
Now the white color fills the active layer selection.
Make sure the background color is white.
6. Shrink Selection
The Shrink command reduces the size of the selected area.
Use Select> Shrink.
The Shrink Selection dialog box appears.
In the pop-up window, set your shrink value manually or through the up and down arrows.
Click OK to apply.
Use Select> Shrink.
The Shrink Selection dialog box appears.
In the pop-up window, set your shrink value manually or through the up and down arrows.
Click OK to apply.
7. Fill Selection With Gray Color
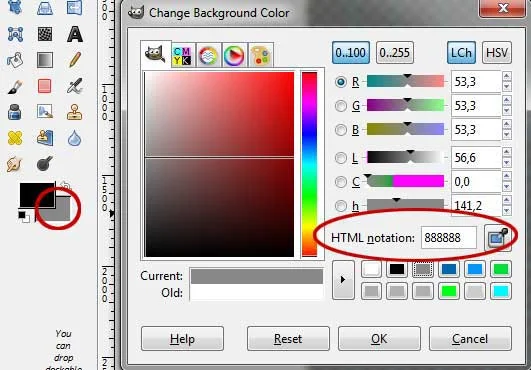
Click the background color box.
The Change Background Color dialog box appears.
Choose a gray color and click OK.
Go to Edit> Fill with BG color (or by using the keyboard shortcut Ctrl+.).
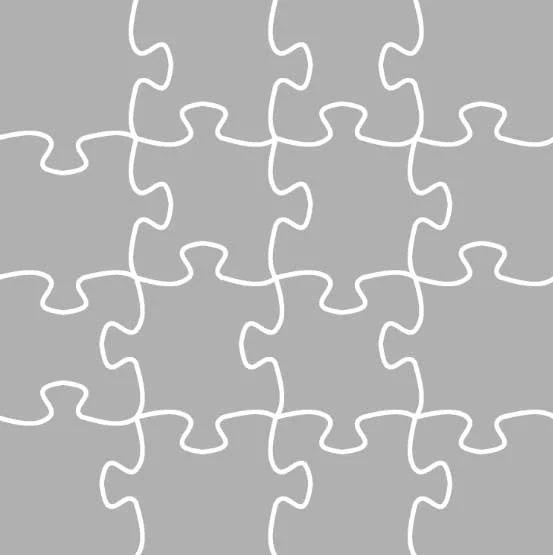
Now a gray color fills the active layer selection.
You can remove the selection by going to Select> None.
Choose a gray color for the background.
The Change Background Color dialog box appears.
Choose a gray color and click OK.
Go to Edit> Fill with BG color (or by using the keyboard shortcut Ctrl+.).
Now a gray color fills the active layer selection.
You can remove the selection by going to Select> None.
8. Create Layer for All Jigsaw
Repeat steps 3 through 7 to create a separate layer for every jigsaw pieces.
9. Insert Image
Stock images used in this GIMP Collage Tutorial: 1870009, 1502597, 1908024, 1277002, 499970, 842020, 983953, 1149983, 1082213, 1149155, 1182735, 1782624, 1908260, 182861, 1223153, 1149716.
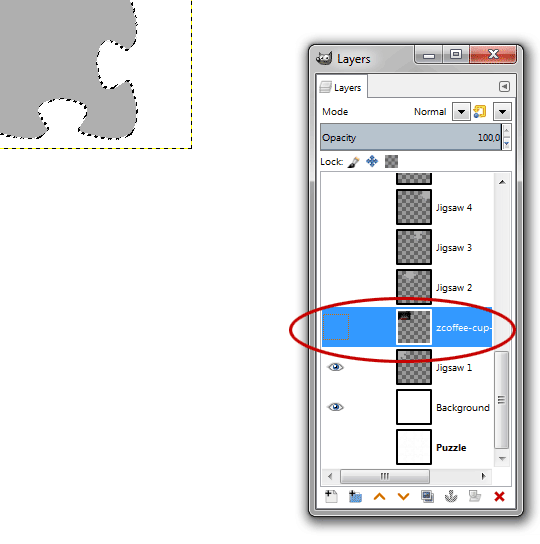
You must stack the image layer above the Jigsaw layer.
Select the jigsaw layer to which you want to insert an image.
Use File> Open As Layers command in the top menu (or just pressing Ctrl+Alt+O) to open the image you'd like to insert.
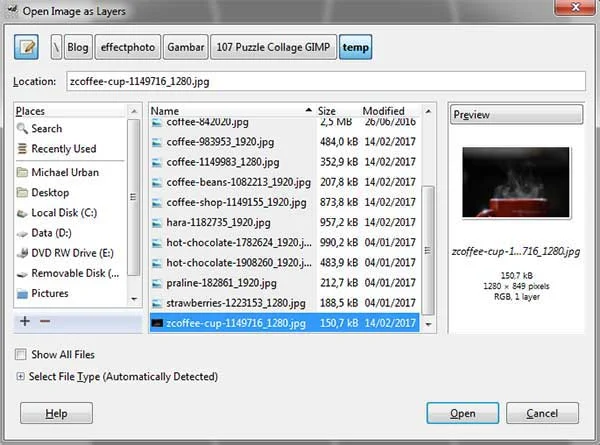
The Open Image as Layers dialog box appears.
Navigate through your folders and click on the image, then click Open.
You can now edit the image as follows:
Select one jigsaw layer on the Layers dialog.
The Open Image as Layers dialog box.
Insert image.
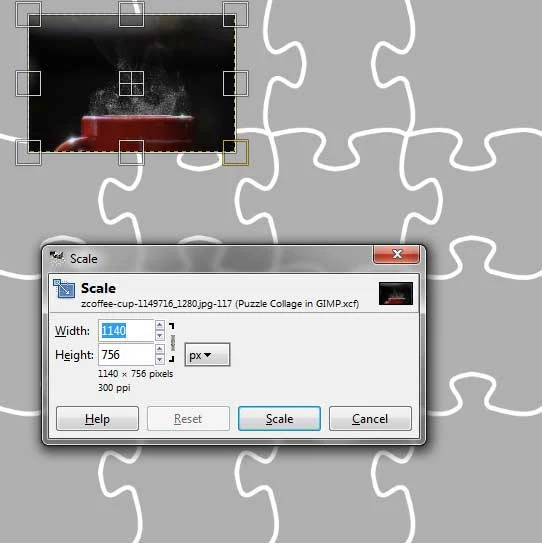
Resize and reposition using the Move Tool and the Scale Tool.
You must stack the image layer above the Jigsaw layer.
Select the jigsaw layer to which you want to insert an image.
Use File> Open As Layers command in the top menu (or just pressing Ctrl+Alt+O) to open the image you'd like to insert.
The Open Image as Layers dialog box appears.
Navigate through your folders and click on the image, then click Open.
You can now edit the image as follows:
- Use Tools>Transform Tools>Scale command to resize the image. Click anywhere inside the image. In the Scale dialog box, click the chain icon to keep the image does not distort. Enter new values for the image's width and height manually or through the up and down arrows. Press the Scale button when you are done.
- Use Tools>Transform Tools>Move command to move the image. Click and hold anywhere inside the image and drag.
- Rotate the image by using Tools>Transform Tools>Rotate, a Rotation Information dialog is open. Set the angle, center X, and center Y, and click the Rotate button.
- Press Enter key when you are done.
10. Add Layer Mask
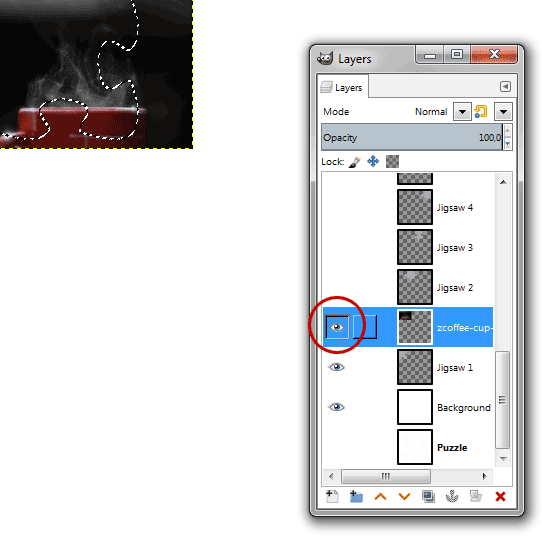
Toggling the visibility of the image's layer by clicking on the eye icon on the left.
Click “Select by color” tool or else use Tools>Selection Tools>By color Select.
Select the Jigsaw layer on the Layers dialog then click on the inner jigsaw layer that is in gray color to create a selection.
Click on the image's layer.
Again, toggling the visibility of the image's layer by clicking on the eye icon on the left and then go to Layer> Add Layer Mask, choose “Selection”.
Click the Add button.
Remove the selection by going to Select> None.
Hide the visibility of the image's layer by clicking on the eye icon on the left.
Select by color tool.
Select the Jigsaw layer on the Layers dialog then click on the jigsaw layer to create a selection.
Select the image layer.
Toggling its visibility options.
Add a layer mask.
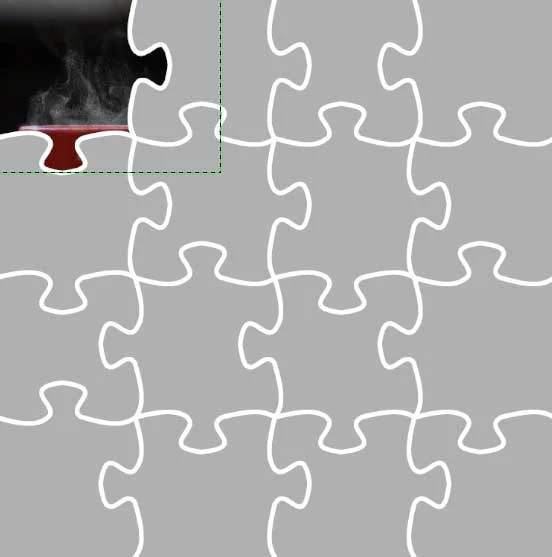
The result of applying a layer mask.
Click “Select by color” tool or else use Tools>Selection Tools>By color Select.
Select the Jigsaw layer on the Layers dialog then click on the inner jigsaw layer that is in gray color to create a selection.
Click on the image's layer.
Again, toggling the visibility of the image's layer by clicking on the eye icon on the left and then go to Layer> Add Layer Mask, choose “Selection”.
Click the Add button.
Remove the selection by going to Select> None.
11. Insert Other Images
Repeat steps 9 through 10 to insert all the images.
12. Save Your Document
Use File>Save command in the top menu or else just press Ctrl+S to save your project file.
The Save Image dialog box appears.
Navigate to the folder where you want to store your project file.
Type a name in the Name text box and leave the default GIMP (*.XCF) format.
XCF is GIMP's native format and is useful because it stores everything about your image and will allow you to later edit your image in GIMP, in case you notice a problem.
Click Save to store the project file.
Once you have finished, you will probably also want to export the image in a more widely used format, such as JPEG, PNG, TIFF, etc.
Here is the result:











Good one. Can you make this tutorial with Photo Viewer Pro?
ReplyDeleteI never used Photo Viewer Pro, sorry. Thanks fo visiting :)
Deletethanks
ReplyDeleteYour tutorials really inspire me. I want to do something for this blog. Please tell me how can I contribute to this blog?
ReplyDeletePlease feel free to share my blog/youtube channel to your social media. Thank you :)
Delete